

Introduction
Blazor has two kinds of Application development on is Blazor Client app which is in preview now and also Blazor Server app. Blazor Client app runs in WebAssembly, Blazor Server app runs using SignalR. Blazor apps can be created using C#, Razor, and HTML instead of JavaScript Blazor WebAssembly Works in all modern web browsers also in mobile browsers. The main advantage we have in Blazor is C# code files and Razor files are compiled into .NET assemblies. Blazor has reusable components, Blazor Component can be as a page, Dialog or Entry Form, Blazor also used to create Single Page Applications. Blazor is used to create two kinds of applications one is Blazor Client-Side App and another one is Blazor Server Side APP.here we will see some more details on
Blazor Client App
- Blazor Client Side is still in preview.
- Blazor Client side uses Web Assembly
- In Blazor Client Side all the.Net dll’s will be downloaded to the browser. The download size might be bigger and might be some time delay in loading due to all downloads happen in client browser.
- No need of server-side dependency for the Blazor Client-side application.
- All similer kind of JavaScript coding can be done in the Blazor Client app and it’s not really needed to use JavaScript Interop.
- It can be deployed as Static site which means it supports offline as well.
- Debugging is more complicated than Blazor Server side.
- In client-side leaking of database connectivity and also all the application code will be on client-side and the security level is not very good.
Blazor Server App
- All the Component Process will be happening in the Server.
- Blazor Server uses SignlR Connection to connect from the webserver to browsers.
- In client side leaking of database connectivity is not happen as all will be happen in Server.
- All the form connection will be happening on the server side and no DLL's download to the client side.As all the dll’s will be in web server.
- Small download size and faster loading time than the Blazor Client App.
- We can use .Net core in the Blazor server side.
- Debugging is great in Blazor Server Side.
- Runs in any web browser as no need for WebAssemble.
- Each browser session is open with a SignalR connection.
Prerequisites
Step 1 - Create a database and a table
We will be using our SQL Server database for our WEB API and EF. First, we create a database named CustDB and a table as CustDB. Here is the SQL script to create a database table and sample record insert query in our table. Run the query given below in your local SQL Server to create a database and a table to be used in our project.
- USE MASTER
- GO
- -- 1) Check for the Database Exists .If the database is exist then drop and create new DB
- IF EXISTS (SELECT [name] FROM sys.databases WHERE [name] = 'CustDB' )
- DROP DATABASE CustDB
- GO
- CREATE DATABASE CustDB
- GO
- USE CustDB
- GO
- -- 1) //////////// Customer Masters
- IF EXISTS ( SELECT [name] FROM sys.tables WHERE [name] = 'CustomerMaster' )
- DROP TABLE CustomerMaster
- GO
- CREATE TABLE [dbo].[CustomerMaster](
- [CustCd] [varchar](20) NOT NULL ,
- [CustName] [varchar](100) NOT NULL,
- [Email] [nvarchar](100) NOT NULL,
- [PhoneNo] [varchar](100) NOT NULL,
- [InsertBy] [varchar](100) NOT NULL,
- PRIMARY KEY (CustCd)
- )
- -- insert sample data to Student Master table
- INSERT INTO [CustomerMaster] (CustCd,CustName,Email,PhoneNo,InsertBy)
- VALUES ('C001','ACompany','[email protected]','01000007860','Shanun')
- INSERT INTO [CustomerMaster] (CustCd,CustName,Email,PhoneNo,InsertBy)
- VALUES ('C002','BCompany','[email protected]','0100000001','Afraz')
- INSERT INTO [CustomerMaster] (CustCd,CustName,Email,PhoneNo,InsertBy)
- VALUES ('C003','CCompany','[email protected]','01000000002','Afreen')
- INSERT INTO [CustomerMaster] (CustCd,CustName,Email,PhoneNo,InsertBy)
- VALUES ('C004','DCompany','[email protected]','01000001004','Asha')
- select * from CustomerMaster
Step 2 - Create ASP.NET Core Blazor Server Application
After installing all the prerequisites listed above, click Start >> Programs >> Visual Studio 2019 >> Visual Studio 2019 on your desktop. Click New >> Project.
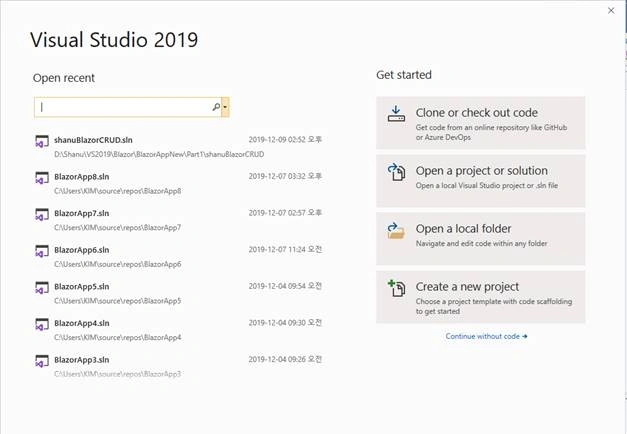
Click Create a new project to create our ASP.NET Core Blazor Application.
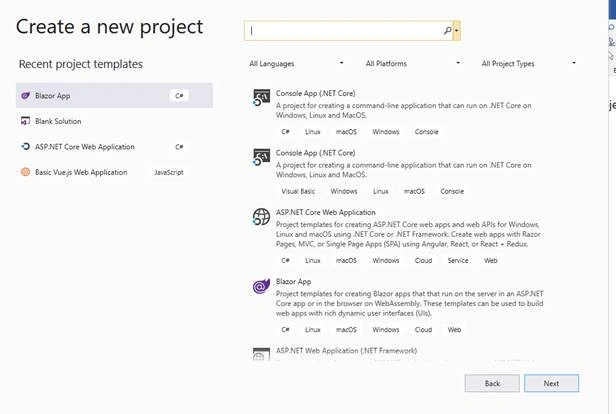
Select Blazor App and click Next button
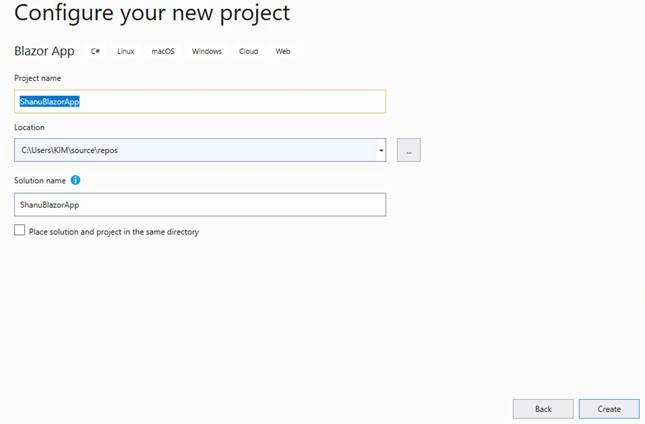
Select your project folder and Enter your Project name and then click Create button.
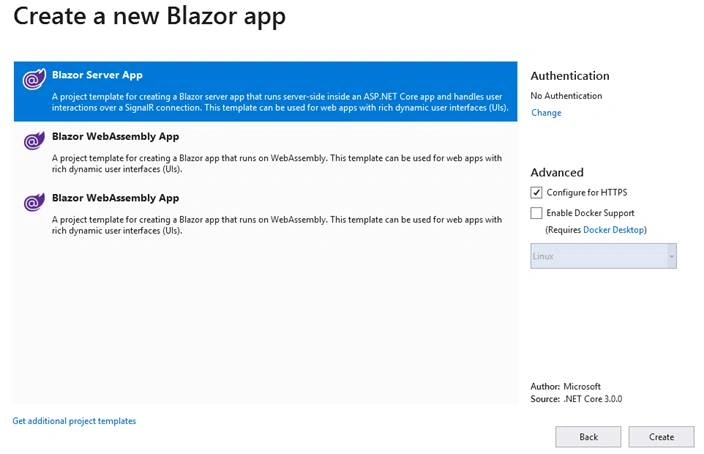
After creating ASP.NET Core Blazor Server Application, wait for a few seconds. You will see the below structure in solution explorer.
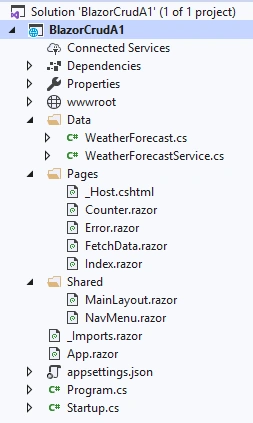
In the Data folder we can add all our Model, DBContext Class, Services and Controller, we will see that in this article.
In the Pages folder we can add all our component files.component file all should have the .razor extension with the file name.
In the Shared folder we can add all left menu form NavMenu.razor file and change the main content from the MainLayout.razor file.
In the _Imports.razor file we can see all set of imports has been added inorder to used in all component pages.
In the App.razor file we will add our main component to be displayed by default when run in browser.
Appsertings.json can be used to add the connection string.
Startup.cs file is important file where we add all our endpoints example like Controller end points, HTTP Client,add services and dbcontext to be used in startup Configuration method.
Run to test the application
When we run the application, we can see that the left side has navigation and the right side contains the data. We can see as the default sample pages and menus will be displayed in our Blazor web site. We can use the pages or remove it and start with our own page.
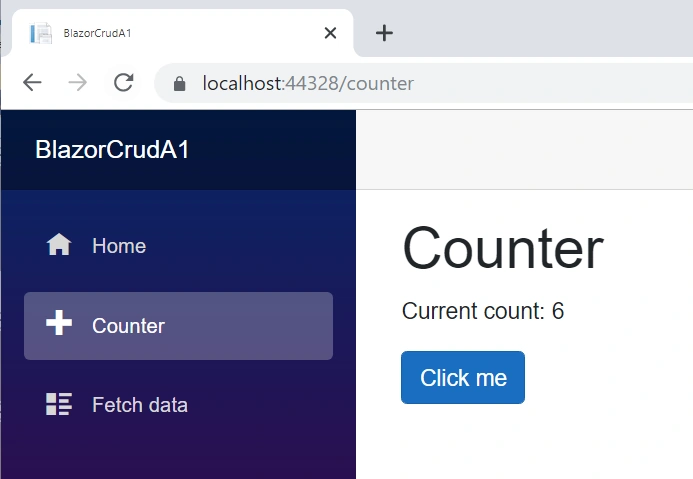
Debug in component
The big advantage of Blazor is as we can use our C# code in razor and also keep the breakpoint in the code part. In the browser we can debug and check for all our business logic is working properly and to trace any kind error easily with the breakpoint.
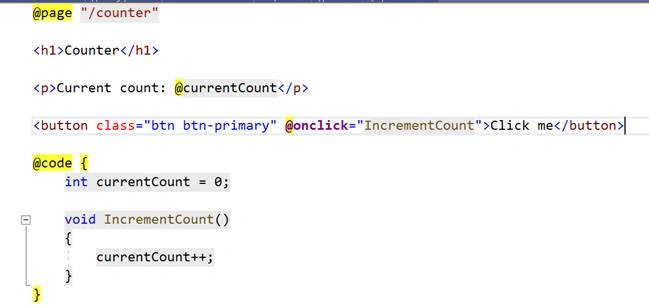
For this we take our existing Counter component page.
This is the actual code of our Counter page as in the counter we can see there is button and in button click called the method to perform the increment.
We add one more button and in button click event we call the method and bind the name in our component page.
In html design part we add the below code.
- <h1>My Blozor Code part</h1>
- My Name is : @myName <br />
- <button @onclick="ClickMe">Click Me</button>
Note that : all the C# code part and functions can be written under the @code {} part.
We add the method ClickMe and declare property to bind the name inside the @Code part
- [Parameter]
- public string myName { get; set; }
- private void ClickMe()
- {
- myName="Shanu";
- }
The complete Coutner Component page code will be like this.
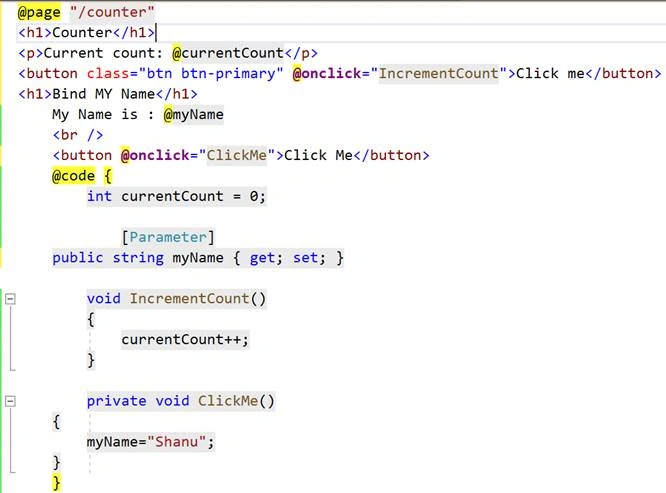
Now lets add the break point in our ClickMe method,

Run the program and open the counter page.

We can see as when we click on the Click Me button we can debug and check for the value from the breakpoint we placed.
Now lets see on performing CRUD operation using EF and Web API in Bloazor.
Step 3 - Using Entity Framework
To use the Entity Framework in our Blazor application we need to install the below packages
Install the Packages
Microsoft.EntityFrameworkCore.SqlServer - For using EF and SQL Server
Microsoft.EntityFrameworkCore.Tools - For using EF and SQL Server
Microsoft.AspNetCore.Blazor.HTTTPClient - For communicating WEB API from our Blazor Component.
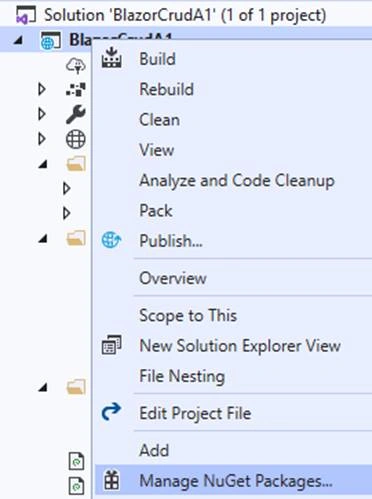
First we will add the Microsoft.EntityFrameworkCore.SqlServer ,For this right click on the project and click on Manage NuGet Packages.
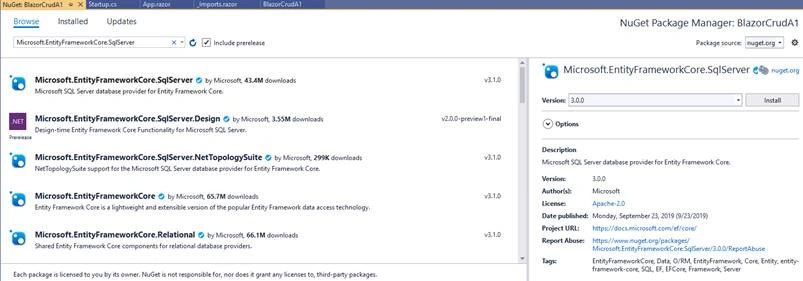
Search for all the three packages and install all the needed packages like the below image.
Add DB Connection string
Open the appsetting file and add the connection string like below image.
- "ConnectionStrings": {
- "DefaultConnection": "Server= DBServerName;Database=CustDB;user id= SQLID;-password=SQLPWD;Trusted_Connection=True;MultipleActiveResultSets=true"
- },

Create Model Class
Next, we need to create the Model class with same as our SQL Table name and also define the property fields similar to our SQL filed name as below.
Right Click the Data Folder and create new class file as “CustomerMaster.cs”
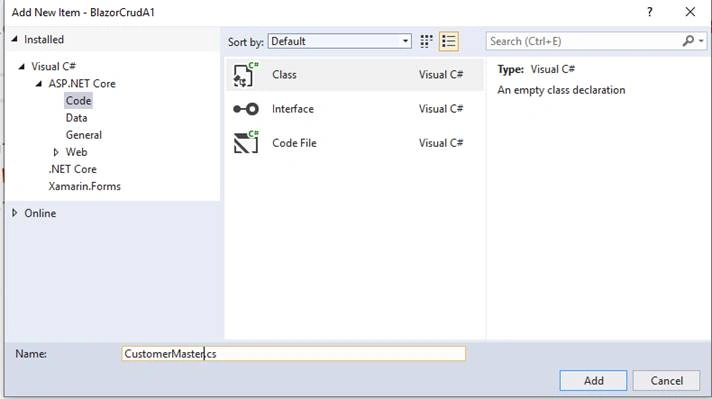
In the class, we add the property field name the same as our table column names like the below code.
- [Key]
- public string CustCd { get; set; }
- public string CustName { get; set; }
- public string Email { get; set; }
- public string PhoneNo { get; set; }
- public string InsertBy { get; set; }
Create dbConext Class
Next, we need to create the dbContext class. Right Click the Data Folder and create a new class file as “SqlDbContext.cs”
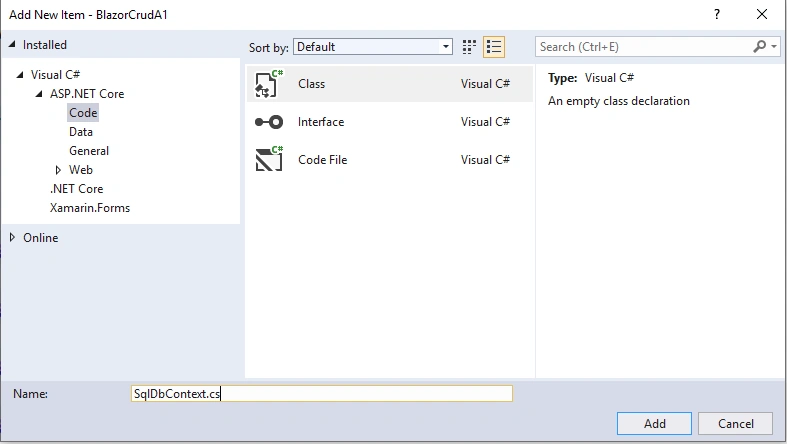
We add the below code in the DbContext class as below in order to add the SQLContext and add the DBset for our CustomerMaster Model.
- public class SqlDbContext:DbContext
- {
- public SqlDbContext(DbContextOptions<SqlDbContext> options)
- : base(options)
- {
- }
- public DbSet<BlazorCrudA1.Data.CustomerMaster> CustomerMaster { get; set; }
- }
Adding DbContext in Startup
Adding the DbContext in Startup.cs file ConfigureServices method as below code and also we give the connection string which we used to connect to SQLServer and DB.
- services.AddDbContext<SqlDbContext>(options => options.UseSqlServer(Configuration.GetConnectionString("DefaultConnection")));
Note that in the ConfigureServices method we can also see as the weatherforecast service has been added.if we create an new service then we need to add the service in like below code in ConfigureServices method.
- services.AddSingleton<WeatherForecastService>();
Creating Web API for CRUD operation
To create our WEB API Controller, right-click Controllers folder. Click Add New Controller.
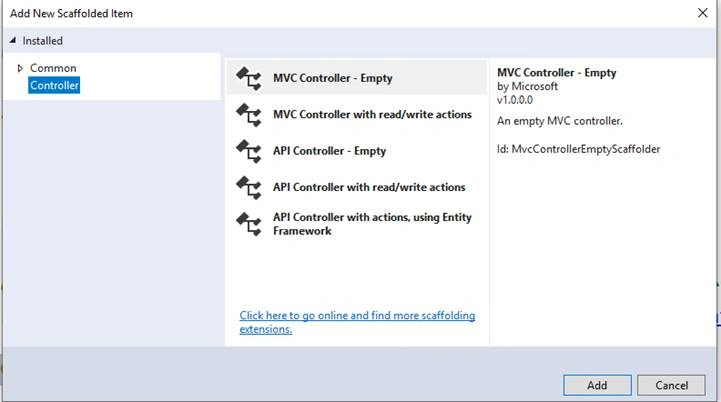
Here we will be using the Scaffold method to create our WEB API. We select API Controller with actions, using Entity Framework and click Add button.
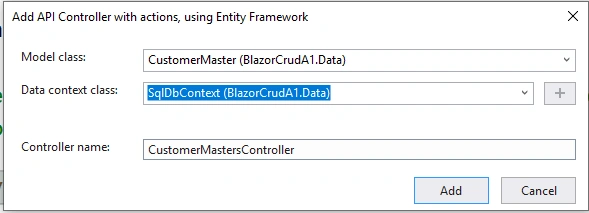
Select our Model class and DBContext class and click Add button.
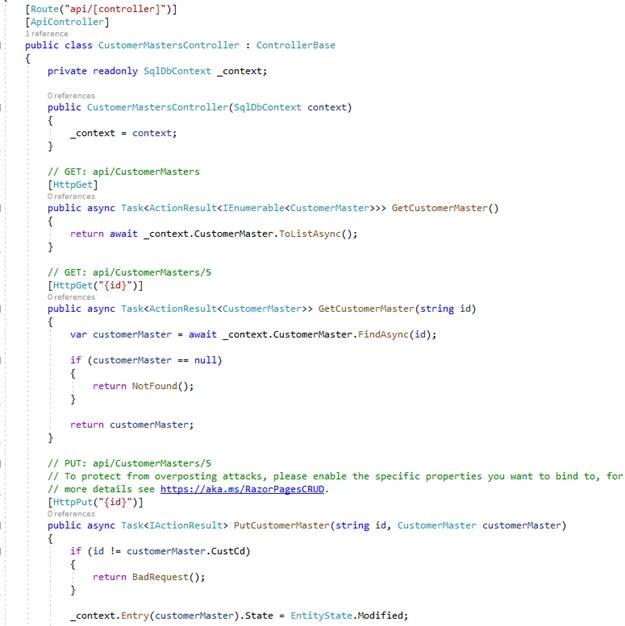
Our WEB API with Get/Post/Put and Delete method for performing the CRUD operation will be automatically created and we no need to write any code in Web API now as we have used the Scaffold method for all the actions and methods add with code.
To test Get Method, we can run our project and copy the GET method API path. Here, we can see our API path to get /api/CustomerMasters/
Run the program and paste API path to test our output.
Run the program and paste API path to test our output.
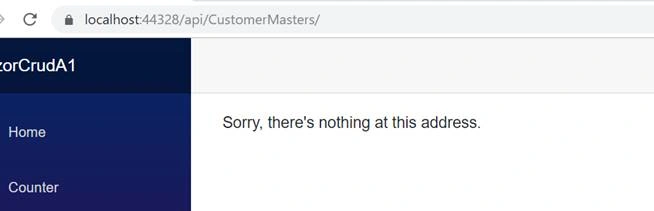
If you see this error means then we need to add the endpoints of controller in the Startup.cs file Configure method.
Add the below code in the Configure method in Startup.cs file
- endpoints.MapControllers();
we add inside the UseEndpoints like below code in Configure method.
- app.UseEndpoints(endpoints =>
- {
- endpoints.MapControllers();
- endpoints.MapBlazorHub();
- endpoints.MapFallbackToPage("/_Host");
- });
Now run again and check for /api/CustomerMasters/ to see the Json data from our database.

Now we will bind all this WEB API Json result in component.
Working with Client Project
First, we need to add the Razor Component page
Add Razor Component
To add the Razor Component page right click the Pages folder from the Client project. Click on Add >> New Item >> Select Razor Component >> Enter your component name,Here we have given the name as Customerentry.razor
Note all the component file need to have the extentions as .razor.
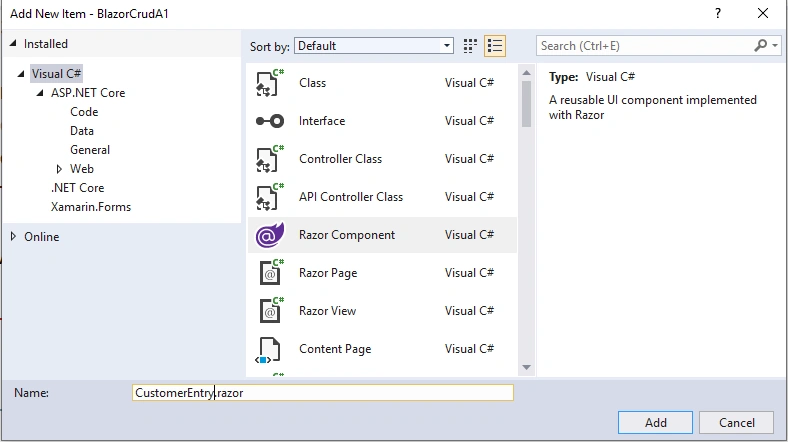
In Razor Component Page we have 3 parts of code as first is the Import part where we import all the references and models for using in the component, HTML design and data bind part and finally we have the function part to call all the web API to bind in our HTML page and also to perform client-side business logic to be displayed in Component page.
Import part
First, we import all the needed support files and references in our Razor View page. Here we have first imported our Model class to be used in our view and also imported HTTPClient for calling the Web API to perform the CRUD operations.
- @page "/customerentry"
- @using BlazorCrudA1.Data
- @using System.Net.Http
- @inject HttpClient Http
- @using Microsoft.Extensions.Logging
Register HTTPClient for Server side Blazor
In order to use the HTTPClient in Blazor Server side we need to add the below code in Startup.cs ConfigureServices method.
- services.AddResponseCompression(opts =>
- {
- opts.MimeTypes = ResponseCompressionDefaults.MimeTypes.Concat(
- new[] { "application/octet-stream" });
- });
- // Server Side Blazor doesn't register HttpClient by default
- if (!services.Any(x => x.ServiceType == typeof(HttpClient)))
- {
- // Setup HttpClient for server side in a client side compatible fashion
- services.AddScoped<HttpClient>(s =>
- {
- // Creating the URI helper needs to wait until the JS Runtime is initialized, so defer it.
- var uriHelper = s.GetRequiredService<NavigationManager>();
- return new HttpClient
- {
- BaseAddress = new Uri(uriHelper.BaseUri)
- };
- });
- }
HTML design and data Bind part
Next, we design our Customer Master details page to display the Customer details from the database and created a form to Insert and update the Customer details we also have Delete button to delete the Custoemr records from the database.
For binding in Blazor we use the @bind="@custObj.CustCd" and to call the method using @onclick="@AddNewCustomer"
- <h1> ASP.NET Core BLAZOR CRUD demo for Customers</h1>
- <hr />
- <table width="100%" style="background:#05163D;color:honeydew">
- <tr>
- <td width="20"> </td>
- <td>
- <h2> Add New Customer Details</h2>
- </td>
- <td> </td>
- <td align="right">
- <button class="btn btn-info" @onclick="@AddNewCustomer">Add New Customer</button>
- </td>
- <td width="10"> </td>
- </tr>
- <tr>
- <td colspan="2"></td>
- </tr>
- </table>
- <hr />
- @if (showAddrow == true)
- {
- <form>
- <table class="form-group">
- <tr>
- <td>
- <label for="Name" class="control-label">Customer Code</label>
- </td>
- <td>
- <input type="text" class="form-control" @bind="@custObj.CustCd" />
- </td>
- <td width="20"> </td>
- <td>
- <label for="Name" class="control-label">Customer Name</label>
- </td>
- <td>
- <input type="text" class="form-control" @bind="@custObj.CustName" />
- </td>
- </tr>
- <tr>
- <td>
- <label for="Email" class="control-label">Email</label>
- </td>
- <td>
- <input type="text" class="form-control" @bind="@custObj.Email" />
- </td>
- <td width="20"> </td>
- <td>
- <label for="Name" class="control-label">Phone</label>
- </td>
- <td>
- <input type="text" class="form-control" @bind="@custObj.PhoneNo" />
- </td>
- </tr>
- <tr>
- <td>
- <label for="Name" class="control-label">Insert By</label>
- </td>
- <td>
- <input type="text" class="form-control" @bind="@custObj.InsertBy" />
- </td>
- <td width="20"> </td>
- <td>
- </td>
- <td>
- <button type="submit" class="btn btn-success" @onclick="@AddCustomer" style="width:220px;">Save</button>
- </td>
- </tr>
- </table>
- </form>
- }
- <table width="100%" style="background:#0A2464;color:honeydew">
- <tr>
- <td width="20"> </td>
- <td>
- <h2>Customer List</h2>
- </td>
- </tr>
- <tr>
- <td colspan="2"></td>
- </tr>
- </table>
- @if (custs == null)
- {
- <p><em>Loading...</em></p>
- }
- else
- {
- <table class="table">
- <thead>
- <tr>
- <th>Customer Code</th>
- <th>Customerr Name</th>
- <th>Email</th>
- <th>Phone</th>
- <th>Inserted By</th>
- </tr>
- </thead>
- <tbody>
- @foreach (var cust in custs)
- {
- <tr>
- <td>@cust.CustCd</td>
- <td>@cust.CustName</td>
- <td>@cust.Email</td>
- <td>@cust.PhoneNo</td>
- <td>@cust.InsertBy</td>
- <td><button class="btn btn-primary" @onclick="@(async () => await EditCustomer(cust.CustCd))" style="width:110px;">Edit</button></td>
- <td><button class="btn btn-danger" @onclick="@(async () => await DeleteCustomer(cust.CustCd))">Delete</button></td>
- </tr>
- }
- </tbody>
- </table>
- }
Function Part
Function part to call all the web API to bind in our HTML page and also to perform client-side business logic to be displayed in Component page.In this Function we create a separate function for Add, Edit and Delete the student details and call the Web API Get,Post,Put and Delete method to perform the CRUD operations and in HTML we call all the functions and bind the results.
- @code {
- private CustomerMaster[] custs;
- CustomerMaster custObj = new CustomerMaster();
- string ids = "0";
- bool showAddrow = false;
- bool loadFailed;
- protected override async Task OnInitializedAsync()
- {
- ids = "0";
- custs = await Http.GetJsonAsync<CustomerMaster[]>("/api/CustomerMasters/");
- }
- void AddNewCustomer()
- {
- ids = "0";
- showAddrow = true;
- custObj = new CustomerMaster();
- }
- // Add New Customer Details Method
- protected async Task AddCustomer()
- {
- if (ids == "0")
- {
- await Http.SendJsonAsync(HttpMethod.Post, "/api/CustomerMasters/", custObj);
- custs = await Http.GetJsonAsync<CustomerMaster[]>("/api/CustomerMasters/");
- }
- else
- {
- await Http.SendJsonAsync(HttpMethod.Put, "/api/CustomerMasters/" + custObj.CustCd, custObj);
- custs = await Http.GetJsonAsync<CustomerMaster[]>("/api/CustomerMasters/");
- }
- showAddrow = false;
- }
- // Edit Method
- protected async Task EditCustomer(string CustomerID)
- {
- showAddrow = true;
- ids = "1";
- //try
- //{
- loadFailed = false;
- ids = CustomerID.ToString();
- custObj = await Http.GetJsonAsync<CustomerMaster>("/api/CustomerMasters/" + CustomerID);
- string s = custObj.CustCd;
- showAddrow = true;
- // }
- //catch (Exception ex)
- //{
- // loadFailed = true;
- // Logger.LogWarning(ex, "Failed to load product {ProductId}", CustomerID);
- //}
- }
- // Delte Method
- protected async Task DeleteCustomer(string CustomerID)
- {
- showAddrow = false;
- ids = CustomerID.ToString();
- await Http.DeleteAsync("/api/CustomerMasters/" + CustomerID);
- custs = await Http.GetJsonAsync<CustomerMaster[]>("/api/CustomerMasters/");
- }
- }
Navigation Menu
Now we need to add this newly added CustomerEntry Razor component to our left Navigation. For adding this Open the Shared Folder and open the NavMenu.cshtml page and add the menu.
- <li class="nav-item px-3">
- <NavLink class="nav-link" href="CustomerEntry">
- <span class="oi oi-list-rich" aria-hidden="true"></span> Customer Master
- </NavLink>
- </li>
Build and Run the application,

Conclusion
Note that when creating the DBContext and setting the connection string, don’t forget to add your SQL connection string. Here we have created a table in SQL server and used with Web API you can also do this with Services and also Code First approach, Hope you all like this article. In the next article, we will see more examples to work with Blazor. It's really very cool to work with Blazor.
Maurice AboagyePosted Jun 16, 2020, 11:33 AM
Very insightful article. Thanx very much
Laxmidhar SahooPosted Jan 5, 2020, 11:04 PM
Sir thanks it is usefull
Rigoberto EstrellaPosted Jan 1, 2020, 12:58 AM
Severity Code Description Project File Line Suppression StateError CS1061 'HttpClient' does not contain a definition for 'GetJsonAsync' and no accessible extension method 'GetJsonAsync' accepting a first argument of type 'HttpClient' could be found (are you missing a using directive or an assembly reference?) BlazorSampleCRUD C:\Users\estre\Source\Repos\BlazorSampleCRUD\BlazorSampleCRUD\Pages\Customerentry.razor 140 Active
Sourav Kumar DasPosted Dec 17, 2019, 10:47 PM
Nice useful article Sir.
Chittaranjan SwainPosted Dec 17, 2019, 10:41 PM
Very nice and useful article.
Pritesh MaturkarPosted Dec 17, 2019, 9:32 PM
It is very nice Article. Thanks for sharing.