

Updated 8/29/2018 - Formatted
My last two articles discussed how to load an image in a Windows form and how to resize that image; see this:
Now we will discuss how to crop an image.
Design form like this view
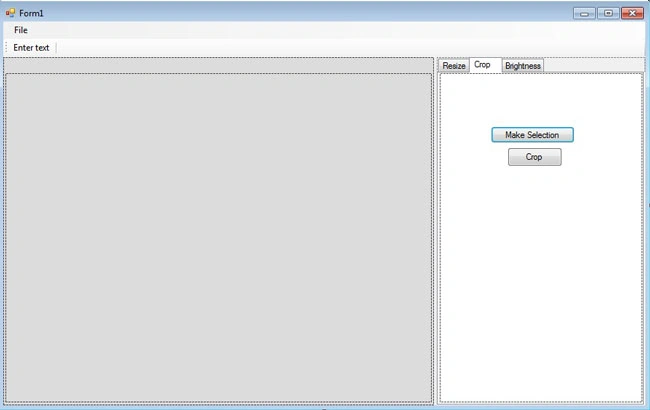
In the crop tab there are two buttons; one is "Make selection" and the other is "Ok".
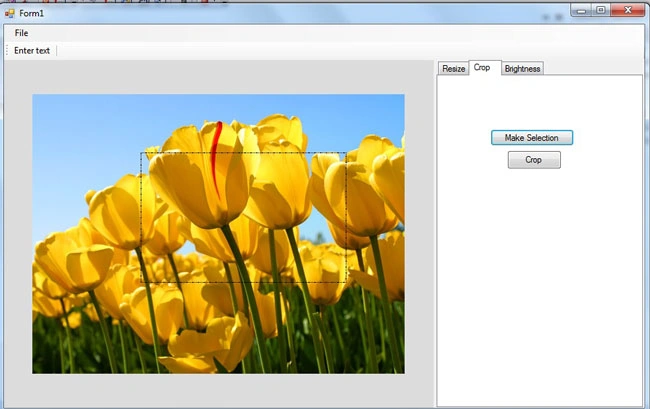
For cropping an image we will need to define a region to crop; in this article we will use a rectangle for defining such an area or region.
We can click the "MakeSelection" button and then draw a rectangle on the PictureBox with the help of the mouse.
Code for draw rectangle
Declare some private variables for locating the cursor and defining drawing objects:
- int cropX;
- int cropY;
- int cropWidth;
- int cropHeight;
- int oCropX;
- int oCropY;
- public Pen cropPen;
- public DashStyle cropDashStyle = DashStyle.DashDot;
We will use mouse down and mouse move events for doing this. We will need to implement this code for the mouse down event:
- if (e.Button == System.Windows.Forms.MouseButtons.Left)
- {
- Cursor = Cursors.Cross;
- cropX = e.X;
- cropY = e.Y;
- cropPen = new Pen(Color.Black, 1);
- cropPen.DashStyle = DashStyle.DashDotDot;
- }
- PictureBox1.Refresh();
In the above code there are two variables; one is cropX for the x position of the rectangle location and another is cropY for the y position. cropPen is the object of pen class with pensize and pencolor.
And write this code on mouse move event:
- if (PictureBox1.Image == null)
- return;
- if (e.Button == System.Windows.Forms.MouseButtons.Left)
- {
- PictureBox1.Refresh();
- cropWidth = e.X - cropX;
- cropHeight = e.Y - cropY;
- PictureBox1.CreateGraphics().DrawRectangle(cropPen, cropX, cropY, cropWidth, cropHeight);
- }
On mouse event we can find the cursor position with the help of event arg e so we can easily determine the rectangle's width and height. And use drawrectangle method. In the above code cropPen determines the color, size and other styles of the rectangle, cropx is the x coordinate of the upper left corner of rectangle, y is the y coordinate of the upper left corner of the rectangle and cropWidth and cropHeight are the width and height of the rectangle respectivly.
Code for crop
- Cursor = Cursors.Default;
- if (cropWidth < 1)
- {
- return;
- }
- Rectangle rect = new Rectangle(cropX, cropY, cropWidth, cropHeight);
- //First we define a rectangle with the help of already calculated points
- Bitmap OriginalImage = new Bitmap(PictureBox1.Image, PictureBox1.Width, PictureBox1.Height);
- //Original image
- Bitmap _img = new Bitmap(cropWidth, cropHeight);
- // for cropinf image
- Graphics g = Graphics.FromImage(_img);
- // create graphics
- g.InterpolationMode = System.Drawing.Drawing2D.InterpolationMode.HighQualityBicubic;
- g.PixelOffsetMode = System.Drawing.Drawing2D.PixelOffsetMode.HighQuality;
- g.CompositingQuality = System.Drawing.Drawing2D.CompositingQuality.HighQuality;
- //set image attributes
- g.DrawImage(OriginalImage, 0, 0, rect, GraphicsUnit.Pixel);
- PictureBox1.Image = _img;
- PictureBox1.Width = _img.Width;
- PictureBox1.Height = _img.Height;
- PictureBoxLocation();
- btnCrop.Enabled = false;
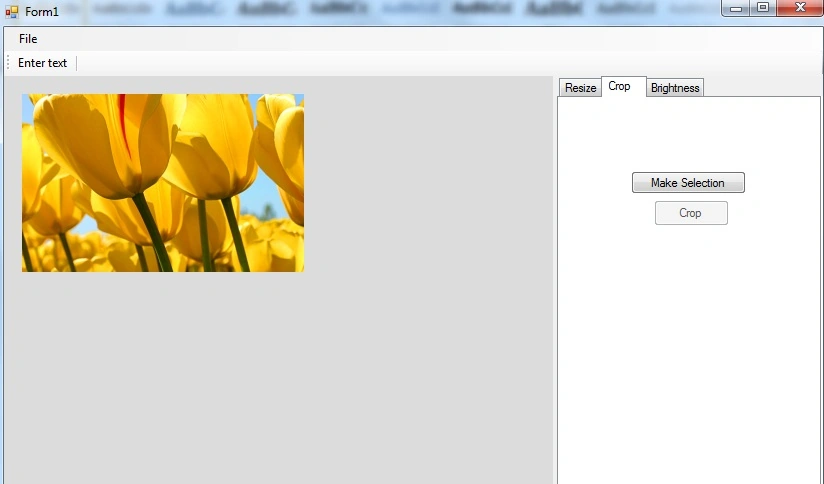
In the above code I have provided comments for better understanding.
So I think now we can crop any image easily with the help of this scenario.
kash ownzPosted Jan 23, 2025, 12:03 PM
Could I Use This Code If I Attribute And Credit You To The Program I'm Creating?
Musfique AhmedPosted Jan 3, 2019, 5:15 AM
You save my life.. :D Thanks :D
Bhavya SharmaPosted Jan 8, 2018, 1:39 AM
How to save the picture after editing
Yazan ZeusPosted Jan 1, 2016, 7:30 AM
can i show code the enter text please
Karthik KumaranPosted Jun 9, 2015, 5:45 AM
Excellent
kiran rsPosted Apr 13, 2015, 5:45 AM
undo option is not working....
Rayan ZaatariPosted Jan 3, 2015, 1:33 PM
very useful
chris wattzPosted Aug 4, 2014, 5:08 PM
cool tutorial, thanks a lot!
shiva singhPosted Apr 16, 2014, 8:51 AM
very nice........thnx
mubashir GulPosted Sep 20, 2013, 2:56 AM
not able to downloading this source code ....but y
Cho HakkaiPosted Jul 2, 2013, 5:01 AM
How can i make something like the crop box is movable? Thanks
dvdj dvdPosted May 21, 2013, 7:32 AM
very Manmnoon !
dvdj dvdPosted May 21, 2013, 7:32 AM
very Manmnoon !
Pratik AgarwalPosted Mar 7, 2013, 3:38 AM
thanks a lot,,,
naveen sharmaPosted Dec 25, 2012, 4:55 AM
Thanks..!!
Capetonis InfernatusPosted Dec 10, 2012, 2:39 PM
Thx!
Huy Lam DucPosted Oct 24, 2012, 7:53 AM
Very good, Thanks for your ARTICLE
Pradip JadhavPosted Sep 24, 2012, 6:31 AM
wow very very nice
Dipti VyasPosted Dec 2, 2011, 6:31 AM
This was really of great help to me. Thanks a ton.
Thilina HerathPosted Aug 29, 2011, 12:28 AM
wow..nice Article
Manish TewatiaPosted Mar 24, 2011, 12:21 AM
Good Article....