

Introduction: In this application we have create the simple admission form using ASP.NET MVC. In this program first we create the business logic after that we create the controller and last we create the view. This is a simple application for beginners that doing help how to create the some informational details to using ASP.NET MVC tools. The Model encapsulates your application data, application flow, and business logic.The View extracts data from the Model and format it for presentation. The Controller direct application flow and receive input and translates it for the Model and View.We have know that MVC is integrated three separated words that is models,views,controllers. models for maintaining data, views for displaying all or a portion of the data, and controllers for handling events that affect the model or view.
Step1: Open Visual Studio 2010.
- Go to file -> New->Projects.
- Create an ASP.NET MVC 2 Empty Web Application.
- The name of application is "Admission Details".
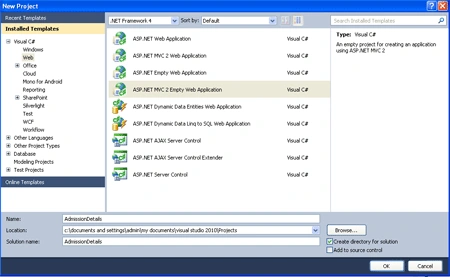
Step2: Add a class in the modeld folder.
- Right click on the Models folder ->add new items->add class
- Name of Class is "Student"
- In a class define the properties
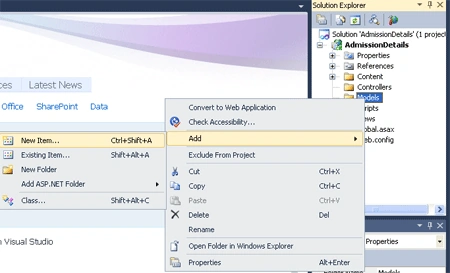

Code:
using
System;
using
System.Collections.Generic;
using
System.Linq;
using System.Web;
namespace
AdmissionDetails.Models
{
public class
Student
{
public string
stu_name { get; set;
}
public
string stu_Fname { get;
set; }
public int
age { get;set;}
public string
NOF_Institution { get;
set; }
public string
address { get; set;
}
}
}
Step3: Add a controller.
- Right click on the Controllers folder ->add->Controllers
- Name of Controllers is "Information"
- In a controller, define the request
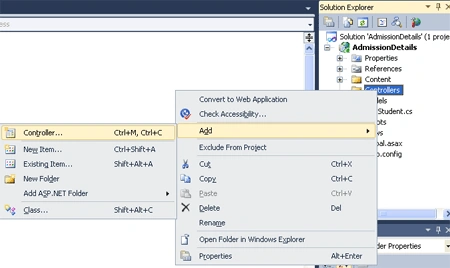
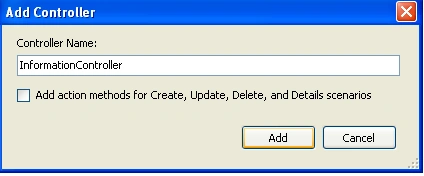
Code:
using
System;
using
System.Collections.Generic;
using
System.Linq;
using System.Web;
using
System.Web.Mvc;
using
AdmissionDetails.Models;
namespace
AdmissionDetails.Controllers
{
public class
InformationController :
Controller
{
static List<Student>
stu = new List<Student>();
public
ActionResult Index()
{
return View(stu);
}
public
ActionResult show(Student bhanu)
{
return View(bhanu);
}
public
ActionResult admission_detail()
{
return View();
}
[AcceptVerbs(HttpVerbs.Post)]
public
ActionResult admission_detail(Student
ranu)
{
if (!ModelState.IsValid)
{
return View("admission_detail",
ranu);
}
stu.Add(ranu);
return RedirectToAction("Index");
}
}
}
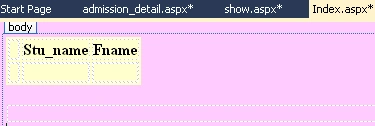
Step4: After, that we create the views.
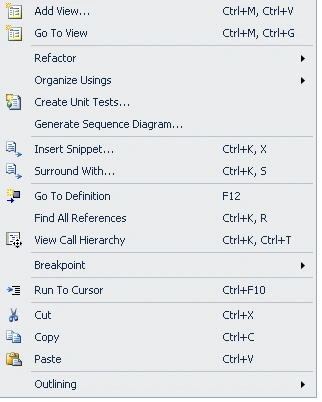
Right click on the Index Method -> Add View- View name same as "Index"
- Create a Strong type View
- When you create the Strong type view automatically take the namespace and class name

Code:
<%@
Page Language="C#"
Inherits="System.Web.Mvc.ViewPage<IEnumerable<AdmissionDetails.Models.Student>>"
%>
<!DOCTYPE
html PUBLIC
"-//W3C//DTD XHTML 1.0 Transitional//EN"
"http://www.w3.org/TR/xhtml1/DTD/xhtml1-transitional.dtd">
<html
xmlns="http://www.w3.org/1999/xhtml"
>
<head
runat="server">
<title>Index</title>
</head>
<body
bgcolor="#ffccff">
<div>
<table
bgcolor="#FFFFCC">
<tr>
<th></th>
<th>
Stu_name
</th>
<th>
Fname
</th>
</tr>
<%
foreach (var
manish in Model) {
%>
<tr>
<td>
<%=
Html.ActionLink("show",
"show", manish)%>
</td>
<td>
<%=
Html.Encode(manish.stu_name) %>
</td>
<td>
<%=
Html.Encode(manish.stu_Fname) %>
</td>
</tr>
<%
} %>
</table>
<p>
<%=
Html.ActionLink("Login",
"admission_detail")%>
</p>
</div>
</body>
</html>
Step5: Add Show views
-
Right click on the Details Method -> Add View
- View name same as "Show"
- Create a Strong type View
- When you create the Strong type view automatically take the namespace and class name


Code:
<!DOCTYPE
html PUBLIC
"-//W3C//DTD XHTML 1.0 Transitional//EN"
"http://www.w3.org/TR/xhtml1/DTD/xhtml1-transitional.dtd">
<html
xmlns="http://www.w3.org/1999/xhtml"
>
<head
runat="server">
<title>show</title>
</head>
<body
bgcolor="#99ccff">
<div>
<h2>Student
Record</h2>
<fieldset>
<legend>Record</legend>
<p
style="background-color:
#FFCCFF">
Stu_Nmae:
<%=
Html.Encode(Model.stu_name) %>
</p>
<p
style="background-color:
#FFCCFF">
Stu_Fname:
<%=
Html.Encode(Model.stu_Fname) %>
</p>
<p
style="background-color:
#FFCCFF">
Age:
<%=
Html.Encode(Model.age) %>
</p>
<p
style="background-color:
#FF99FF">
Institution:
<%=
Html.Encode(Model.NOF_Institution) %>
</p>
<p
style="background-color:
#FF99FF">
Address:
<%=
Html.Encode(Model.address) %>
</p>
</fieldset>
<p>
<%=Html.ActionLink("Back
to List", "Index")
%>
</p>
</div>
</body>
</html>
Step6: Add last view.
-
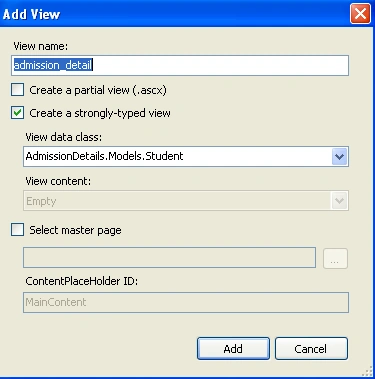
Right click on the Create Method -> Add View
- View name same as "admission_detail"
- Create a Strong type View
- When you create the Strong type view automatically take the namespace and class name

Code:
<%@
Page Language="C#"
Inherits="System.Web.Mvc.ViewPage<AdmissionDetails.Models.Student>"
%>
<!DOCTYPE
html PUBLIC
"-//W3C//DTD XHTML 1.0 Transitional//EN"
"http://www.w3.org/TR/xhtml1/DTD/xhtml1-transitional.dtd">
<html
xmlns="http://www.w3.org/1999/xhtml"
>
<head
runat="server">
<title>admission_detail</title>
</head>
<body
bgcolor="#99ff99">
<div>
<h2
>Login</h2>
<%=
Html.ValidationSummary("Create was unsuccessful.
Please correct the errors and try again.")
%>
<%
using (Html.BeginForm()) {%>
<fieldset>
<legend>Fields</legend>
<p
style="background-color:
#9999FF">
<label
for="stu_name"
style="background-color:
#9999FF">Stu_Name:</label>
<%=
Html.TextBox("stu_name")
%>
<%=
Html.ValidationMessage("stu_name",
"*") %>
</p>
<p
style="background-color:
#9999FF">
<label
for="stu_Fname">Stu_Fname:</label>
<%=Html.TextBox("stu_Fname")
%>
<%=
Html.ValidationMessage("stu_Fname",
"*") %>
</p>
<p
style="background-color:
#9999FF">
<label
for="age">Age:</label>
<%=
Html.TextBox("age")
%>
<%=
Html.ValidationMessage("age",
"*") %>
</p>
<p
style="background-color:
#9999FF">
<label
for="NOF_Institution">Institution:</label>
<%=
Html.TextBox("NOF_Institution")%>
<%=
Html.ValidationMessage("NOF_Institution",
"*")%>
</p>
<p
style="background-color:
#9999FF"
<label
for="address">address:</label>
<%=
Html.TextBox("address")%>
<%=
Html.ValidationMessage("address",
"*")%>
</p>
<p>
<input
type="submit"
value="Login"
/>
</p>
</fieldset>
<%
} %>
<div>
<%=Html.ActionLink("Back
to List", "Index")
%>
</div>
</div>
</body>
</html>
Step7: Press crtl+f5 run
your application.
Output:


Ahmed MohamudPosted Dec 10, 2016, 2:50 PM
Hello programmers!I have been given a project to make an online shopping in asp.net and their rules are: admin,product, ""product registration "" product edit/ lost of product"""" product disable""" root "" but I don't have much ideas how to do that. So, I need your help. What things I should consider and how the look of the website should be and how to maintain the asp.net? What to understand first? ETC SO , please help me as much as you can. By suggesting some samples that you have etc.Thanks. ,