

Introduction
We successfully completed day 1 before coming here.
Day 2 Agenda
- Namespaces
- Classes
- Abstraction
- Encapsulation
- Inheritance
- Properties
- Access Modifiers
Namespaces
Why Namespace?
- Namespace help us organize our programs.
- They help us to avoid name clashing.
- To control the scope of the class and method name in our Projects.
Syntax: Namespace nameofNamespace
“Namespace is a collection of classes and are used to organize them.”
System.Console.WriteLine("Learn C# in 7 days!");
Here System is a Namespace and Console is a class present in System.
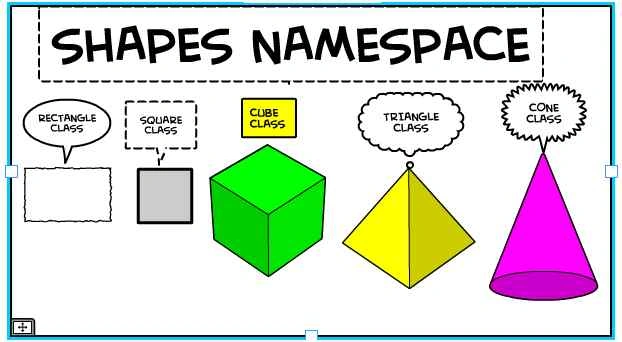
Fig 1.0 Represent a Shape Namespace and its corresponding Classes
Let’s take example where we have two teams which are working on same project with same class so in order to organize them we create namespace with projectname and then the namespace for subclasses as shown below:
- namespace ProjectA //project name
- {
- namespace PromoTeam //to signify whose Team class is this
- {
- class A
- {
- public static void print()
- {
- System.Console.WriteLine("heelo i am PromoTeam");
- Console.ReadLine();
- }
- }
- }
- }
- namespace ProjectA //project name
- {
- namespace OMSTeam //to signify whose Team class is this
- {
- class B
- {
- public static void print()
- {
- Console.WriteLine("heelo i am OMSTeam");
- Console.ReadLine();
- }
- }
- }
- }
- class Program
- {
- static void Main(string[] args)
- {
- ProjectA.OMSTeam.B.print(); //Namespace.Namespace.ClassName.Method
- }
- }
- using System;
- using System.Collections.Generic;
- using System.Linq;
- using System.Text;
- using System.Threading.Tasks;
- using ProjectA.OMSTeam;
- using ProjectA.PromoTeam;
- class Program
- {
- static void Main(string[] args)
- {
- A.print();
- }
- }
- namespace ProjectA
- {
- namespace PromoTeam
- {
- class A
- {
- public static void print()
- {
- System.Console.WriteLine("heelo i am PromoTeam");
- Console.ReadLine();
- }
- }
- }
- }
- namespace ProjectA
- {
- namespace OMSTeam
- {
- class A
- {
- public static void print()
- {
- Console.WriteLine("heelo i am OMSTeam");
- Console.ReadLine();
- }
- }
- }
- }
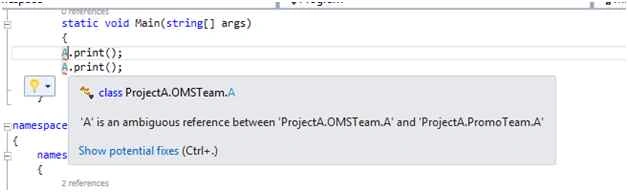
In order to resolve this we can use fully qualified name.
- class Program
- {
- static void Main(string[] args)
- {
- ProjectA.OMSTeam.A.print();
- ProjectA.PromoTeam.A.print();
- }
- }
We can create alias name of the Namespace by using the using statement through which we can resolve this problem using alias name of Namespace as shown below,
- using System;
- using System.Collections.Generic;
- using System.Linq;
- using System.Text;
- using System.Threading.Tasks;
- using Omsteam = ProjectA.OMSTeam; //giving alias name to Namespace
- using PromoTeam = ProjectA.PromoTeam; //giving alias name to Namespace
- class Program
- {
- static void Main(string[] args)
- {
- Omsteam.A.print();
- Omsteam.A.print();
- }
- }
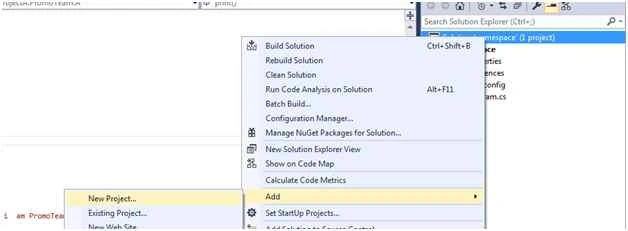
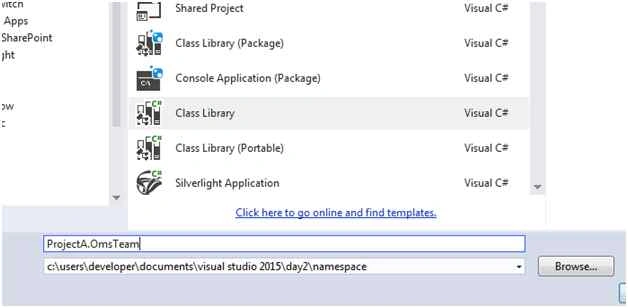
And name the class as article.
Note: I have changed the class name so that it will look more Business related.
- namespace ProjectA.OmsTeam
- {
- public class Article
- {
- public static void print()
- {
- Console.WriteLine("heelo i am OMSTeam");
- Console.ReadLine();
- }
- }
- }
- namespace ProjectA.PromoTeam
- {
- public class Article
- {
- public static void print()
- {
- System.Console.WriteLine("heelo i am PromoTeam");
- Console.ReadLine();
- }
- }
- }
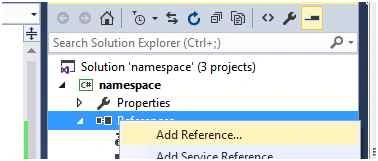

We will check the checkbox and select both of them to be used in our project.
- using System;
- using System.Collections.Generic;
- using System.Linq;
- using System.Text;
- using System.Threading.Tasks;
- using OmsTeam = ProjectA.OmsTeam; //using the namespace with alias name
- using PromoTeam = ProjectA.PromoTeam; //using the namespace with alias name
- class Program
- {
- static void Main(string[] args)
- {
- OmsTeam.Article.print(); //calling the print method
- PromoTeam.Article.print(); //calling the print method
- Console.ReadLine();
- }
- }

Classes and Objects in C#
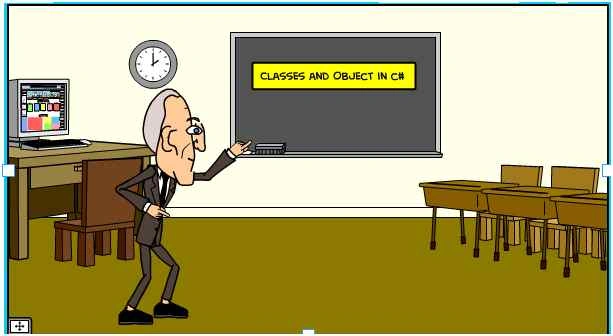
When we store the list of Information regarding a type we make use of classes e.g. Employee so Employee has the varieties of information that are needed to be stored i.e. EmployeeName, EmployeeId, EmployeePhoneNo, EmployeeAddress, Gender, Jobtitle, etc. A class is a template for creating object. Class can also contain methods to perform operations related to Employee that is termed as behavior. Class is basically a template which is a repository of information and that information can be called using a Class Object.
A class consists of state and behavior. Class data is represented by Properties/Fields and behavior is represented by methods.
Syntax: Class ClassName
Go to your project and right click and add NewItem, select class and give your Class name.
- using System;
- using System.Collections.Generic;
- using System.Linq;
- using System.Text;
- using System.Threading.Tasks;
- namespace ClassDef
- {
- class Employee
- {}
- }
Note- Constructor is creation of object at run time, as soon as the object creating the Class Constructor is called. Constructors are used for object initialization and memory, field’s allocation of its class.
- using System;
- using System.Collections.Generic;
- using System.Linq;
- using System.Text;
- using System.Threading.Tasks;
- namespace ClassDef
- {
- class Employee
- {
- string _Name;
- int _Age;
- public Employee(string Name, int Age)
- {
- this._Name = Name; //this is points towards object of this classs
- this._Age = Age;
- }
- public void Information()
- {
- Console.WriteLine("The Information of the Employee is Name={0} and Age={1}", _Name, _Age);
- Console.ReadLine();
- }
- }
- }
- using System;
- using System.Collections.Generic;
- using System.Linq;
- using System.Text;
- using System.Threading.Tasks;
- namespace ClassDef
- {
- class Program
- {
- static void Main(string[] args)
- {
- Employee obj = new Employee("Saillesh", 26);
- obj.Information();
- }
- }
- }

As we go ahead we will see how to use properties and assign value to the properties.
Objects
An object is instance of a class, i.e. an instance has properties for identifying its state (attributes) and methods for behavior and event for depicting the change of state defined by the class.
Object Entity
Object Entity means that every object is unique and can be differentiated from other, each time the object is created an Object entity is defined. What we always see and are able to distinguish from each other is an Object.

When we talk about Saillesh Desktop, we are referring to an object of Class Desktop that can subdivide in to child classes like Desktop of Hp or Sony etc. But as here we are talking about Saillesh Desktop we will discuss only this desktop and its attributes and methods.
You can see the following diagram to see Saillesh Desktop behavior and Attributes.
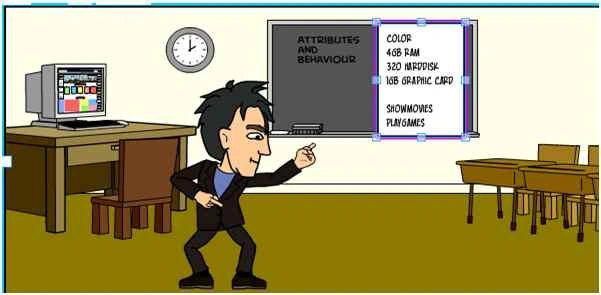
As I said object is instance of a class, i.e. we can say that a birth or creation of object is called instantiation.
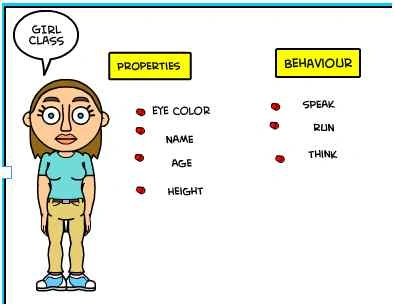
Sample examples of a class : Girl
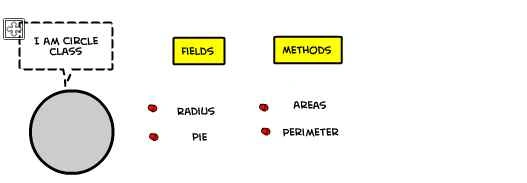
Circle Class
Static Classes – A static class is same as non-static class, the only difference is we cannot create object of Static class.
Note: Static class should have all the methods, fields and properties as static.
Benefits:
- We don’t need to make instance of the class all the methods, fields and properties are easily accessible using Class name.
- No OOP principles are applicable to Static class.
- Do not map to Real world objects, it’s just a collection of unrelated methods or logic so that we can increase the reusability in our project.
- If you want cache data.
Note: Constructor runs only once in Static class.
Declaration
A static class is created by using keyword 'Static' as shown here:
Static class ClassName
{
//list of properties and methods
}
Abstraction
"A view of a problem that extracts the essential information
relevant to a particular purpose and ignores the remainder of
the information."
-- [IEEE, 1983]
"Abstraction is the selective examination of certain aspects of
a problem. The goal of abstraction is to isolate those aspects
that are important for some purpose and suppress those aspects
that are unimportant."
-- [Rumbaugh et al, 1991]
"[A] simplified description, or specification, of a system that
emphasizes some of the system's details or properties while
suppressing others. A good abstraction is one that emphasizes
details that are significant to the reader or user and suppress
details that are, at least for the moment, immaterial or
diversionary."
-- [Shaw, 1984]
Source: http://www.tonymarston.co.uk/php-mysql/abstraction.txt
Encapsulation
"Encapsulation is used as a generic term for techniques which
realize data abstraction. Encapsulation therefore implies the
provision of mechanisms to support both modularity and information
hiding. There is therefore a one to one correspondence in this
case between the technique of encapsulation and the principle of
data abstraction."
-- [Blair et al, 1991]
"Data hiding is sometimes called encapsulation because the data
and its code are put together in a package or 'capsule.'"
-- [Smith, 1991]
"[E]ncapsulation -- also known as information hiding --
prevents clients from seeing its inside view, were the behavior
of the abstraction is implemented."
-- [Booch, 1991]
Source: http://www.tonymarston.co.uk/php-mysql/abstraction.txt
From the above definitions we figured out that Abstraction is more collective thing the principle of Object oriented programming and denotes to show something in simpler way e.g. Building blocks of Building, such as color or shapes. What is necessary to the User and essential feature of the object to the End User and ignoring the essential details? While Encapsulation is a strategy used as part of abstraction to implement the abstraction, wrap data in a unit or capsule i.e. Class. It keeps the data safe from outside code. It refers to the object of the class. We access the class by instantiating the class object. Object properties and method can be hidden from the end user.
Note: Here end user is perspective to the User who references your DLL File. Now we use reference of object then it will show only necessary methods and properties and hide methods which are not necessary which we have hide from the external User.
For example, I have Meeting Management System App.
Where when I create the MOM Minutes of the Meeting and insert the Meetings details to the DB for e.g. using Function:
- CreateMOM()
When this function executes it first it adds the Meeting Name, Segments (Retails, Audit, Operational etc.) and create the MeetingId for the MOM and then based on the Meeting Id after that based upon the MeetingId it internally calls other methods that creates the child of Meeting as in the following,
- Participants in the Meeting (Employees who participated in the Meeting)
- Agenda Covered in the Meeting
- File uploaded (any excel file)
- Format Function Covered
- Sending mail to all the participants related what action was taken in the meeting.
So we can imagine that there are couple of step it does.
- Now imagine we have another User or Client who is consuming our class rather than telling him all the things we just tell him the method name CreateMOM(), as Abstraction we are hiding the user only the necessary function and encapsulation is hiding the other complex things from it. (Adding participants to other sub tables, agenda covered in the meeting, etc.) We implement the encapsulation using Access Modifiers (Private).
- using System;
- using System.Collections.Generic;
- using System.Linq;
- using System.Text;
- using System.Threading.Tasks;
- using System.Data.SqlClient;
- //Abstraction Namespace
- namespace Abstraction
- {
- /// <summary>
- /// Meeting Class contains list of Properties and functions for the Meeting Creation
- /// </summary>
- class Meeting
- {
- private int _Id;
- private string _Name;
- public string Name
- {
- get
- {
- return _Name;
- }
- set
- {
- _Name = value;
- }
- }
- private string _Format;
- public string Format
- {
- get
- {
- return _Format;
- }
- set
- {
- _Format = value;
- }
- }
- private string _Location;
- public string Location
- {
- get
- {
- return _Location;
- }
- set
- {
- _Location = value;
- }
- }
- private string _FileUploaded;
- public string FileUploaded
- {
- get
- {
- return _FileUploaded;
- }
- set
- {
- _FileUploaded = value;
- }
- }
- public bool InsertToDb()
- {
- try
- {
- this._Id = AddandGetMeetingId(_Name, _Format, _Location);
- bool Status = AdduploadedFiles(this._Id, _FileUploaded);
- if (Status == true)
- {
- return true;
- }
- else
- {
- return false;
- }
- }
- catch (Exception ex)
- {
- throw new Exception(ex.Message.ToString());
- }
- }
- private int AddandGetMeetingId(string MeetingName, string FormatName, string MeetingLocation)
- {
- try
- {
- DAL objDal = new DAL();
- int Id = objDal.CreateMom(MeetingName, FormatName, MeetingLocation);
- return Id;
- }
- catch (Exception ex)
- {
- throw new Exception(ex.Message.ToString());
- }
- }
- private bool AdduploadedFiles(int id, string FileName)
- {
- try
- {
- DAL objDal = new DAL();
- bool status = objDal.CreateMom(id, FileName);
- return true;
- }
- catch (Exception ex)
- {
- throw new Exception(ex.Message.ToString());
- }
- }
- }
- }
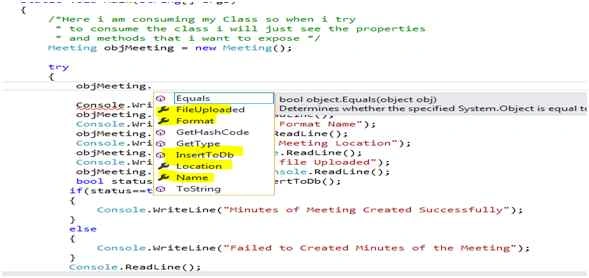
We can see from the above diagram that only required information is shown to the User. User access the class method as shown below:
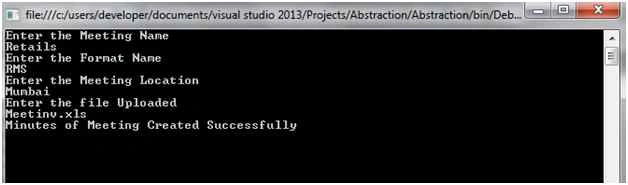
- try
- {
- Console.WriteLine("Enter the Meeting Name");
- objMeeting.Name = Console.ReadLine();
- Console.WriteLine("Enter the Format Name");
- objMeeting.Format = Console.ReadLine();
- Console.WriteLine("Enter the Meeting Location");
- objMeeting.Location = Console.ReadLine();
- Console.WriteLine("Enter the file Uploaded");
- objMeeting.FileUploaded = Console.ReadLine();
- bool status = objMeeting.InsertToDb();
- if (status == true)
- {
- Console.WriteLine("Minutes of Meeting Created Successfully");
- }
- else
- {
- Console.WriteLine("Failed to Created Minutes of the Meeting");
- }
- Console.ReadLine();
- }
- catch (Exception ex)
- {
- Console.WriteLine(ex.Message.ToString() + " " + ex.StackTrace.ToString());
- }
- using System;
- using System.Collections.Generic;
- using System.Linq;
- using System.Text;
- using System.Threading.Tasks;
- using System.Data.SqlClient;
- using System.Configuration;
- namespace Abstraction
- {
- public class DAL
- {
- public static SqlConnection con;
- static DAL()
- {
- con = new SqlConnection(ConfigurationManager.ConnectionStrings["DBclass"].ConnectionString);
- }
- public int CreateMom(string MtngName, string FrmtName, string Location)
- {
- try
- {
- string query = "insert into tblMeetingMaster values ('" + MtngName + "','" + FrmtName + "','" + Location + "')";
- SqlCommand cmd = new SqlCommand(query, DAL.con);
- con.Open();
- cmd.ExecuteScalar();
- string query2 = "select IDENT_CURRENT('tblMeetingMaster')";
- SqlCommand cmd1 = new SqlCommand(query2, DAL.con);
- decimal value = (decimal) cmd1.ExecuteScalar();
- return Convert.ToInt32(value);
- }
- catch (Exception ex)
- {
- throw new Exception(ex.Message.ToString());
- }
- finally
- {
- con.Close();
- }
- }
- public bool CreateMom(int MeetingId, string FileName)
- {
- try
- {
- string query = "insert into tblFileUploaded values ('" + MeetingId + "','" + FileName + "')";
- SqlCommand cmd = new SqlCommand(query, DAL.con);
- con.Open();
- cmd.ExecuteNonQuery();
- return true;
- }
- catch (Exception ex)
- {
- return false;
- throw new Exception(ex.Message);
- }
- finally
- {
- con.Close();
- con.Dispose();
- }
- }
- }
- }
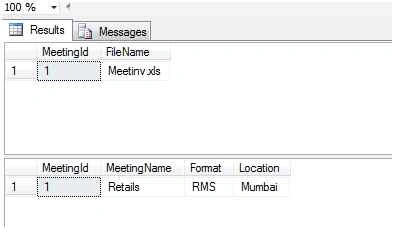
Values inserted in DB
Inheritance
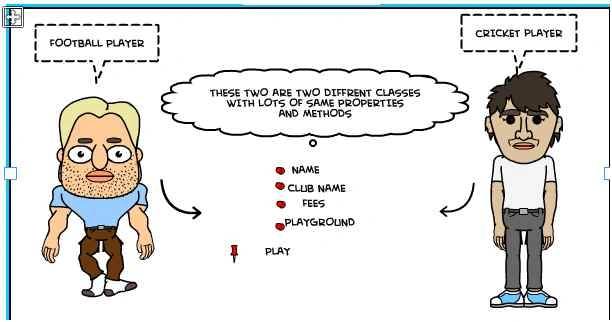
From the above diagram you can predict there are two Classes Football Player, Cricket player and both of them are having lots of common properties and methods. So in order to duplicate code in both the classes we move all duplicate code into base class called Player.
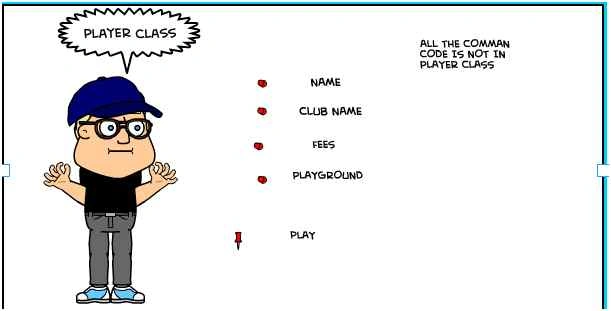
Inheritance is a parent child relationship in an object oriented programming where we can create a Parent class and extend the functionality of parent class by creating child class.
While talking about above classes the specific code that left respective include: football and cricket. In football we have Goals Scored, while in Cricket we have Run Scored, etc. Let go ahead and implement the same as written below.
- using System;
- using System.Collections.Generic;
- using System.Linq;
- using System.Text;
- using System.Threading.Tasks;
- namespace Inheritance
- {
- public class Player
- {
- public string PlayerName;
- public string ClubName;
- public string PlayGround;
- public void PlayerDetails()
- {
- Console.WriteLine("THE Player details are PlayerName {0}, Registered to{1} playing in {2}", PlayerName, ClubName, PlayGround);
- Console.ReadLine();
- }
- }
- public class CricketPlayer: Player
- {
- public int Runscored;
- }
- public class FootballPlayer: Player
- {
- public int GoalScored;
- }
- }
- In this above example derived class inherits from the Parent class.
- C# Supports only single class inheritance.
- Child class is a specialization of base class.
- Parent classes are automatically instantiated before derived class.
- Parent class constructs executes before child class.
In interview sometimes Interviewer asks us which constructor will be called first when we call a child class constructor.
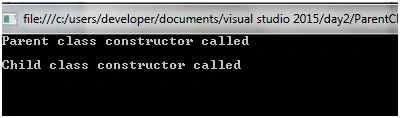
Parent classes are automatically instantiated before derived class, as soon as we create an object of child class the parent class constructor is called as shown below.
- using System;
- using System.Collections.Generic;
- using System.Linq;
- using System.Text;
- using System.Threading.Tasks;
- namespace ParentClassConstructor
- {
- public class Parent
- {
- public Parent()
- {
- Console.WriteLine("Parent class constructor called");
- Console.ReadLine();
- }
- }
- public class Child: Parent
- {
- public Child()
- {
- Console.WriteLine("Child class constructor called");
- Console.ReadLine();
- }
- }
- class Program
- {
- static void Main(string[] args)
- {
- Child objChild = new Child();
- }
- }
- }
Properties
Property is a member that provides the mechanism to what gets assigned and what gets returned from your fields/classes variables. In simple terms we can say that properties help us to inject the logic inside the fields /classes variables. By using the Access modifiers we can make it possible to what gets assigned and what gets returned from your fields. Properties implements Encapsulation because it hides the complexity from the User.
Why Properties
- As discussed earlier if we make our class fields public we will not have any control on what gets assigned and what gets returned from your fields.
- Below are the scenarios which we face when our fields are public.
The following is a class called Employee Class with public fields ID.
- Our Business rule say that ID should not be less than 1.
- Name cannot be set to NULL
- Marks Should be Read only
But as we can see below we are able to change the values and assign the same to our fields.
- public class Employee
- {
- public int ID;
- }
- public class Program
- {
- static void Main(string[] args)
- {
- Employee obj = new Employee();
- obj.ID = -100; // ID should not be less than 1
- obj.NAME = null; // name should not be empty
- obj.MARKS = 20; //Marks should be a read only property but here we are able to change it
- Console.WriteLine("the values of the new object are ID {0} ,NAME {1}, MARKS {2} ", obj.ID, obj.NAME, obj.MARKS);
- Console.ReadLine();
- }
- }

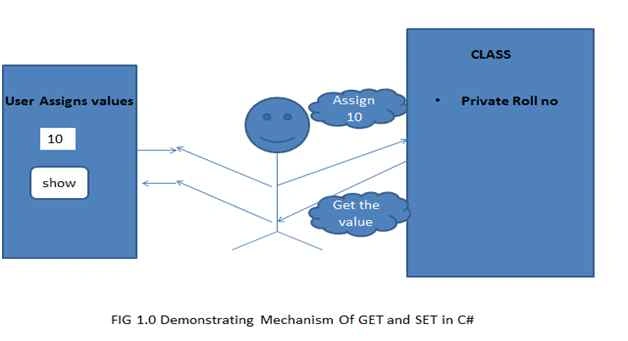
So in order to validate the Business rule we use get and set methods properties in C#. The programming language that before properties they use Getter and Setter(for better understanding) method as shown below.
Firstly, we create our property to be private so that they won’t be accessible to the external world.
Now we write to methods for set and get i.e. SetId, GetId to control what’s get into the fields and what set into the fields of class.
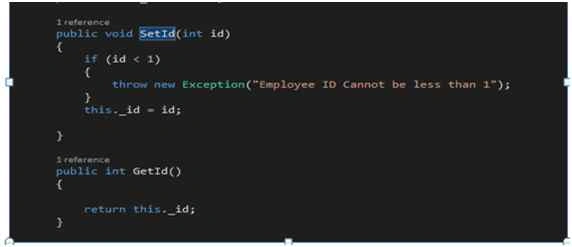
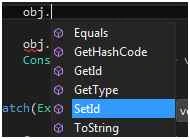
Now I initialize the object of Employee class we find that we are not able to get access to our fields rather we are able to access SetId and GetId methods. Now I set the value to the _id field as shown below:
Now I will set the value of id as -100 and then call the obj.Getid we see how the flow of program goes.
Step 1: Once the object is created we try to set the value of _id=-100
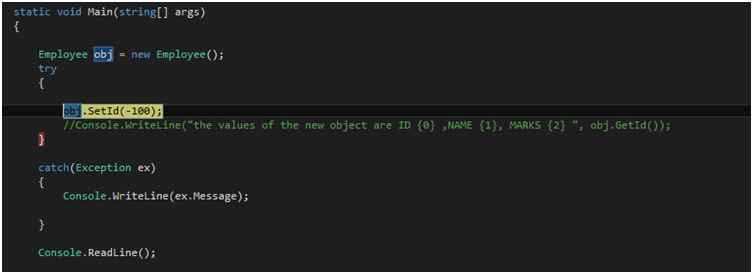
Step 2: As the id value passed is less than 1 it enters the exception and throw a new exception for the same.
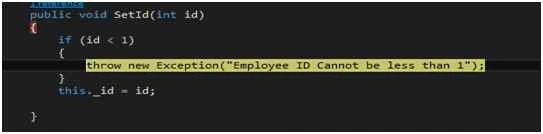
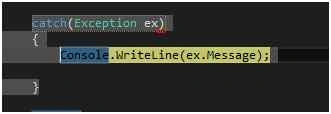
Step 3: It enters the catch block and will print the exception message as shown below.

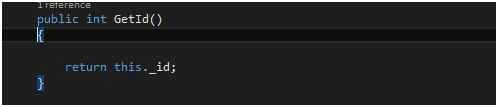
Now we input a correct value which is greater than 1 and print the value using getId function as shown below.
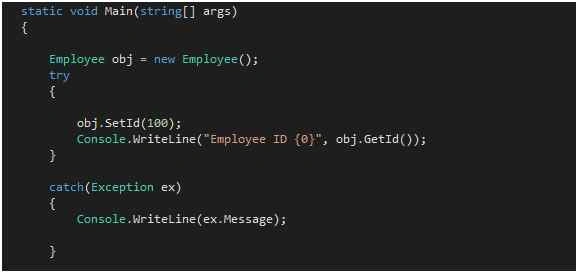
Now we are following the business rules so the output will be,

So now we can see that these methods are allowing us to control over what gets assigned and returned.
Now we will see how in C# we implement Properties in order to hide complexity from the User (Encapsulation).
In order to use a property you have to write the following,
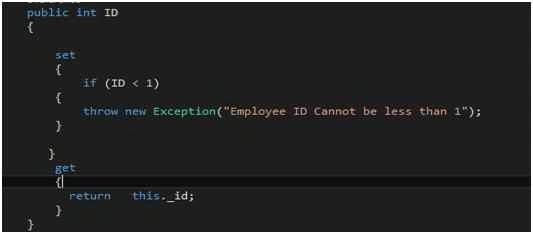
Or we can use code snippet shortcut prop and press tab for the same.


And then create your get and set accessor as above.
Now before as we created the object of Employee class and we called the function getID and setId but now we will not get any method beside no will get ID Property as shown below.
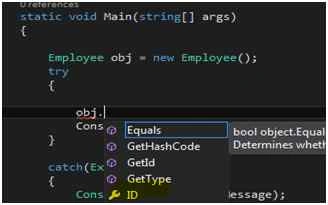
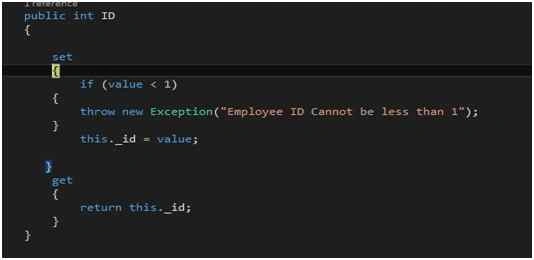
Now how will it be checked once the value of property ID is passed to the set accessor it has keyword called (value).
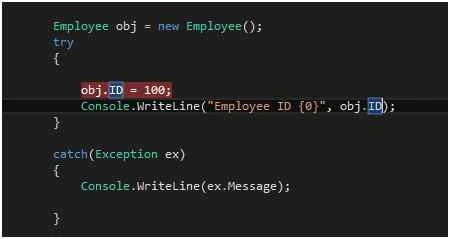
Once the value is assigned to property ID it calls the set accessor as shown below:
And for getting the values of the id we have to just write object name than property name, it invokes the id provided and invokes the get accessor of this property and returns a value which is present in private.
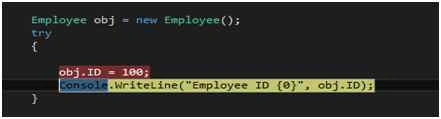

As we can see get and set are Read Write properties, user can write a value to the fields and same he can read the value from the fields.
So what if we want only read only field like pi in maths that is 3.14 or other ready only fields as per business logic.
For this we need to make our property with only get accessor.
E.g. Here I am taking an example of bonus which is same for all employees. In order to make it a read property we will assign only get accessor to it as shown below.
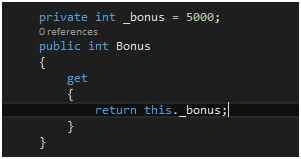
Now if I try and change the property to something else,
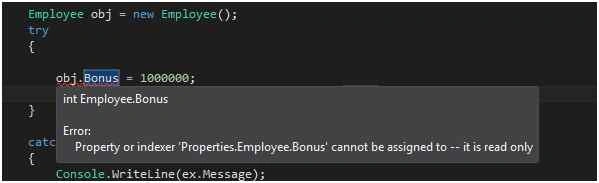
It shows that the value cannot be assigned as it’s a read only property i.e. we can only read the value, not assign them.
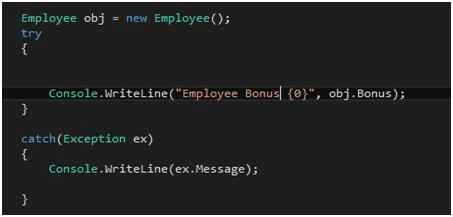

And if in case you want to make a property you want to write only and then you have to use only set accessor.
Auto Implemented Properties: As earlier discussed shortcut for property prop, actually Microsoft introduced auto implemented properties in C# 3.0. For scenarios where we don’t want to inject any logic Eg. City. In Auto Implemented we don’t have to create private fields because compiler will automatically create for us private field and the public property will be used to read and write to that property.
E.g. of Auto Implemented Property.
public int MyProperty { get; set; } //Just one line
Note: In the end I want to end this article saying that the advantage of using properties is that we don’t have to create function for what gets and set in the fields. In properties the compiler on its own generates getter and setter methods as we did earlier before properties when it parses the C# property syntax as per the algorithm defined.
Access Modifiers
All Class members’ behavior, data and class have their accessibility level, which specify that whether they can be accessed from other code in your Assembly.
There are 5 types of different Access Modifiers in C#:
- Private
- Protected
- Friend
- Protected Friend(Protected Internal)
- Public

Image Source: http://dotnethints.com/blogs/public-vs-protected-vs-private
In Private Access modifier only the members of class can access to the function or variable or accessibility level is within the containing class.
For example
We have a Customer Class with two properties.
CustomerID and CustomerName as shown below,
- using System;
- using System.Collections.Generic;
- using System.Linq;
- using System.Text;
- using System.Threading.Tasks;
- namespace AccessModifier
- {
- public class Customer
- {
- private int _id; //declared with private
- private string _CustomerName;
- public int id //public property with get and set accessor
- {
- get
- {
- return id;
- }
- set
- {
- id = value;
- }
- }
- public string CustomerName
- {
- get
- {
- return _CustomerName;
- }
- set
- {
- CustomerName = value;
- }
- }
- }
- }
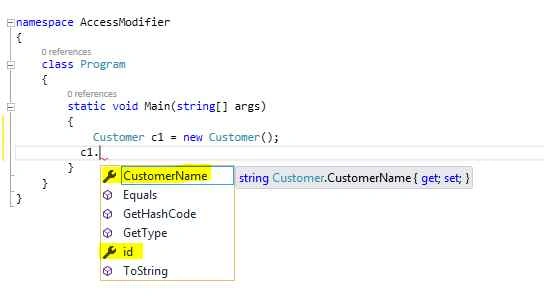
We can only access the Public Properties not private fields.
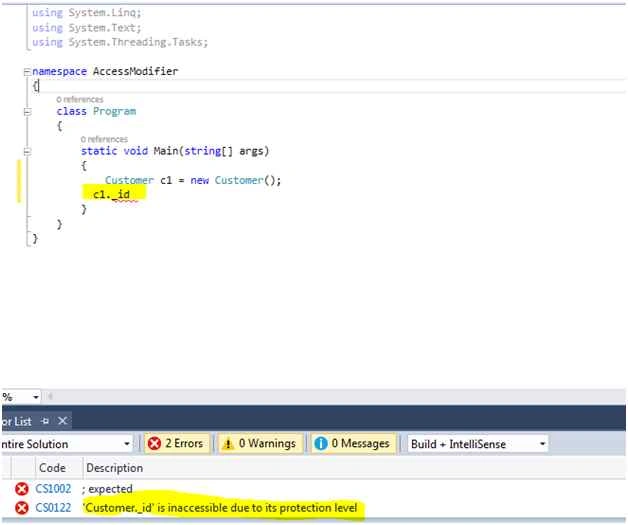
If I try to access the public members there are no errors and we can easily access them.
- namespace AccessModifier
- {
- class Program
- {
- static void Main(string[] args)
- {
- Customer c1 = new Customer();
- c1.id = 1;
- c1.CustomerName = "saillesh";
- }
- }
- }
Protected: In Protected access modifiers all the members of the class are accessible to the class member and to the derived classes.
Now I create two classes one Customer and GoldCustomer. Gold Customer inherits from Customer class as shown below,
- using System;
- namespace AccessModifier
- {
- public class Customer
- {
- protected int _id;
- protected string _CustomerName;
- public int id
- {
- get
- {
- return id;
- }
- set
- {
- id = value;
- }
- }
- public string CustomerName
- {
- get
- {
- return _CustomerName;
- }
- set
- {
- CustomerName = value;
- }
- }
- }
- public class GoldCustomer: Customer
- {
- private float _Discount;
- public float Discount
- {
- get
- {
- return _Discount;
- }
- set
- {
- _Discount = value;
- }
- }
- public void PrintDetails()
- {
- GoldCustomer cust = new GoldCustomer(); //creating object of child class
- cust._id = 1; ///we can access the protected value of parent class
- cust._CustomerName = "Nishant"; //same goes here
- }
- }
- }
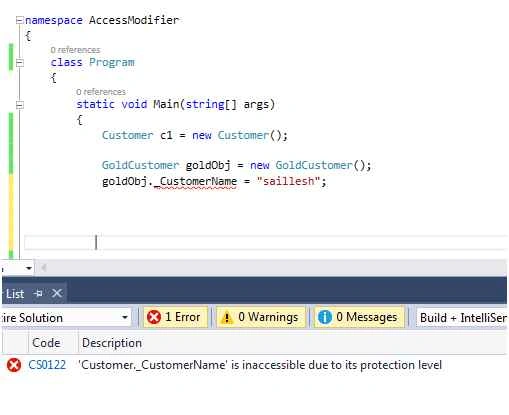
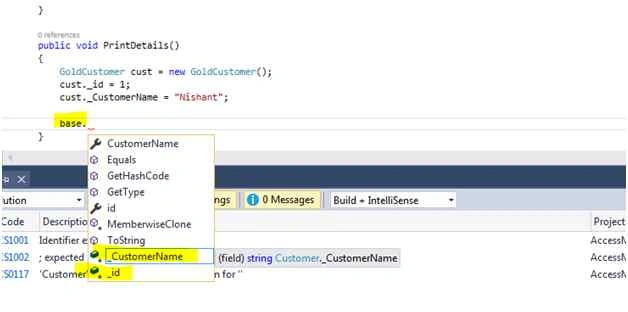
If I try to access it from outside the class we can see that it is inaccessible due to its protection level. So if you want to access the protected class member you can access it from child class using child class object inside a class or using Base keyword.
Friend (Internal): The members with internal access modifiers are available anywhere in the containing project or assembly.
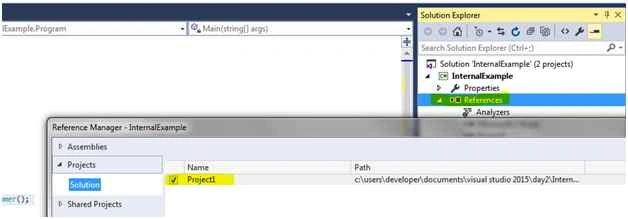
To demonstrate the same we need to add one more project as mentioned below.
Add Class library and Name it Project1.
- using System;
- namespace Project1
- {
- public class SilverCustomer
- {
- internal string CustomerName = "saillesh"; //internal
- }
- public class BronzeCustomer
- {
- public void details()
- {
- SilverCustomer obj = new SilverCustomer(); //we create an instance of Silver Customer
- Console.WriteLine(obj.CustomerName); //we can easily access the member of SilverCustomer
- }
- }
- }
As shown below:
- using System;
- using Project1; //using the Namespace
- namespace InternalExample
- {
- class Program
- {
- static void Main(string[] args)
- {
- SilverCustomer objSilver = new SilverCustomer();
- }
- }
- }
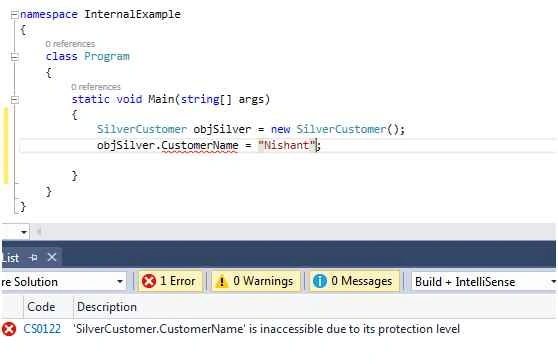
Protected Internal is the combination of both Internal and Protection. All members in current project and all members in derived class in any other project /assembly can access the members. Don’t get confused it means that the class of different project who is inheriting this class will be able to access the member. You can see that as shown below.
Main class of Project1 named as SilverCustomer.
- using System;
- namespace Project1
- {
- public class SilverCustomer
- {
- protected internal string CustomerName = "saillesh";
- }
- }
- using System;
- using Project1; //using the project1 namespace
- namespace InternalExample
- {
- public class PlatinumCustomer: SilverCustomer //inheriting the SilverCustomer Class
- {
- public void details()
- {
- PlatinumCustomer obj = new PlatinumCustomer();
- obj.CustomerName = "Ankit Negi";
- we can see that SilverCustomer protected Intenal member is accessible to other project
- }
- }
- }
Here we complete our day 2. In Day 3 we will take our C# class to next level. If any confusion you can comment for the same. Add on information is heartily welcomed.
Kuppurasu NagarajPosted Apr 9, 2016, 10:47 AM
Nice article..
Kuppurasu NagarajPosted Apr 9, 2016, 10:47 AM
Nice article..
Shailesh UkePosted Feb 23, 2016, 4:45 AM
Nice...
Akash VarshneyPosted Dec 29, 2015, 6:35 AM
Nice Article
Rajesh SinghPosted Dec 27, 2015, 11:44 AM
nice article.
Rashed Bin HaresPosted Dec 12, 2015, 4:19 AM
thank you so much.how i can get all series of this tutorial.
Saillesh PawarPosted Dec 11, 2015, 12:03 PM
Thanks Sibeesh Ji..
Saillesh PawarPosted Dec 11, 2015, 12:03 PM
http://www.c-sharpcorner.com/UploadFile/cb1429/learn-tiny-bit-of-C-Sharp-in-7-days-day-2146/
Sibeesh VenuPosted Dec 11, 2015, 7:06 AM
Nice Share
Raja TPosted Dec 10, 2015, 11:21 PM
Nice explanation, Thanks for sharing
Saillesh PawarPosted Dec 10, 2015, 2:51 PM
Thank You Sir
Ankur MistryPosted Dec 10, 2015, 1:38 PM
Nice explanation, Saillesh.