

Introduction
In this article we see how to bind a GridView with a list collection and also the Join operation on the elements of the list<>. The namespace that we use for the list<> is System.Collection.Generic. The steps are as follows:
Step 1
First start your Visual Studio 2010; click on File->New->Website->click on ASP.Net Website. Select Filesystem in the Web location and give the path where you want to save this application. I give D:\Richa\list.
Step 2
Go to the design view and double-click on the form so that the Page load event is created as:
public partial class list : System.Web.UI.Page
{
protected void Page_Load(object sender, EventArgs e)
{
}
}
In the Page Load event, create the List as a string type, and add some elements in the list using the add() method. In this I use the names of some books as elements of the list as:
public partial class list : System.Web.UI.Page
{
protected void Page_Load(object sender, EventArgs e)
{
//creation of the list
List<string> booklist = new List<string>();
//add some elements in the list
booklist.Add("ASP.NET");
booklist.Add("VB.NET");
booklist.Add("ADO.NET");
booklist.Add("c#");
booklist.Add("SQL 2005");
}
}
Step 3
In the Designing part add some controls like label, textbox and GridView control as:
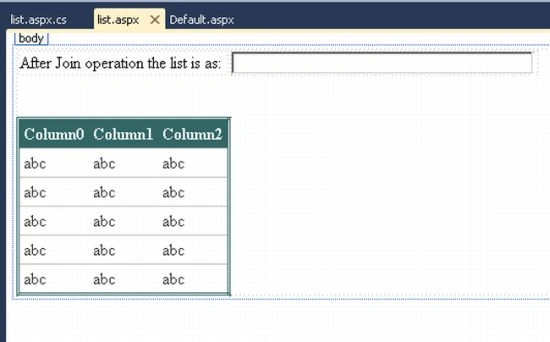
The code for this designing is:
<%@ Page Language="C#" AutoEventWireup="true" CodeFile="list.aspx.cs" Inherits="list" %>
<!DOCTYPE html PUBLIC "-//W3C//DTD XHTML 1.0 Transitional//EN" "http://www.w3.org/TR/xhtml1/DTD/xhtml1-transitional.dtd">
<html xmlns="http://www.w3.org/1999/xhtml">
<head runat="server">
<title></title>
<style type="text/css">
.style1
{
width: 201px;
}
.style2
{
width: 296px;
}
</style>
</head>
<body>
<form id="form1" runat="server">
<div>
<table>
<tr>
<td class="style1">
After Join operation the list is as:
</td>
<td class="style2">
<asp:TextBox ID="TextBox1" runat="server" Width="292px"></asp:TextBox>
</td>
</tr>
</table>
<br />
<asp:GridView ID="GridView1" runat="server" BackColor="White" BorderColor="#336666"
BorderStyle="Double" BorderWidth="3px" CellPadding="4" GridLines="Horizontal">
<FooterStyle BackColor="White" ForeColor="#333333" />
<HeaderStyle BackColor="#336666" Font-Bold="True" ForeColor="White" />
<PagerStyle BackColor="#336666" ForeColor="White" HorizontalAlign="Center" />
<RowStyle BackColor="White" ForeColor="#333333" />
<SelectedRowStyle BackColor="#339966" Font-Bold="True" ForeColor="White" />
<SortedAscendingCellStyle BackColor="#F7F7F7" />
<SortedAscendingHeaderStyle BackColor="#487575" />
<SortedDescendingCellStyle BackColor="#E5E5E5" />
<SortedDescendingHeaderStyle BackColor="#275353" />
</asp:GridView>
</div>
</form>
</body>
</html>
Step 4
Now to bind the GridView with list item and to join the elements of list and display these elements in the textbox write the code as:
public partial class list : System.Web.UI.Page
{
protected void Page_Load(object sender, EventArgs e)
{
//creation of the list
List<string> booklist = new List<string>();
//add some elements in the list
booklist.Add("ASP.NET");
booklist.Add("VB.NET");
booklist.Add("ADO.NET");
booklist.Add("c#");
booklist.Add("SQL 2005");
//bind the GridView
GridView1.DataSource = booklist;
GridView1.DataBind();
//join operation
//ToArray is used to convert the list into the array.
string line = string.Join(", ", booklist.ToArray());
//display the join element in the textbox
TextBox1.Text = line;
}
}
Output is
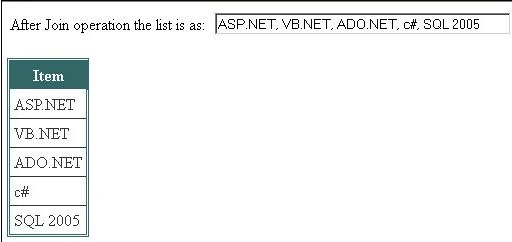
Summary
In this article I explained the concept of the join operation on the list and also display the list's elements in the GridView.
Upendra Pratap ShahiPosted Sep 21, 2015, 8:58 AM
good