

In this article we going to learn how to open a PopUp Control in a Flyout manner in Windows Store Apps using XAML.
Flyouts are great at showing a UI that you don't want on the screen all the time. The user can close a Flyout at any time by simply tapping or clicking outside of it, or by pressing ESC. If users are in control of bringing up a new UI, they must also be in control of dismissing it. When the user makes a selection in the Flyout, the Flyout should be dismissed. To learn more please follow this link:
http://msdn.microsoft.com/en-us/library/windows/apps/hh465341.aspx
Here I will show you an example of using a PopUp control and open it as a Flyout control on the screen in Windows Store Apps.
Followed these Steps.
Step 1
Create a Blank application of Windows Store using XAML.
Step 2
In the MainPage.XAML page write following coding.
<Page
x:Class="popupcontrol.BlankPage1"
xmlns="http://schemas.microsoft.com/winfx/2006/xaml/presentation"
xmlns:x="http://schemas.microsoft.com/winfx/2006/xaml"
xmlns:local="using:popupcontrol"
xmlns:d="http://schemas.microsoft.com/expression/blend/2008"
xmlns:mc="http://schemas.openxmlformats.org/markup-compatibility/2006"
mc:Ignorable="d">
<Grid Background="{StaticResource ApplicationPageBackgroundThemeBrush}">
<Grid>
<StackPanel HorizontalAlignment="Center" Margin="0,50,0,0">
<Button Content="Show Popup Flyout" Click="ShowFlyoutPopup" />
</StackPanel>
<Popup x:Name="logincontrol1" IsOpen="False" IsLightDismissEnabled="True">
<Popup.ChildTransitions>
<TransitionCollection>
<PaneThemeTransition />
</TransitionCollection>
</Popup.ChildTransitions>
<Border BorderBrush="{StaticResource ApplicationForegroundThemeBrush}" BorderThickness="2" Background="{StaticResource ApplicationPageBackgroundThemeBrush}" x:Name="RootPopupBorder">
<StackPanel Orientation="Vertical" Background="Pink" Height="400" x:Name="pop" >
<StackPanel>
<TextBlock Text="Sign In With an Account" HorizontalAlignment="Center" Foreground="White" FontSize="25" Margin="0,20,0,0" />
</StackPanel>
<StackPanel Orientation="Horizontal" Margin="0,50" HorizontalAlignment="Center">
<TextBlock Text="Email Id" Margin="10" Foreground="White" FontSize="25" />
<TextBox x:Name="id" IsSpellCheckEnabled="True" Height="40" Margin="13,1" Width="408" InputScope="EmailSmtpAddress" >
</TextBox>
</StackPanel>
<StackPanel Orientation="Horizontal" HorizontalAlignment="Center">
<TextBlock Text="Password" Foreground="White" FontSize="25" />
<PasswordBox x:Name="pwd" IsPasswordRevealButtonEnabled="True" Height="40" Margin="5,1" Width="408"/>
</StackPanel>
<StackPanel Orientation="Horizontal" Margin="0,30" HorizontalAlignment="Center">
<Button x:Name="loginclick" Foreground="White" Width="100" Content="Login"/>
<Button x:Name="cancel" Foreground="White" Width="100" Content="Cancel" />
</StackPanel>
<StackPanel HorizontalAlignment="Center">
<TextBlock Text=" Sign Up with a new Account" FontSize="25"/>
</StackPanel>
</StackPanel>
</Border>
</Popup>
</Grid>
</Grid>
</Page>
In the above coding we take a button to show the Popup control.
To use the animate like Flyout in the Popup control here I use trasition property of Popup control.
<Popup.ChildTransitions>
<TransitionCollection>
<PaneThemeTransition />
</TransitionCollection>
</Popup.ChildTransitions>
I also use the IsLightDismissEnabled property of the PopUp control. Setting this property gives you the light dismissing behavior of when a user gestures away from your Popup content (either by tapping or clicking on another UI) and your Popup will automatically close.
IsLightDismissEnabled="True"
Step 3
Here is the code of MainPage.cs file in which I open the PopUp control in the button click event:
private void ShowFlyoutPopup(object sender, RoutedEventArgs e)
{
if (!logincontrol1.IsOpen)
{
RootPopupBorder.Width = 646;
logincontrol1.HorizontalOffset = Window.Current.Bounds.Width - 550;
logincontrol1.VerticalOffset = Window.Current.Bounds.Height - 1000;
logincontrol1.IsOpen = true;
}
}
The above code will have to perform these measurements depending on the structure of the apps.
Note: The UI guidelines for a proper "Settings" Flyout are such that it should fill the height of the current Window and be either narrow (346px) or wide (646px).
Step 4
Now, build your app and Run it.
Click on the button. You will see that the Popup is opened as a Flyout from the right side of the windows screen with animated properties.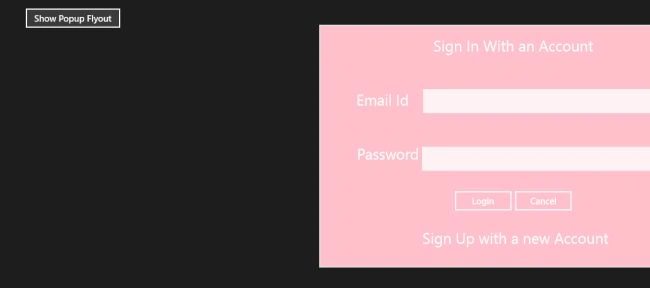
Naveen ChaladiPosted Oct 19, 2015, 7:33 AM
how to display popups for three buttons when they are binded
lavanya geethaPosted Mar 7, 2013, 6:16 AM
Hi , Actually i need to show the Flyout bar as Charm bar. But i cant set the height .please kindly clear me the calculation you done in the button_click method .so i can calculate for my criteria Thanks In Advance
Suresh BadagiPosted Nov 8, 2012, 12:58 AM
Hi Gaurav Good one. Can I use these popups like Toast Notification as toast notifications will be displayed even when if you are in another project.
Suresh BadagieditedPosted Nov 8, 2012, 12:58 AMEdited Nov 8, 2012, 1:01 AM
I can not use toast notifications as it will violate the Windows Store apps rules in my project.
Suresh BadagieditedPosted Nov 8, 2012, 12:58 AMEdited Nov 8, 2012, 12:59 AM
I want to display popups like toast messages