

Sometimes you may need to handle multiple submit buttons on the same form as as in the following screen shot.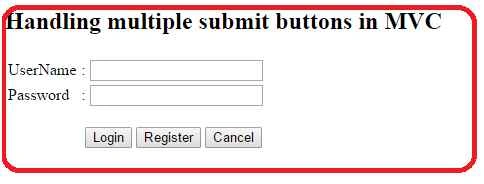
Figure 1: Multiple buttons
In the preceding figure we have the three buttons Login, Register and Cancel. Here each button has different functionality. In this way each submit button will post a form to the server but will provide different values of each button.
Procedure
- Create a controller with one action method that accepts two parameters, one is for the model and the other is for determining the status of the button click.
In the preceding code snippet, assume you clicked on the Login button, then the command parameter will have the values Login, null, null respectively.- [HttpPost]
- public ActionResult Index(Login model, string command)
- {
- if (command=="Login")
- {
- // do stuff
- return RedirectToAction("Home");
- }
- else if (command=="Register")
- {
- // do stuff
- ViewBag.msg = "You have Clicked Register button";
- return View();
- }
- else if (command=="Cancel")
- {
- // do stuff
- ViewBag.msg = "You have Clicked Cancel Button";
- return View();
- }
- else
- {
- return View();
- }
- }
- Create a View for the preceding controller.
You can declare the form tag in another way as in the following:- @model MvcMultipleSubmitButtons.Models.Login
- @{
- ViewBag.Title = "Index";
- }
- <h2>
- Handling multiple submit buttons in MVC </h2>
- <h5 style="color: Red">@ViewBag.msg</h5>
- <form action="Home/Index" id="myform" method="post" >
- //here action name is Index, controller name is Home. So the action path is Home/Index
- <table>
- <tr>
- <td>
- UserName
- </td>
- <td>
- :
- </td>
- <td>@Html.TextBoxFor(m => m.userName)
- </td>
- <td>
- @Html.ValidationMessageFor(m => m.userName)
- </td>
- </tr>
- <tr>
- <td>
- Password
- </td>
- <td>
- :
- </td>
- <td>@Html.TextBoxFor(m => m.password)
- </td>
- <td>
- @Html.ValidationMessageFor(m => m.password)
- </td>
- </tr>
- </table>
- <br/>
- <div style="padding-left: 80px;">
- <input type="submit" id="Login" value="Login" name="Command" title="Login" />
- <input type="submit" id="Register" value="Register" name="Command" title="Register" />
- <input type="submit" value="Cancel" name="Command" title="Cancel" />
- </div>
- </form>
Note: there is a relation between button name and action method parameter. For example, the button name is “Command”, the action parameter name should be “command”.- @using(Html.BeginForm("Index","Home",FormMethod.Post))
- {
- //here action name is Index, controller name is Home and form method is post.
- }
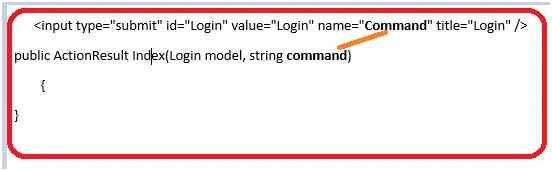
Figure 2
You can have different names for each button. So in that case you need to handle it as in the following:
Controller- <input type="submit" id="Login" value="Login" name="Command1" title="Login" />
- <input type="submit" id="Register" value="Register" name="Command2" title="Register" />
- <input type="submit" value="Cancel" name="Command3" title="Cancel" />
- public ActionResult Index(Login model, string command1, string command2, string command3)
- {
- // here command1 is for Login, command2 is for Register and command3 is for cancel
- }
- Create a Model class with the name Login.
- public class Login
- {
- public string userName { get; set; }
- public string password { get; set; }
- }
Also the source code has been uploaded with this article, it may help you.
@Happy Coding.
Mohammad AmanPosted Jan 12, 2017, 1:02 AM
Its not working ..i have checked all code..but not working
scott baldridgePosted Jul 25, 2016, 9:56 AM
What would cause command to always be null?
DarinPosted Sep 28, 2015, 4:57 AM
Thanx for the code, buddy !!!
Yashwanth MuthineniPosted Aug 19, 2015, 6:16 AM
Nice Share
Santhakumar MunuswamyPosted Aug 12, 2015, 3:03 PM
Good Article. Thanks for sharing
Narasimha Reddy ChennupalliPosted Aug 11, 2015, 6:20 AM
Thanks.. Sibesh
Sibeesh VenuPosted Aug 11, 2015, 6:16 AM
Nice Share
Nihal AhmedPosted Aug 11, 2015, 5:15 AM
Good one...
Karthikeyan KPosted Aug 11, 2015, 3:38 AM
Good one...
Former memberPosted Aug 11, 2015, 3:33 AM
you should show various approach to handle this situations.
Jaipal ReddyPosted Aug 11, 2015, 3:22 AM
good one
Gopi ChandPosted Aug 11, 2015, 1:23 AM
Nice one to share
Debasis SahaPosted Aug 11, 2015, 1:00 AM
Good One..
Rajeesh MenothPosted Aug 11, 2015, 12:56 AM
Good One
Ankit BansalPosted Aug 11, 2015, 12:32 AM
good one...