

Introduction
In this article we are going to explore how to work with collections of items to bind them into a control in a Metro Style App. Further in this we will discuss all the details of how it is possible to bind them. In this article first of all we will take a generic list in which we will add items information. Further we will create some properties about these items such as Name, Model Name and Price; whatever you want to give you can easily do using properties. Further In this section we will see how to bind a collection of business objects to a data control. We will bind data with a Dropdown list. First, we will create an object called Cars of List<> collection type, which is a strongly typed list. Then we will add class objects to this list collection and finally we will bind the object Cars to a Dropdown list with the help of DataContext. If you want to implement this type of functionality in a Metro Style App then you should follow the steps which is given below. Now let's start to work with these controls; see the steps.
Step 1: In this step you will see how to start working with a Metro Style App; let's see the steps, given below:
- Go to Visual Studio 2011
- New->Project->Metro Style App
- Select an application and give it a name as you want to give
- Click OK.

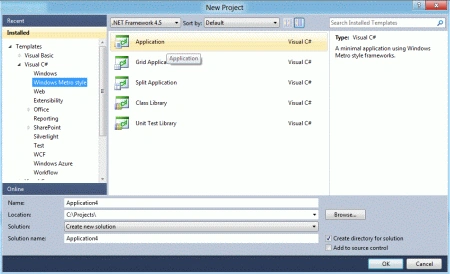
Step 2: In this step we will see a class in which we have defined some properties which is given below.
Code:
public class MyCar
{
public MyCar() { }
public MyCar(string Br_Name, string M_Name, string Mkt_Price)
{
C_Brand = Br_Name;
C_Model = M_Name;
C_Price = Mkt_Price;
}
public string C_Brand { get; set; }
public string C_Model { get; set; }
public string C_Price { get; set; }
// Overriding the ToString method
public override string ToString()
{
return "The Brand New " + C_Brand + " - " + C_Model + ", at price: " + C_Price;
}
}
Step 3: In this step we will see the code for the MainPage.xaml file which is shown below.
Code:
<UserControl x:Class="Myapp.MainPage"
xmlns="http://schemas.microsoft.com/winfx/2006/xaml/presentation"
xmlns:x="http://schemas.microsoft.com/winfx/2006/xaml"
xmlns:d="http://schemas.microsoft.com/expression/blend/2008"
xmlns:mc="http://schemas.openxmlformats.org/markup-compatibility/2006"
mc:Ignorable="d"
d:DesignHeight="768" d:DesignWidth="1366">
<Grid x:Name="ContentPanel" Grid.Row="1" Margin="12,0,12,0">
<Grid.Background>
<LinearGradientBrush EndPoint="0.5,1" StartPoint="0.5,0">
<GradientStop Color="Black"/>
<GradientStop Color="#FF20A089" Offset="1"/>
</LinearGradientBrush>
</Grid.Background>
<ComboBox x:Name="cboCars" ItemsSource="{Binding}"
Foreground="#FFD3001D" FontSize="30" Height="50" Width="780">
<ComboBox.Background>
<LinearGradientBrush EndPoint="0.5,1" StartPoint="0.5,0">
<GradientStop Color="Black"/>
<GradientStop Color="#FF227DBB" Offset="0.182"/>
</LinearGradientBrush>
</ComboBox.Background>
</ComboBox>
</Grid>
</UserControl>
Step 4: In this step we will see the code for the MainPage.xaml.cs file which is shown below.
Code:
using System;
using System.Collections.Generic;
using System.Linq;
using System.Threading.Tasks;
using Windows.Foundation;
using Windows.UI.Xaml;
using Windows.UI.Xaml.Controls;
using Windows.UI.Xaml.Data;
namespace Myapp
{
partial class MainPage
{
public List<MyCar> Cars = new List<MyCar>();
public MainPage()
{
InitializeComponent();
// Add items to the collection.
Cars.Add(new MyCar("Ferrari", "F1", "$222000"));
Cars.Add(new MyCar("Tata", "Safari", "630000"));
Cars.Add(new MyCar("Hyundai", "Santro", "422000"));
Cars.Add(new MyCar("Tata", "Nano", "122000"));
Cars.Add(new MyCar("Toyota", "Fortuner", "2322000"));
Cars.Add(new MyCar("Honda", "SX4", "622000"));
// Set the data context for the combo box.
cboCars.DataContext = Cars;
}
// A Business object of a Car
public class MyCar
{
public MyCar() { }
public MyCar(string Br_Name, string M_Name, string Mkt_Price)
{
C_Brand = Br_Name;
C_Model = M_Name;
C_Price = Mkt_Price;
}
public string C_Brand { get; set; }
public string C_Model { get; set; }
public string C_Price { get; set; }
// Overriding the ToString method
public override string ToString()
{
return "The Brand New " + C_Brand + " - " + C_Model + ", at price: " + C_Price;
}
}
}
}
Step 5: In this step we are going to run the application by pressing F5 and the output regarding it is given below.
Output 1:

Output 2:
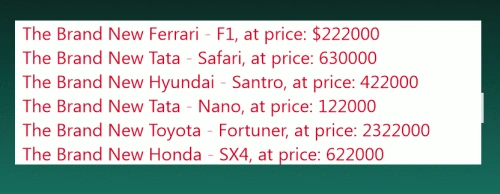
Output 3:
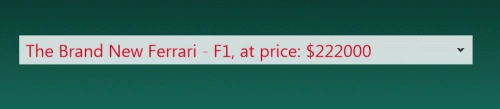
Output 4:

Here are some other resources which may help you
Windows 8: Adding Shortcuts to Metro UI
Introduction to Windows 8 Metro Style Application
Windows 8 Metro Application Development
Binding and Defining Layout Through XAML in Metro Style Application
Nachiappan MPosted Mar 17, 2013, 1:06 PM
Hi.I'm developing an win8 app using c# and xaml.Im in a confusion in adding contents to a combobox from a sqlite DB.Pls help me with query to add content to combobox using sqlite query.
Deepak DwijPosted Mar 26, 2012, 4:58 PM
Nice representation as always Amit ! Keep it up