
Introduction
It is a very simple concept to support landscape mode or portrait mode in applications. For this, you will need to create a folder named "layout-land". In the layout-land folder, you will paste the same XML file present in your layout folder (activity_main.xml). So when we change the layout to landscape mode it will automatically take the XML file from the layout-land folder.
Step 1
Create an XML file inside the layout folder and write the following:
- <LinearLayout xmlns:android="http://schemas.android.com/apk/res/android"
- xmlns:tools="http://schemas.android.com/tools"
- android:layout_width="match_parent"
- android:layout_height="match_parent"
- tools:context=".MainActivity"
- android:orientation="horizontal">
- <LinearLayout
- android:layout_height="wrap_content"
- android:layout_width="wrap_content"
- android:orientation="vertical">
- <Button
- android:id="@+id/button1"
- android:layout_height="wrap_content"
- android:layout_width="wrap_content"
- android:text="@string/about"
- android:background="#ffffff">
- </Button>
- <Button
- android:id="@+id/button2"
- android:layout_height="wrap_content"
- android:layout_width="72dp"
- android:text="@string/help"
- android:background="#ffffff">
- </Button>
- </LinearLayout>
- <ImageView
- android:layout_height="352dp"
- android:layout_width="wrap_content"
- android:src="@drawable/socialnetwork"
- android:paddingLeft="20dp">
- </ImageView>
- </LinearLayout>
Step 2
Create the same XML file inside the layout-land folder and write the following:
- <LinearLayout xmlns:android="http://schemas.android.com/apk/res/android"
- xmlns:tools="http://schemas.android.com/tools"
- android:layout_width="match_parent"
- android:layout_height="match_parent"
- tools:context=".MainActivity"
- android:orientation="horizontal">
- <LinearLayout
- android:layout_height="wrap_content"
- android:layout_width="wrap_content"
- android:orientation="vertical">
- <Button
- android:layout_height="wrap_content"
- android:layout_width="wrap_content"
- android:text="@string/about"
- android:background="#ffffff">
- </Button>
- <Button
- android:layout_height="wrap_content"
- android:layout_width="72dp"
- android:text="@string/help"
- android:background="#ffffff">
- </Button>
- </LinearLayout>
- <ImageView
- android:layout_height="352dp"
- android:layout_width="wrap_content"
- android:src="@drawable/socialnetwork"
- android:paddingLeft="20dp">
- </ImageView>
- </LinearLayout>
Step 3
Create another XML file for another activity.
Step 4
Create a Java file and write the following:
- <?xml version="1.0" encoding="utf-8"?>
- <LinearLayout xmlns:android="http://schemas.android.com/apk/res/android"
- android:orientation="vertical"
- android:layout_width="match_parent"
- android:layout_height="match_parent">
- <TextView
- android:layout_height="wrap_content"
- android:layout_width="wrap_content"
- android:id="@+id/textview"
- android:textSize="50dp">
- </TextView>
- </LinearLayout>
- package com.supportdifferentscreensizes;
- import android.content.Intent;
- import android.os.Bundle;
- import android.app.Activity;
- import android.view.Menu;
- import android.view.View;
- import android.widget.Button;
- public class MainActivity extends Activity
- {
- Button button1, button2;
- @Override
- public void onCreate(Bundle savedInstanceState)
- {
- super.onCreate(savedInstanceState);
- setContentView(R.layout.activity_main);
- button1 = (Button) findViewById(R.id.button1);
- button2 = (Button) findViewById(R.id.button2);
- button1.setText(R.string.about);
- button2.setText(R.string.help);
- button2.setOnClickListener(new View.OnClickListener()
- {
- @Override
- public void onClick(View view)
- {
- Intent i = new Intent(MainActivity.this, Second.class);
- Bundle b = new Bundle();
- String s = getResources().getString(R.string.help);
- b.putString("1", s);
- i.putExtras(b);
- startActivity(i);
- }
- });
- }
- @Override
- public boolean onCreateOptionsMenu(Menu menu)
- {
- // Inflate the menu; this adds items to the action bar if it is present.
- getMenuInflater().inflate(R.menu.main, menu);
- return true;
- }
- }
Step 4
Create another Java class file and write the following:
- package com.supportdifferentscreensizes;
- import android.app.Activity;
- import android.content.Intent;
- import android.os.Bundle;
- import android.widget.TextView;
- /**
- * Created by vivek on 8/26/13.
- */
- public class Second extends Activity
- {
- public void onCreate(Bundle savedInstanceState)
- {
- super.onCreate(savedInstanceState);
- setContentView(R.layout.second);
- TextView textview = (TextView) findViewById(R.id.textview);
- Intent i = getIntent();
- Bundle b = i.getExtras();
- String text = b.getString("1");
- textview.setText(text);
- }
- }
Step 5
Create a string.xml file inside the value-es (res\value-es) folder to support Spanish language as in the following:
- <?xml version="1.0" encoding="utf-8"?>
- <resources>
- <string name="app_name">SupportDifferentScreenSizes</string>
- <string name="action_settings">Settings</string>
- <string name="about">acerca de</string>
- <string name="help">ayudar</string>
- </resources>
Step 6
In the string.xml file inside the value (res\value) folder add support for language as in the following:
- <?xml version="1.0" encoding="utf-8"?>
- <resources>
- <string name="app_name">SupportDifferentScreenSizes</string>
- <string name="action_settings">Settings</string>
- <string name="about">About</string>
- <string name="help">Help</string>
- </resources>
Step 7
Change an Android Manifest.xml file as in the following:
- <?xml version="1.0" encoding="utf-8"?>
- <manifest xmlns:android="http://schemas.android.com/apk/res/android"
- package="com.supportdifferentscreensizes"
- android:versionCode="1"
- android:versionName="1.0" >
- <uses-sdk
- android:minSdkVersion="7"
- android:targetSdkVersion="16" />
- <application
- android:allowBackup="true"
- android:icon="@drawable/ic_launcher"
- android:label="@string/app_name"
- android:theme="@style/AppTheme" >
- <activity
- android:name="com.supportdifferentscreensizes.MainActivity"
- android:label="@string/app_name" >
- <intent-filter>
- <action android:name="android.intent.action.MAIN" />
- <category android:name="android.intent.category.LAUNCHER" />
- </intent-filter>
- </activity>
- <activity
- android:name=".Second">
- </activity>
- </application>
- </manifest>
Step 8
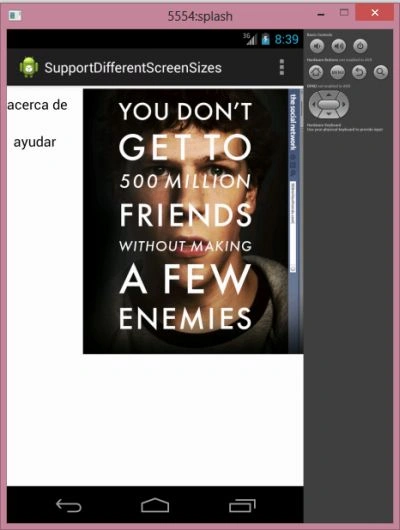
In portrait mode:
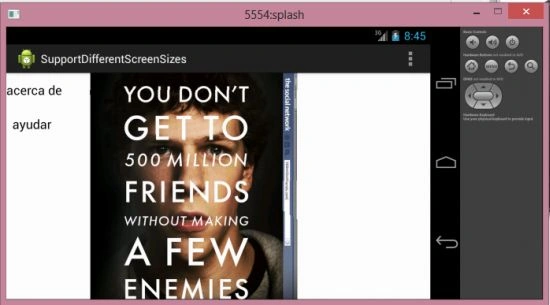
 In landscape mode:
Join the conversation! Your thoughts help the community grow.