How to access controls of one screen from another screen using LightSwitch in Visual Studio 2012
This article describes how to access controls of one screen from another screen using LightSwitch in Visual Studio 2012. We have taken two screens; the first screen has a button that when it is clicked a new button is created on another screen.
Procedure for accessing controls of one screen from another screen.
Step 1
- Open Visual Studio 2012.
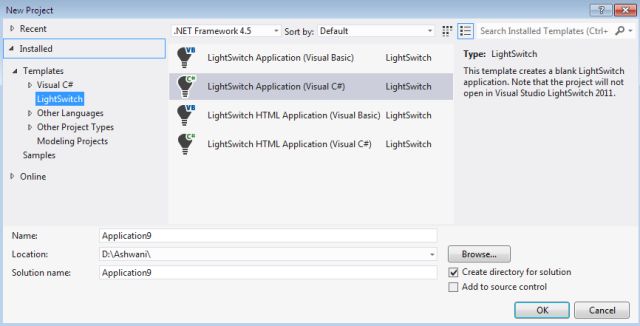
- Go to "File" => "New" => "Project..."
- In "New Project" => "Installed" => "Template"
- In "Template" => "LightSwitch"
- Select "LightSwitch Application (Visual C#)".
- Enter the name and choose the location.
- Click "OK".

Step 2
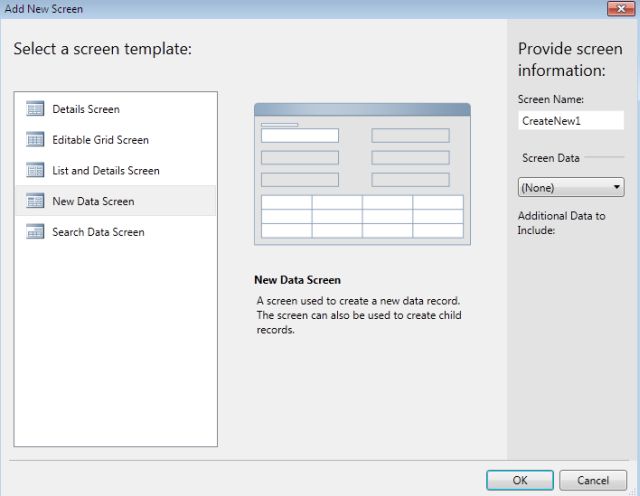
Go to Solution Explorer, right-click on the Screens and select "Add Screen".

In this way we will add another screen.
![create another.jpg]()
Here we create two data screens without a table.
Step 3
For the screen the application designer appears:
![app desi.jpg]()
Step 4
To hold a dynamic button we need to add a holder, therefore add a canvas to the Screen.
For adding a canvas we will click on the drop down list and select a New Custom Control as shown:
![app des drop down.jpg]()
Step 5
The Add Custom Control Dialog Box appears. From this you can specify the control that you want to add. Here I am using a canvas.
![add custom ctrl.jpg]()
Step 6
After adding the Custom Control, the application designer will appear as in the following:
![app designer after custom ctrl.jpg]()
Step 7
Right-click on the Screen Command Bar and choose Add Button.
![add button.jpg]()
Step 8
The Add Button dialog box appears.
![add button dialog.jpg]()
Step 9
From the Add Button choose New Method and enter "AddControl" in the Name TextBox.
![add control.jpg]()
Step 10
The Add Control Application Designer will appear as in the following:
![add control app designer.jpg]()
Step 11
In the same manner you can add another button named Remove Button.
![removecontrol.jpg]()
Step 12
In the application designer, right-click on add controls and choose Edit Execute code.
![add edit execute code.jpg]()
Step 13
We will do the following code to add a control method to create another screen:
using System;
using System.Linq;
using System.IO;
using System.IO.IsolatedStorage;
using System.Collections.Generic;
using Microsoft.LightSwitch;
using Microsoft.LightSwitch.Framework.Client;
using Microsoft.LightSwitch.Presentation;
using Microsoft.LightSwitch.Presentation.Extensions;
using Microsoft.LightSwitch.Client;
using System.Windows.Controls;
namespace LightSwitchApplication
{
public partial class Createanother
{
partial void AddControl_Execute()
{
// Write your code here.
IList<IActiveScreen> screens = Application.ActiveScreens;
IActiveScreen anotherscr = screens.Single(scr => scr.GetName() == "AnotherScreen");
anotherscr.Screen.FindControl("ScreenContent").ControlAvailable+=(s,e)=>
{
Canvas Panel = e.Control as Canvas;
Button btn = new Button();
btn.Name = "NewButton";
btn.Content = "Click Me";
if (Panel.FindName("NewButton") == null)
{
Panel.Children.Add(btn);
}
anotherscr.Activate();
};
}
}
}
Step 14
Similarily we will do the following code to remove the control method that creates a new screen:
using System;
using System.Windows;
using System.Linq;
using System.IO;
using System.IO.IsolatedStorage;
using System.Collections.Generic;
using Microsoft.LightSwitch;
using Microsoft.LightSwitch.Framework.Client;
using Microsoft.LightSwitch.Presentation;
using Microsoft.LightSwitch.Presentation.Extensions;
using System.Windows.Controls;
using Microsoft.LightSwitch.Client;
namespace LightSwitchApplication
{
public partial class CreateNew
{
partial void RemoveControl_Execute()
{
this.FindControl("ScreenContent").ControlAvailable += (s, e) =>
{
Canvas Panel = e.Control as Canvas;
if (Panel.FindName("NewButton") != null)
{
Panel.Children.Remove(Panel.FindName("NewButton") as UIElement);
}
};
}
}
}
While clicking the "RemoveControl" button, the code above will remove the button from the "AnotherScreen" screen.