

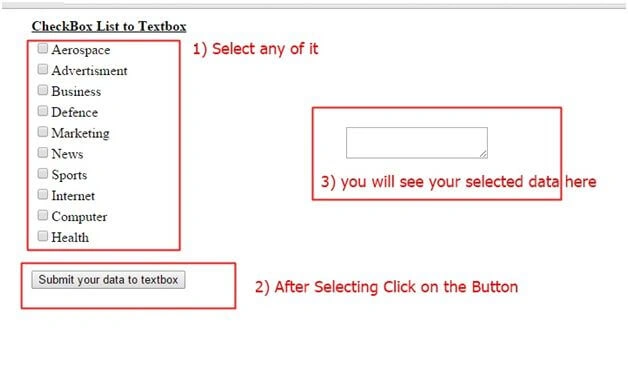
We took one bound checkboxlist and a TextBox. When the user checked a checkbox and clicks the button for it, the selected data will be entered into the TextBox.
Initial Chamber
Step 1
Open your Visual Studio 2010 and create an Empty Website, provide a suitable name (CheckBoxList_demo).
Step 2
In Solution Explorer you get your empty website, then add two web forms and a SQL Server Database as in the following.
For Web Form:
CheckBoxList_demo (your empty website) then right-click then select Add New Item -> Web Form. Name it Autocomplete_demo.aspx.
For SQL Server Database
CheckBoxList_demo (your empty website) then right-click then select Add New Item -> SQL Server Database. (Add a database inside the App_Data_folder).
DATABASE CHAMBER
Step 3
In Server Explorer, click on your database (Database.mdf) then select Tables -> Add New Table. Make the table like this.
Table tbl_data (Don't forget to make ID as IS Identity -- True).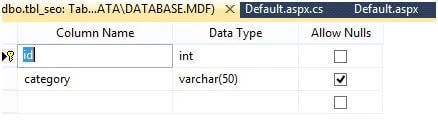
We had embed some data in the table tbl_seo. To do that just go to your table then right-click then select Show Table Data then enter your data in the given field.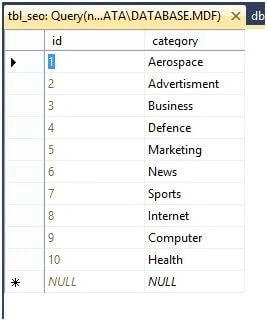
Design Chamber
Step 4
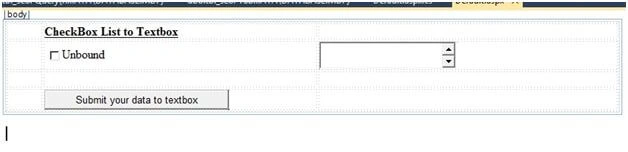
Open your CheckBoxList_demo.aspx file from Solution Explorer and start designing you're application as in the following:
- <%@PageLanguage="C#"AutoEventWireup="true"CodeFile="Default.aspx.cs"Inherits="_Default"%>
- <!DOCTYPEhtmlPUBLIC"-//W3C//DTD XHTML 1.0 Transitional//EN""http://www.w3.org/TR/xhtml1/DTD/xhtml1-transitional.dtd">
- <html
- xmlns="http://www.w3.org/1999/xhtml">
- <headrunat="server">
- <title></title>
- <styletype="text/css">
- .style2
- {
- width: 358px;
- }
- .style3
- {
- width: 44px;
- }
- .style4
- {
- width: 358px;
- text-decoration: underline;
- font-size: medium;
- }
- </style>
- </head>
- <body>
- <formid="form1"runat="server">
- <div>
- <tablestyle="width:100%;">
- <tr>
- <tdclass="style3">
- </td>
- <tdclass="style4">
- <strong>CheckBox List to Textbox</strong>
- </td>
- <td>
- </td>
- </tr>
- <tr>
- <tdclass="style3">
- </td>
- <tdclass="style2">
- <asp:CheckBoxListID="CheckBoxList1"runat="server"DataTextField="category"
- DataValueField="category">
- </asp:CheckBoxList>
- </td>
- <td>
- <asp:TextBoxID="txtmsg"runat="server"TextMode="MultiLine">
- </asp:TextBox>
- </td>
- </tr>
- <tr>
- <tdclass="style3">
- </td>
- <tdclass="style2">
- </td>
- <td>
- </td>
- </tr>
- <tr>
- <tdclass="style3">
- </td>
- <tdclass="style2">
- <asp:ButtonID="Button1"runat="server"onclick="Button1_Click"
- Text="Submit your data to textbox"/>
- </td>
- <td>
- </td>
- </tr>
- </table>
- </div>
- </form>
- </body>
- </html>
Code Chamber
Finally open your CheckBoxList_demo.aspx.cs file to write the code, so that the application works.
Here is the code:
- using System;
- usingSystem.Collections.Generic;
- usingSystem.Linq;
- usingSystem.Web;
- usingSystem.Web.UI;
- usingSystem.Web.UI.WebControls;
- usingSystem.Data;
- usingSystem.Data.SqlClient;
- publicpartialclass_Default : System.Web.UI.Page
- {
- protectedvoidPage_Load(object sender, EventArgs e)
- {
- if (!Page.IsPostBack)
- {
- SqlConnection con = newSqlConnection(@"Data Source=.\SQLEXPRESS;AttachDbFilename=|DataDirectory|\Database.mdf;Integrated Security=True;User Instance=True");
- SqlCommandcmd = newSqlCommand("select * from tbl_seo", con);
- SqlDataAdaptersda = newSqlDataAdapter(cmd);
- DataTabledt = newDataTable();
- sda.Fill(dt);
- CheckBoxList1.DataSource = dt;
- CheckBoxList1.DataBind();
- }
- }
- protectedvoid Button1_Click(object sender, EventArgs e)
- {
- for (inti = 0; i< CheckBoxList1.Items.Count; i++)
- {
- if (CheckBoxList1.Items[i].Selected)
- {
- txtmsg.Text += CheckBoxList1.Items[i].Text + ",";
- }
- }
- txtmsg.ForeColor = System.Drawing.Color.MediumVioletRed;
- }
- }
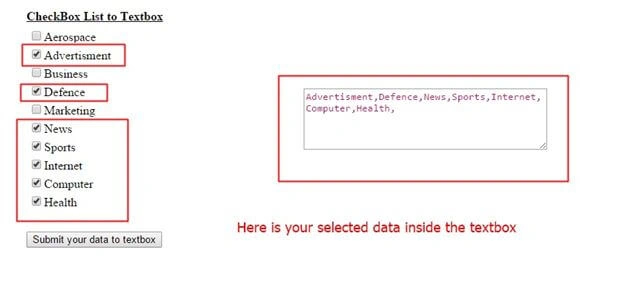
I hope you like it. Thank you for reading. Have a good day.
Bhavesh VankarPosted Mar 5, 2022, 10:38 AM
Nice and useful article,,, but here is one issue ther is appear comma after text or value which is display in textbox what to do if we need comma in between value or text like ... 1,2,3 comma should not be display after text like ,1,2,3,
Arul RPosted Oct 28, 2015, 5:38 AM
Good one !!!
Govinda Rajulu YemineniPosted Jul 17, 2015, 2:47 AM
Nice One
Narasimha Reddy ChennupalliPosted Jul 12, 2015, 10:04 AM
Nice one.
Neeraj KumarPosted Jul 12, 2015, 9:34 AM
Good
Sibeesh VenuPosted Jul 12, 2015, 8:13 AM
Nice share
Gopi ChandPosted Jul 12, 2015, 5:39 AM
Well done
RakeshPosted Jul 12, 2015, 3:36 AM
Good one
Rakesh KalluriPosted Jul 12, 2015, 2:45 AM
good onee.
Abhishek YadavPosted Jul 12, 2015, 1:07 AM
Nice work Nilesh... (Y)
Pankaj Kumar ChoudharyPosted Jul 11, 2015, 11:55 PM
Nice way of Explanation........