Introduction:
As we know, Silverlight has limitations for accessing files from local drives. In this article, we will see how to read and write files anywhere in local drives.
Creating OOB Silverlight Application:
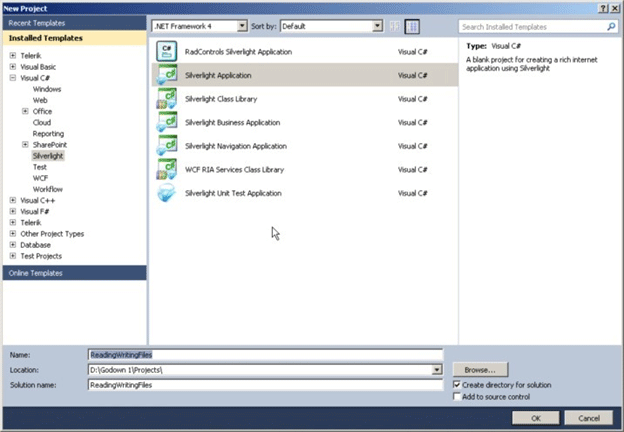
Fire up VS 2010 and create a Silverlight Application with the name ReadingWritingFiles.

Setting for OOB Silverlight Application:
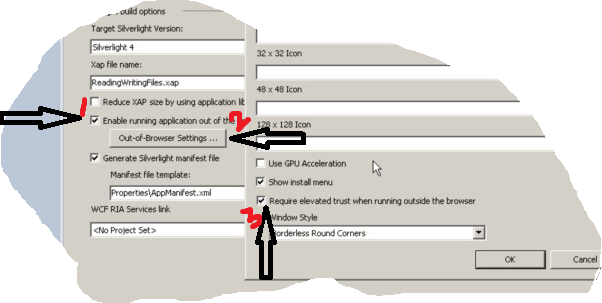
The settings for OOB application is given here.

First, go to the Project Properties -> Silverlight.
As shown above select the checkbox marked as 1 and click the Out-Of-BrowserSettings button it will pop up a window. In that Out-Of-BrowserSettings window select the Require elevated trust when running outside the browser which makes the Silverlight application to access the local files (My Documents, My Music etc.).
Now our OOB Application is ready to have the feature of reading and writing local files.
Designing the Silverlight OOB Application:
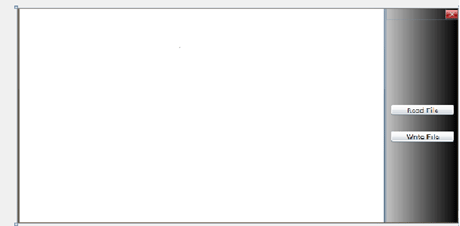
Design the Application as per the image given below.

Else, use the XAML code to produce the above design.
<Grid x:Name="LayoutRoot" Width="695">
<Grid.Background>
<LinearGradientBrush EndPoint="1,0.5" StartPoint="0,0.5">
<GradientStop Color="Black" Offset="1" />
<GradientStop Color="White" Offset="0.785" />
</LinearGradientBrush>
</Grid.Background>
<Grid.ColumnDefinitions>
<ColumnDefinition Width="*" />
<ColumnDefinition Width="115" />
</Grid.ColumnDefinitions>
<Border>
<StackPanel Orientation="Vertical" Grid.Column="0" Background="Transparent">
<RichTextBox Name="rtbContent" Height="405" ScrollViewer.VerticalScrollBarVisibility="Auto" ScrollViewer.HorizontalScrollBarVisibility="Auto" >
</RichTextBox>
</StackPanel>
</Border>
<Border Grid.Column="1">
<StackPanel Orientation="Vertical" >
<StackPanel Orientation="Vertical" Height="20">
<Image Name="imgClose" Width="20" Height="20" HorizontalAlignment="Right" MouseLeftButtonDown="imgClose_MouseLeftButtonDown" Source="/ReadingWritingFiles;component/Image/close.png"></Image>
</StackPanel>
<Button Content="Read File" Name="btnReadFile" Width="100" Height="20" Margin="0,160,0,0" Click="ReadFileFromLocalDrive"></Button>
<Button Content="Write File" Name="btnWriteFile" Width="100" Height="20" Margin="0,30,0,0" Click="WriteFileToLocalDrive"></Button>
</StackPanel>
</Border>
</Grid>
Reading Files from Local Drives :
Using the OpenFileDialog class, we are accessing the files from Local Drives. We cannot access the root path of file but we can access the file as a Stream using the following piece of code.
When you call the ShowDialog method in OpenFileDialog it will show the OpenFileDialog so that Silverlight gives the access permission to the files from anywhere in the local drives like from C:\ or D:\ etc.
However, when you try to access the root path of the file or when you try to access the files using the root path like c:\SomeFolder\SomeFile.txt at the time it will throw error.

The above code uses the method OpenRead () to read the stream of the file.
Writing Files to Local Drives:

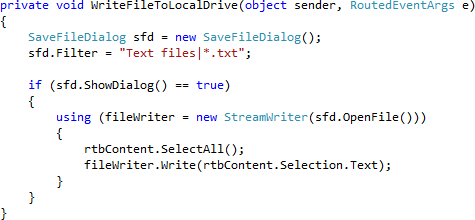
As the image shown above, we can write the file in local drive with the help of SaveFileDialog.
The OpenFile() file method will open a text file in the selected folder to write the content.
Here we have used the RichTextBox to show the content of the text file and save the content to the File.
Summary:
In conclusion, we can access the files anywhere in the system using OpenFileDialog and SaveFileDialog in Silverlight 4.
Please provide your valuable feedbacks and suggestions. Thanks in Advance.