
Introduction
This article describes how you can make your background customizable in Windows Phone 7. In this article we'll see how color and image will change upon the click of a radiobutton.
Getting Started
Step 1:
Open new Windows Phone Application named CustoBackGround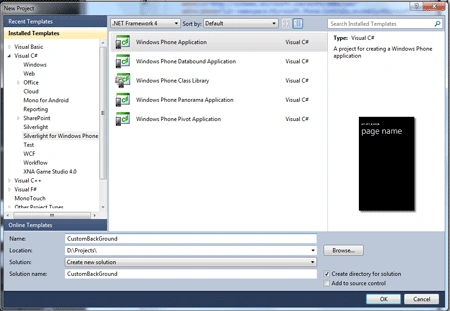
First we design the application by go to MainPage.xaml file, we added RadioButton's, TextBlock's, Button and PasswordBox. The RadioButton has event's handlers to manage selected states. When the RadioButton is selected, the background of the page will be change automatically according to the RadioButton event.
Step 2:
Go to
MainPage.xaml file and drag
and drop five TextBlock's, six RadioButton's, one TextBox, one PassworBox and
one Button. Arrange all the controls according to there positions looks like
below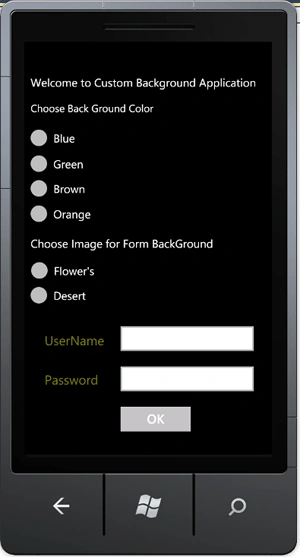
Here is the complete code of
MainPage.xaml
file
<phone:PhoneApplicationPage
x:Class="CustomBackground.MainPage"
xmlns="http://schemas.microsoft.com/winfx/2006/xaml/presentation"
xmlns:x="http://schemas.microsoft.com/winfx/2006/xaml"
xmlns:phone="clr-namespace:Microsoft.Phone.Controls;assembly=Microsoft.Phone"
xmlns:shell="clr-namespace:Microsoft.Phone.Shell;assembly=Microsoft.Phone"
xmlns:d="http://schemas.microsoft.com/expression/blend/2008"
xmlns:mc="http://schemas.openxmlformats.org/markup-compatibility/2006"
mc:Ignorable="d"
d:DesignWidth="480"
d:DesignHeight="768"
FontFamily="{StaticResource
PhoneFontFamilyNormal}"
FontSize="{StaticResource
PhoneFontSizeNormal}"
Foreground="{StaticResource
PhoneForegroundBrush}"
SupportedOrientations="Portrait"
Orientation="Portrait"
shell:SystemTray.IsVisible="True">
<Grid
x:Name="PhoneBackGround"
Background="Transparent">
<TextBlock
Height="69"
HorizontalAlignment="Left"
Margin="12,31,0,0"
Name="textBlock1"
Text="Welcome
to Custom Background Application"
FontSize="22"
VerticalAlignment="Top"
Width="444"
/>
<TextBlock
Height="30"
HorizontalAlignment="Left"
Margin="12,82,0,0"
Name="textBlock2"
Text="Choose
Back Ground Color"
VerticalAlignment="Top"
Width="381"
/>
<RadioButton
Content="Blue"
Height="72"
HorizontalAlignment="Left"
Margin="0,118,0,0"
Name="BlueButton"
VerticalAlignment="Top"
BorderThickness="0"
FontSize="22"
Checked="BlueButton_Checked"
/>
<RadioButton
Content="Green"
Height="72"
HorizontalAlignment="Left"
Margin="0,168,0,0"
Name="GreenButton"
VerticalAlignment="Top"
BorderThickness="0"
FontSize="22"
Checked="GreenButton_Checked"
/>
<RadioButton
Content="Brown"
Height="72"
HorizontalAlignment="Left"
Margin="0,216,0,0"
Name="BrownButton"
VerticalAlignment="Top"
BorderThickness="0"
FontSize="22"
Checked="BrownButton_Checked"
/>
<RadioButton
Content="Orange"
Height="72"
HorizontalAlignment="Left"
Margin="0,265,0,0"
Name="OrangeButton"
VerticalAlignment="Top"
BorderThickness="0"
FontSize="22"
Checked="OrangeButton_Checked"
/>
<TextBlock
Height="56"
HorizontalAlignment="Left"
Margin="12,343,0,0"
Name="textBlock3"
Text="Choose
Image for Form BackGround"
VerticalAlignment="Top"
FontSize="22"
Width="422"
/>
<RadioButton
Content="Flower's"
Height="72"
HorizontalAlignment="Left"
Margin="1,375,0,0"
Name="FlowerButton"
VerticalAlignment="Top"
BorderThickness="0"
FontSize="22"
Checked="FlowerButton_Checked"
/>
<RadioButton
Content="Desert"
Height="72"
HorizontalAlignment="Left"
Margin="0,423,0,0"
Name="DesertButton"
VerticalAlignment="Top"
BorderThickness="0"
FontSize="22"
Checked="DesertButton_Checked"
/>
<Grid
Height="255"
HorizontalAlignment="Left"
Margin="12,501,0,0"
Name="LoginForm"
VerticalAlignment="Top"
Width="456">
<TextBlock
Height="30"
HorizontalAlignment="Left"
Margin="27,28,0,0"
Name="textBlock4"
Text="UserName"
VerticalAlignment="Top"
FontSize="25"
Foreground="Olive"
/>
<TextBlock
Height="30"
HorizontalAlignment="Left"
Margin="27,104,0,0"
Name="textBlock5"
Text="Password"
VerticalAlignment="Top"
FontSize="25"
Foreground="Olive"
/>
<TextBox
Height="72"
HorizontalAlignment="Right"
Margin="0,6,12,0"
Name="textBox1"
VerticalAlignment="Top"
Width="282"
Background="White" />
<PasswordBox
Height="72"
HorizontalAlignment="Left"
Margin="162,84,0,0"
Name="passwordBox1"
VerticalAlignment="Top"
Width="282"
Background="White"
/>
<Button
Content="OK"
Height="72"
HorizontalAlignment="Left"
Margin="162,162,0,0"
Name="button1"
VerticalAlignment="Top"
Width="160"
BorderThickness="0"
Background="Silver"
/>
</Grid>
</Grid>
</phone:PhoneApplicationPage>
Now Come to the code
Step 3:
Go
to
MainPage.xaml.cs file and modify
the code like below
|
using
System;
using
System.Collections.Generic;
using
System.Linq;
using
System.Net;
using
System.Windows;
using
System.Windows.Controls;
using
System.Windows.Documents;
using
System.Windows.Input;
using
System.Windows.Media;
using
System.Windows.Media.Animation;
using
System.Windows.Shapes;
using
Microsoft.Phone.Controls;
using
System.Windows.Media.Imaging;
namespace
CustomBackground
{
public partial
class MainPage
: PhoneApplicationPage
{
// Constructor
public MainPage()
{
InitializeComponent();
}
private void
BlueButton_Checked(object sender,
RoutedEventArgs e)
{
PhoneBackGround.Background = new
SolidColorBrush(Colors.Blue);
}
private void
GreenButton_Checked(object sender,
RoutedEventArgs e)
{
PhoneBackGround.Background = new
SolidColorBrush(Colors.Green);
}
private void
BrownButton_Checked(object sender,
RoutedEventArgs e)
{
PhoneBackGround.Background = new
SolidColorBrush(Colors.Brown);
}
private void
OrangeButton_Checked(object sender,
RoutedEventArgs e)
{
PhoneBackGround.Background = new
SolidColorBrush(Colors.Orange);
}
private void
FlowerButton_Checked(object sender,
RoutedEventArgs e)
{
BitmapImage bitmapImage =
new BitmapImage(new
Uri("Images/Flower.jpg",
UriKind.Relative));
ImageBrush imageBrush =
new ImageBrush();
imageBrush.ImageSource = bitmapImage;
this.LoginForm.Background =
imageBrush;
}
private void
DesertButton_Checked(object sender,
RoutedEventArgs e)
{
BitmapImage bitmapImage =
new BitmapImage(new
Uri("Images/Desert.jpg",
UriKind.Relative));
ImageBrush imageBrush =
new ImageBrush();
imageBrush.ImageSource = bitmapImage;
this.LoginForm.Background =
imageBrush;
}
}
}
What happen in code
In the Checked event handlers code of every RadioButton , we set the Background, respectively using the SolidColorBrush properly like below code we use for first RadioButton checked property
private
void BlueButton_Checked(object sender,
RoutedEventArgs e)
{
PhoneBackGround.Background = new
SolidColorBrush(Colors.Blue);
}
For the login form background
changing we use BitmapImage and ImageBrush like below code we use for first
backgroung image
private
void FlowerButton_Checked(object sender,
RoutedEventArgs e)
{
BitmapImage bitmapImage =
new BitmapImage(new
Uri("Images/Flower.jpg",
UriKind.Relative));
ImageBrush imageBrush =
new ImageBrush();
imageBrush.ImageSource = bitmapImage;
this.LoginForm.Background =
imageBrush;
}
Step 4: Go to Project Add menu and add
new folder and two images inside the folder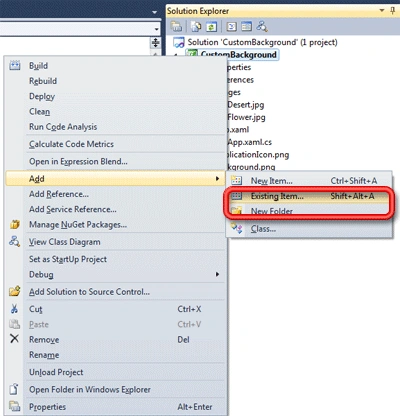
Step 5: Run the application
Click on Blue RadioButton the background will
change in Blue color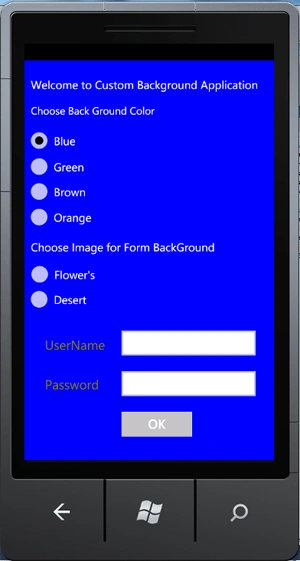
Click on Green RadioButton the background will
change in Green color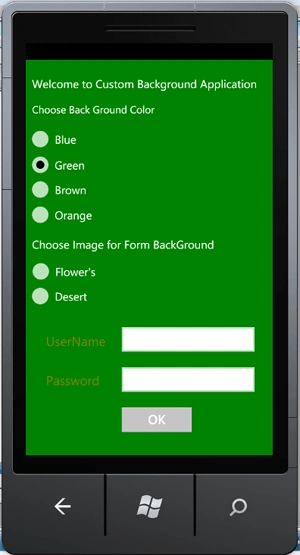
Click on Brown RadioButton the background will
change in Brown color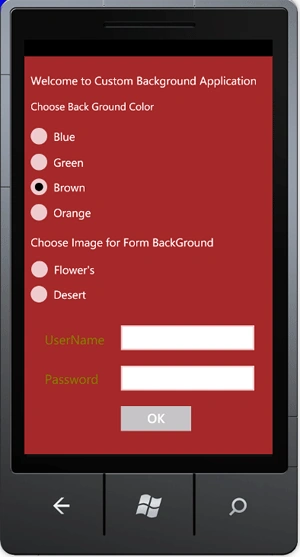
Click on Orange RadioButton the background will
change in Orange color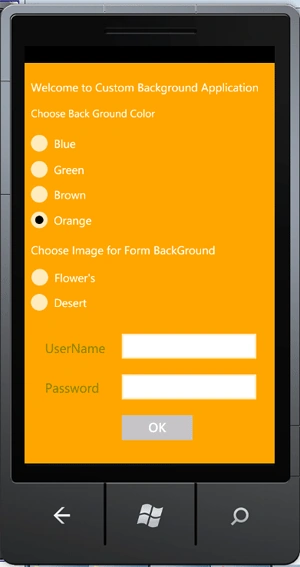
Now choose Image for the login form background,
now you see when you check on first Flower's RadioButton the hole background
will not change only the form background will change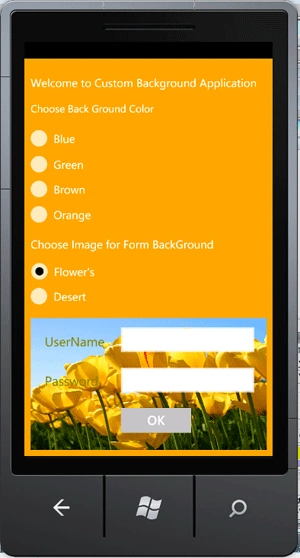
Click on Desert RadioButton the background
image will change in Desert image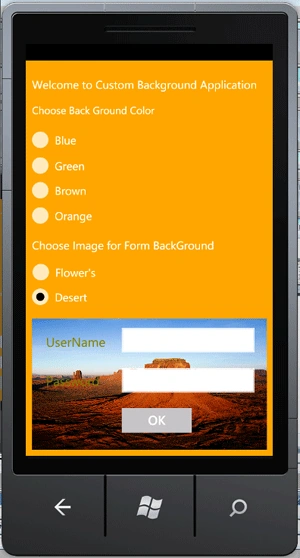
Thank You....
Join the conversation! Your thoughts help the community grow.