Python: Anaconda Installation and Setup
Introduction
In this chapter, we will learn about installing and setting up Anaconda on Windows 10.
Anaconda
Anaconda distribution is the most trusted Distribution for Data Science.
Anaconda has more than 1500 open source packages, an environment manager, and a Python/R data science distributions, as well as being free and easy to install on the latest operating systems. We will go with Anaconda 3 on Windows 10.
Installation of Anaconda Navigator
Let’s start with the installation process of Anaconda navigator on the Windows 10 Operating System.
Step 1
Go to a web browser, Search this URL,
https://www.anaconda.com/download/
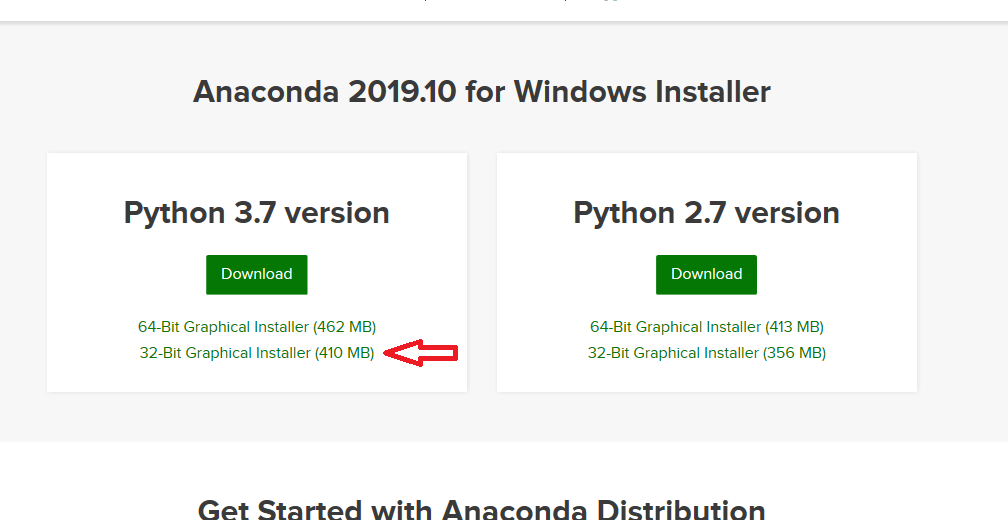
Users can see this screen. Now, click the Download Button.

Step 2
There are two options available on the screen choose either one of them,
Download 64bit Anaconda editor
or
Download 32bit Anaconda editor

We will go with 32-bit Anaconda editor,

Step 3

Step 4
For personal use or for a group of people, according to the requirements of the user, we have to decide the type of the installation,
As of now, we will install Anaconda Navigator for personal use, so choose this radio button: Just Me(recommended)
Select Next

Step 5
If required, then change the installation location with the Browse option. Then select Next.

Step 6
Choose the second checkbox: Register Anaconda as my default Python 3.7
The reason behind this it allows other programs, such as Python Tools for Visual Studio PyCharm, Wing IDE, PyDev, and MSI binary packages, to automatically detect Anaconda as the primary Python 3.7 on the system. Now, select on Install.
(The first option has the basic pitfall which is it causes problems while user requires to uninstall or reinstall Anaconda.)

Step 7
Wait until the installing process is completed. It will take a maximum of 30 to 40 minutes depending on the operating system and internet connection.

Why do we use Navigator?
Data scientists mostly use multiple versions of environment packages and scientific packages. The command-line program conda is the combination of an environment manager and package manager. There are dependencies and separation required for any version, where packages can be installed, run and updated inside the navigator and work properly. From this point of view, we can say that the navigator is easy to use and doesn’t require conda commands.
Step 8
Go to Start - Select Anaconda Navigator (Anaconda3)

This is how Anaconda Navigator looks

Step 9
Launch the Jupyter Notebook 6.0.1:

After a few minutes, you can check if it launched successfully and Jupyter Notebook 6.0.1 is opened in a new window of the same browser.

Step 10
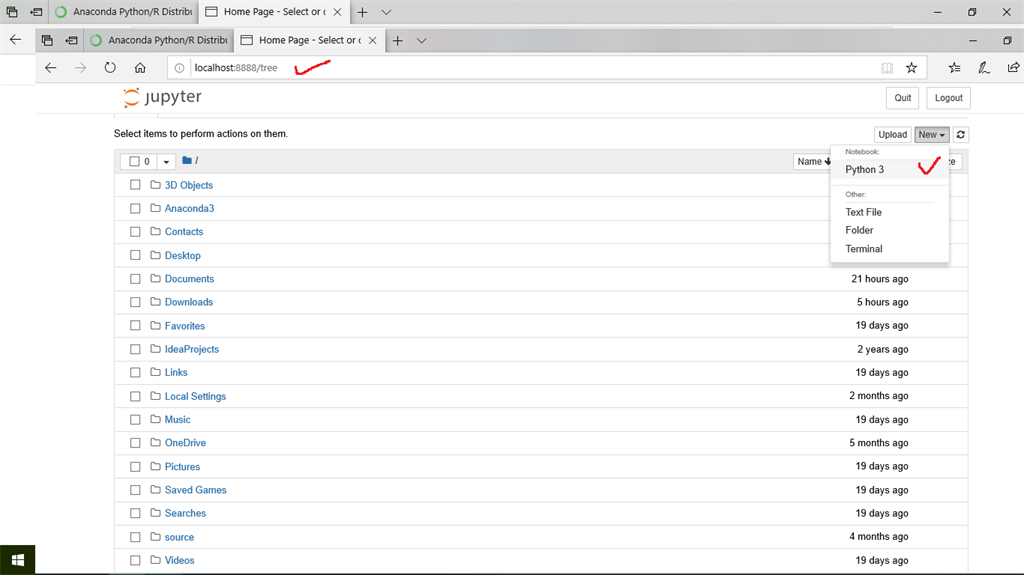
All the Python Library and References are getting installed for the very first time. It will take a few minutes. Note that it runs on http://localhost:8888/tree
Choose the New dropdown menu and select Python 3.

Step 11
This screen will be open where you can type code for the Python Applications.

No matter whether you are at the Beginner level or at an advanced level. It is very simple to go ahead.
Example
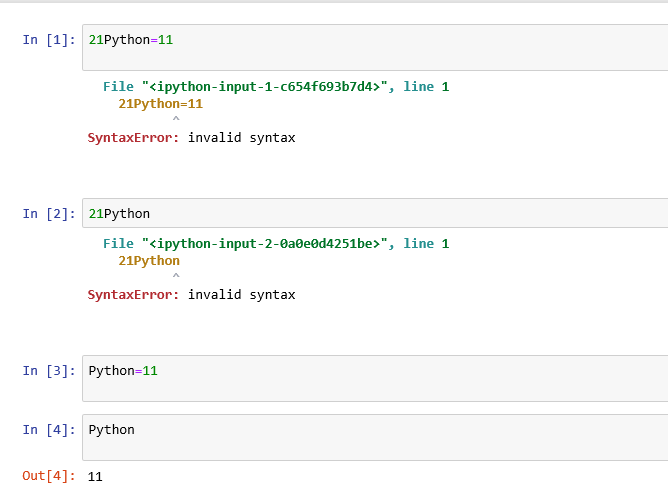
Open the Jupyter Notebook, create a new Python 3 Notebook and get started with this code and check the output of the variable.
In this example, we can see that the Variable name Python is valid. 21Python is not valid because it starts with a number ’2’.

There is no particular syntax required at the beginner’s level of Python Programming.
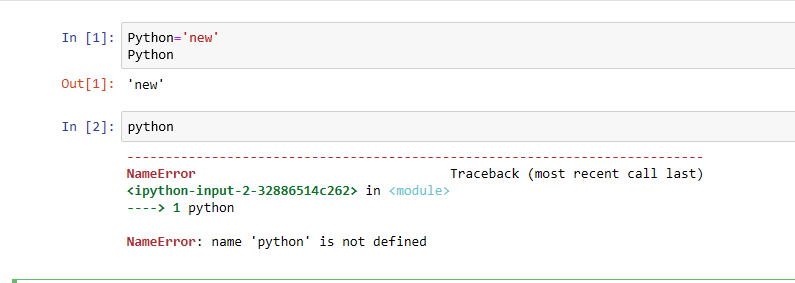
Python is case-sensitive. It means there are Python and python both considered as different names of the variables.
Example

Python stored a value “new”, whereas python is not declared and different variable.
Conclusion
In the next chapter, you will learn about Python Operators.
Author
Dipa Mehta
152
12.6k
534.2k
