Setting Up Anaconda on Windows
Introduction
You can learn how to install and use Python Anaconda in this portion. Although Anaconda can be used and configured on Linux and Mac OS X, we will be looking at the installation and usage of an ML system on Windows in this portion.
Anaconda Navigator
Anaconda is an open-source and free distribution of R and Python programming language for machine learning as well as data science projects. Therefore, it is known as a professional data science platform. It contains a powerful environment manager, which provides a different type of Python environment such as a Spyder, Jupyter notebook, and so on.
Benefits
- Anaconda is a free and open-source distributer
- Support for Windows, Mac OS, and Linux
- Manages a lot of Python libraries
- Then it provides various environments by virtualization,
- Can easily deal with large data computing and,
- It works properly without the need for any administrative privileges.
Supported libraries or packages
- Numby
- Scipy
- Scikit learn
- Matplotlib
- NLTK
- Pandas
- Bokeh
- R essential.
- Jupyter notebook
- Jupyterlab
- Spyder
- Orange
- QtConsole
- R studio
- Visual Studio code.
Jupyter notebook
A Jupyter notebook is an open-source environment run in the web browser that allows you to create and share documents belonging to the Python and R program. It provides working facilities such as data cleaning, transformation and visualization, static modeling, and machine learning. Jupyter is concerned with three types of core languages such as Julia, Python, and R. Its document is a JSON document, which is default connected to the IPython kernel. It supports launching and managing condo packages without using command-line commands.
Spyder
Spyder is an acronym for the Scientific Python development environment used in machine learning projects developed in Python language. Then it is integrated with open-source software packages such as NumPy, SciPy, Matplotlib, and IPython. It's also called an open-source cross-platform IDE. Anaconda Spyder has some essential features like advanced editing, interactive testing, and debugging.
II Program in Jupyter notebook
Step 1 - Launch Jupyter notebook
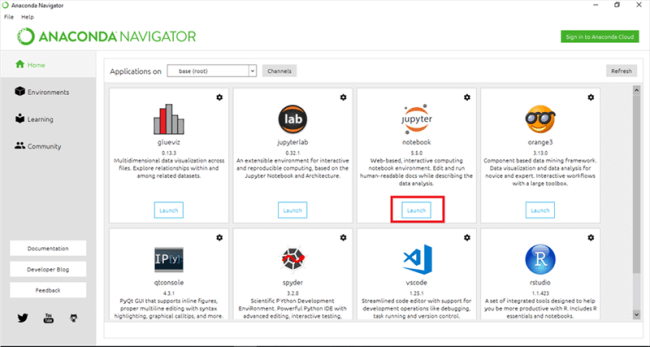
- Open the Anaconda navigator from your system; there is an available number of working environments.
- Choose Jupyter notebook and click on “launch”. Then it will appear with your default web browser.

Step 2 - Creating a Python folder
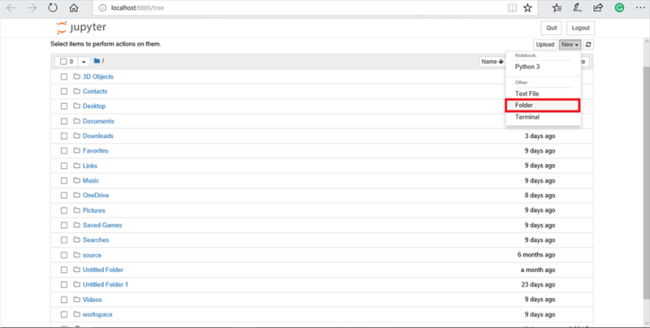
After running the Jupyter notebook in your local machine, click on the “new” icon in the top right corner of the web page for creating a new Python “folder” in your system.

Step 3 - Creating a Python file
Click on new icon create a new "python 3" file (Python program file).

Step 4 - Add codes and Run
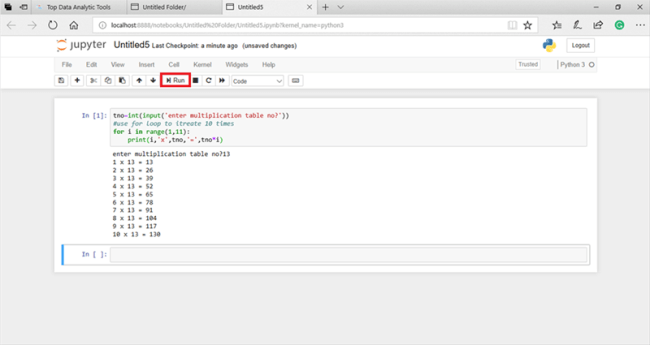
- After creating a new Python file, enter your codes inside the rectangular box.
- Click on “save” and “run” the program (generally Jupyter has autosave). Then the output will be displayed under the coded area.

Program description
The "two" is a variable that will be getting an input, which type of multiplication table you want. If the for loop is determine iteration 1 to 10, then iterate until false itself. Then the “print” statement will be print belongs to your desired multiplication table.
II Program in spyder
Step 1 - Launch Spyder
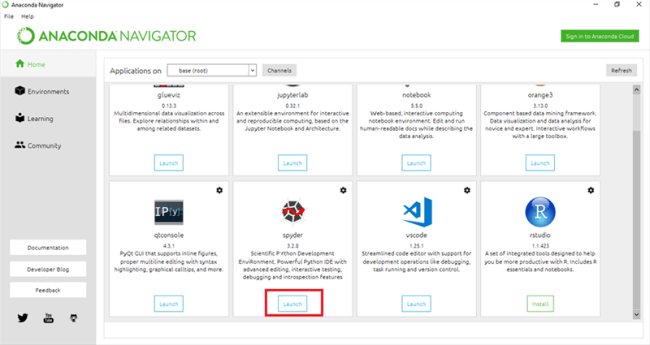
- Open the anaconda navigator.
- Choose “spyder” and click on “launch”.
Step 2 - Add codes and Run
- Enter your codes in your spyder editor and “save” it.
- Click “run” icon then the codes will be running on the python console environment.

Program description
Imports two types of libraries such as numpy library as “np” and matplot library as “plt”. If the x variable contains pi values belonging to the numpy then it's related to the sin and cos variable and their values. Then finally that value is displayed according to the display query “plt.show()” in the console environment.
Conclusion
In this chapter, you learned about Anaconda, Jupyter Notebook, and Spyder, and how to set an ML environment using Anaconda Navigator.
In the next chapter, we will learn about Python NumPy. Python NumPy is majorly used for adding support for large, multi-dimensional arrays and matrices.
Author
Elavarasan R
165
11.4k
648.6k
