Internet of Things: Arduino IDE
Introduction
Until now, you have heard about Arduino's hardware side, now its lean period. Arduino can be programmable in two forms, one in Arduino IDE and Arduino Web Editor in the other.
We can find out in this segment about Arduino IDE, a software program for all major operating systems, such as Linux, Windows, and Mac OS X, which can be downloaded.
In this chapter, we will discuss the Arduino IDE and in the next chapter, we will be discussing the Arduino Web IDE.
Arduino IDE

Figure: Arduino

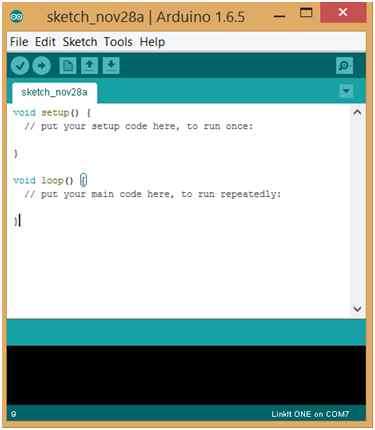
Figure: Arduino IDE in Windows OS
- File menu at the top
- Toolbar below this,
- Code window
- Message window
The buttons at toolbar provide easy access to most commonly used functions like Verify, New, Upload, Open, Save, Serial Monitor.
- Verify: This is used to check that your code is correct before uploading it to the board.
- Upload: Used to upload the code to your board.
- New: This button creates a completely new sketch with two default functions in another window. It is named with the current date by default which you have to save before uploading.
- Open: Opens a sketch.
- Save: Save the current sketch.
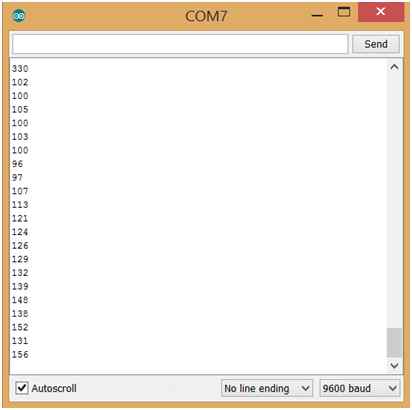
- Serial Monitor: This is a very useful tool for debugging the code. It opens another window that displays the serial data being sent out by the board.
 Figure: Serial Monitor
On the File menu, you will get the option to Create, Open, Save, and Print a sketch. There is a sketchbook option where you can put some sample sketch and take a look at them.
Adding Sketchbook to Arduino IDE
- Open Arduino IDE.
- Select “File" -> "Preferences”.
 Figure: Preferences
 - View the “Sketchbook location” field.
- Click “Browse” and copy the Sketches into the resulting folder and rename it with something appropriate.
With the Arduino IDE version 1.6.4 and greater, you can easily add 3rd party boards directly from the stock IDE by adding the URL in Preferences under the File menu.
In examples, you will find many sample programs that come with Arduino IDE.
In the Sketch tab, you will find options to Verify, Compile, Upload Code, and the option to import the library.
In the Tools menu, you will find the option to AutoFormat your code and make it look nicer. Here you can select the COM port to which your board is connected, and you can choose your board from Board Manager.
The final option is the Help Menu where you can find information about the IDE and links to the Arduino website and other useful pages.
Now you have learned to use the Arduino IDE and its components and buttons. Arduino IDE is pretty simple, you can easily get your hands on it by running a few sketches. Now you can make the hardware work with the software.
That’s all for this chapter. I hope you enjoyed reading!!
Author
Pooja Baraskar
0
7.8k
518.7k
