HTML: Tables and Forms
Introduction
In the last chapter, we took a quick glance at Full-Stack Development in Python. Here, we will cover more two features of HTML tables and Forms.
HTML Tables
Tables in HTML consist of several tags together,
<table>
- <thead>: Table head
<th>: Table coloumns
- <tr>: Table rows
Every tag has an opening, and closing tags are required. <thead> is not a compulsory section for the table structure but it will give to the user a proper idea about the columns and arrangement of the rows. Let's check the below code and example with table tags.
Example 1
In this example, we have taken three countries with names, flags, and weather details.
We have used image tags within a row and <img> tag is used with another attribute like height and width.
- <!DOCTYPE html>
- <html lang="en" dir="ltr">
- <head>
- <meta charset="utf-8">
- <title>This is part-2 file</title>
- </head>
- <body>
- <table border="1">
- <thead>
- <th>Countries Name</th>
- <th>Countries Flag</th>
- <th>Weather</th>
- </thead>
- <tr>
- <td>India</td>
- <td>
- <img src="255px-Flag_of_India.svg.png" width="200" height="100" alt="">
- </td>
- <td>30 Degree Celcius</td>
- </tr>
- <tr>
- <td>USA</td>
- <td>
- <img src="220px-Flag_of_the_United_States.svg.png" width="200" height="100" alt="">
- </td>
- <td>21 Degree Celcius</td>
- </tr>
- <tr>
- <td>Germany</td>
- <td>
- <img src="255px-Flag_of_Germany.svg.png" width="200" height="100" alt="">
- </td>
- <td>24 Degree Celcius</td>
- </tr>
- </table>
- </body>
- </html>
Output
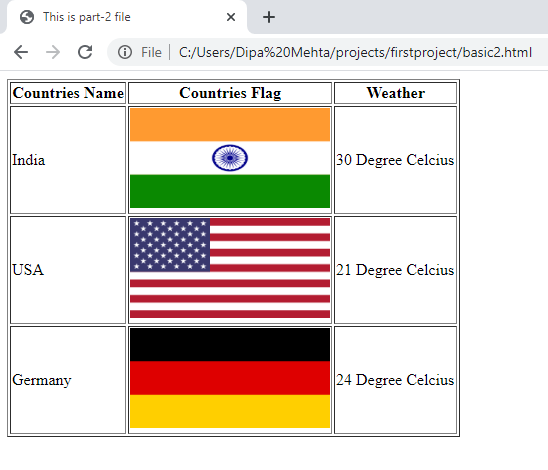
Try this code for the practice.
We can also do styling with table attributes. For a more functional site, we have to do this styling with CSS. We will discuss it soon.
Let's move on with forms.
HTML Forms
The form will be a key component of Django later on, but in order to understand how to use them with Django, we need to fully understand them with just HTML.
To make a form we will use <input> tag. Different input types are used with input tag like text, radio, checkbox, email, password, color reset, etc.
Example 2
Let's check this example having three different input types: Email, Password, and Submit
Here is the code for the output screen as below,
- <!DOCTYPE html>
- <html lang="en" dir="ltr">
- <head>
- <meta charset="utf-8">
- <title>HTML Forms</title>
- </head>
- <body>
- <form>
- <h1>Login Form</h1>
- <h2>Please fill the details:</h2>
- <input type="email" name="useremail" value="Enter Email">
- <input type="password" name="password" value="valid password Please">
- <input type="submit" name="Submit" value="Submit">
- </form>
- </body>
- </html>
Output
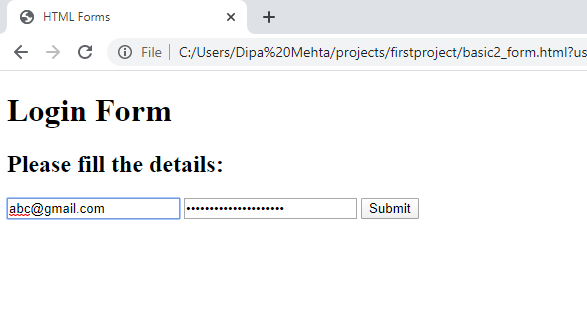
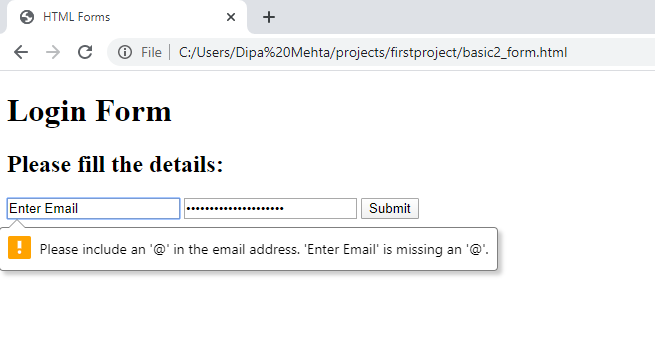
You can see the differences between these two images. Without a valid email format, it couldn't be possible to click Submit. It will generate a pop-up message. Also, there is a password in non-readable mode or we can say it is encrypted type. Submit is a button most probably so it's in Button form. In this form, there are email, password, and submit input types executed.
Now, we will move on with labels and actions.
The use of the label tag will allow you to add labels in front of input in your HTML form. We will also learn how to activate actions by clicking submit.
- <body>
- <form action="https://www.Google.com" method="get">
- <h1>Enter text and take me to Google</h1>
- <input type="text" name="userinput" value="">
- <input type="submit" name="Submit" value="Submit">
- </form>
- </body>
Output
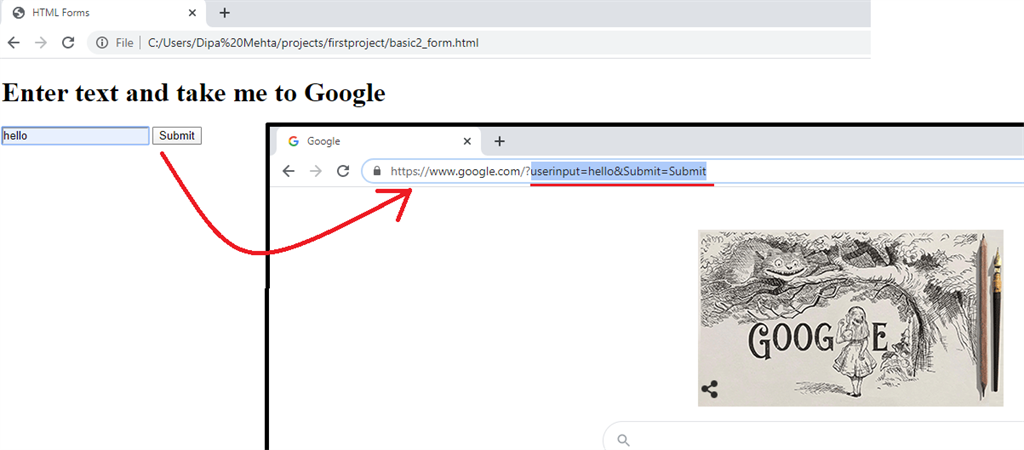
We can see the redirection of these two windows in an image, where username value is "hello" and page performs the action to the mentioned link: in the form tag. This is the example of ACTION in form.
Let's check with Label Tag.
In this example, we will give two simple labels to the text boxes. Label tag has an attribute 'for' and we will take a quick glance below.
- <body>
- <form>
- <label>
- Enter Text:
- <input type="text" name="" value="block1">
- </label>
- <label>
- Enter Text:
- <input type="text" name="" value="block2">
- </label>
- </form>
- </body>
Output
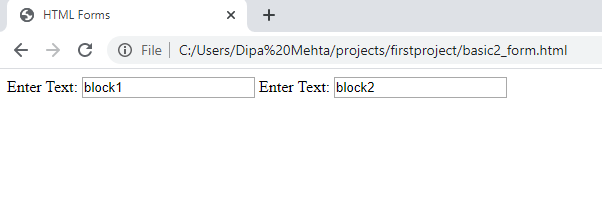
Now, we will see how the attribute is used with <label> tag.
In Label tag, for attribute has a value which always matches the other value of the <input id=""> id attribute. Also we have used placeholder attribute with input tag which will be good looking compared to value attribute. See this in the below code snippet,
- <body>
- <form>
- <!--use of for with label-->
- <label for="username">Enter User Name:</label>
- <input id="username" type="text" name="Enter name" placeholder="Enter Name">
- </form>
- </body>
Output
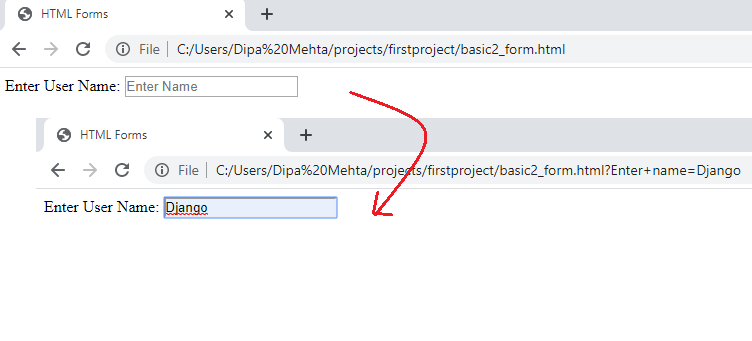
That's all about the Labels and Actions using Form.
Form Selection
Let's explore the input methods for forms:
- Radio Button
- Drop Down Menu
- Text Area Inputs
There is another example which has all these methods used in different ways.
- <body>
- <h1>Feedback Form</h1>
- <form method="get">
- <h2>Are you from India?</h2>
- <label for="in">Inside:</label>
- <input id="in" type="radio" name="a" value="">
- <label for="out">Outside:</label>
- <input id="out" type="radio" name="a" value="">
- <h2>Service Stars</h2>
- <select name="Stars">
- <option value="Excellent">3</option>
- <option value="Good">2</option>
- <option value="Average">1</option>
- </select>
- <input type="submit" name="" value="SUBMT">
- <h2>Any Other Feedback?</h2>
- <textarea name="mytext" rows="8" cols="80"></textarea>
- <input type="submit" name="" value="SUBMT">
- </form>
- </body>
Output
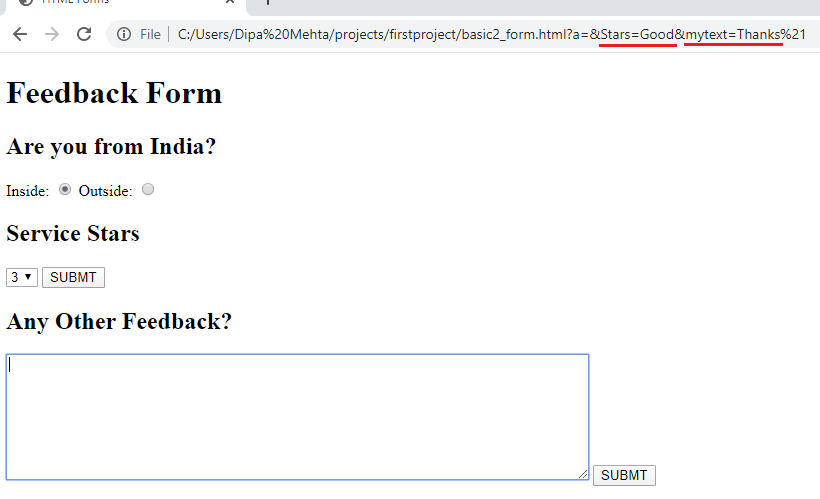
Inside this image, there are two values generated in the address bar after clicking the Submit Buttons.
Here, we have checked the <input> tag type with radio button, used two different tags: <select> for Drop Down Menu, <textarea> for writing some text in a box, with enough space.
Example
This is a complete combo of this article's content.
- <!DOCTYPE html>
- <html lang="en" dir="ltr">
- <head>
- <meta charset="utf-8">
- <title>HTML Forms</title>
- </head>
- <body>
- <h1>Course Signup Page</h1>
- <form method="get">
- <p> Please note First Name, Last Name, Email and Password are required:</p>
- <lable>First Name:
- </label>
- <input type="text" name="fn" placeholder="First Name">
- <lable>last Name:
- </label>
- <input type="text" name="ln" placeholder="Last Name">
- <p>
- <lable>Email:
- </label>
- <input type="Email" name="e" placeholder="[email protected]">
- <lable>Password:
- </label>
- <input type="password" name="ln" placeholder="Password">
- </p>
- <p>Are you over age of 18?
- <p>
- <label for="r">Yes</label>
- <input id="r" type="radio" name="y" value="">
- <label for="ra">No</label>
- <input id="ra" type="radio" name="y" value="">
- </p>
- </p>
- <p>Do you have a Credit Card or PayPal?
- <p>
- <select name="Payment">
- <option value="Credit Card"> Credit Card </option>
- <option value="PayPal"> PayPal </option>
- </select>
- </p>
- <input type="submit" name="" value="SIGN UP">
- </p>
- </form>
- </body>
- </html>
Output
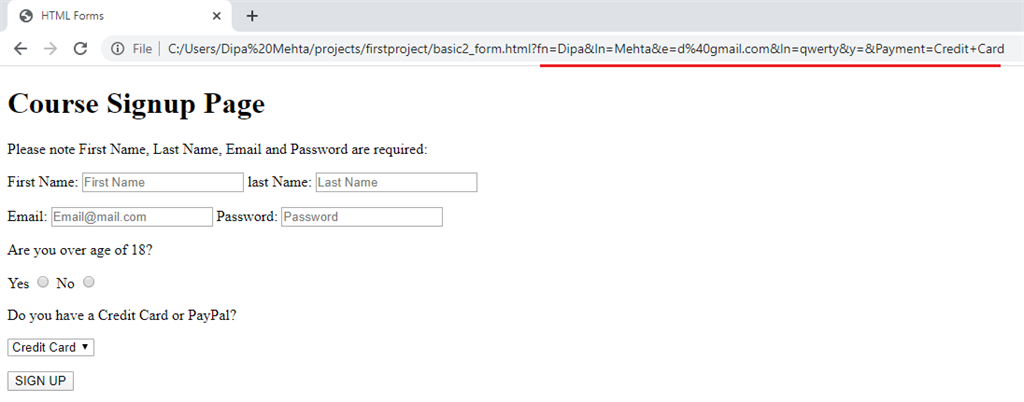
Summary
In the next article, we will learn some basics of CSS.
Author
Dipa Mehta
153
12.6k
540k
