Hey Everyone,
I'm working on a huge ONVIF IP camera project using C#.NET and I learned something cool this week that I think would be useful for the C#Corner community. Let me share my project in the hope that I can help anyone who wants to improve his/her video surveillance / security system – and I also hope you will contribute to my solution by providing any further useful development suggestion.
So do not hesitate to leave a constructive message related to this project! I am looking forward to your comments!
Background
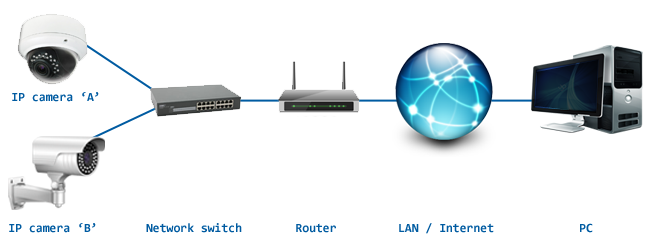
The future's surveillance systems (and today's most improved monitoring systems) are based on IP (that is Internet Protocol). IP-based cameras turn the analog camera image and audio into digital data then transmit this data over LAN or through the Internet (Figure #1). The greatest benefits of using IP-based systems over traditional analog CCTV (Closed-circuit television) systems are the followings: greater flexibility, better camera performance, easier system installation, better system integration and batter value. Figure 1: How an IP-based surveillance system work
Alhough IP CCTV has been available for around 10 years, this technology
has started to spread just in the last few years. Due to its advantages, by now I'm also interested not just in building IP-based surveillance systems, but also in developing IP camera solutions.
If you are also interested in this field of programming, it is important to know the basics of ONVIF technology. As my application is based on the ONVIF specification as well, let me write some lines about this technology in a nutshell.
ONVIF is the acronym for Open Network Video Interface Forum. This is an open industry forum for the development of a global standard for the interface of IP-based physical security products. The ONVIF specification will ensure interoperability between products regardless of manufacturer. ONVIF, that is committed to the adoption of IP in the security market, has the following three cornerstones:
- Standardization of communication between IP-based physical security.
- Interoperability between IP-based physical security products regardless of manufacturer.
- Open to all companies and organizations. The ONVIF specification defines a common protocol for the exchange of information between network video devices including automatic device discovery, real-time video streaming, PTZ (Pan-Tilt-Zoom) control, advanced video analytics, etc.
In this article I am going to introduce the basics of ONVIF developments. I will show some useful code snippets that help you to implement an Onvif CCTV IP camera viewer that makes it possible to display the image and play the audio of your IP camera in a Windows Forms application. As you could read above, ONVIF technology enables many more advanced functionalities - I guess the following explanation can be a good base for further ONVIF developments.
Prerequisites
Due to the characteristics of ONVIF technology, you will need broadband Internet connection and at least one IP camera connected to your network. A connected speaker/earphones/headphones/headset is also needed to be able to listen to the audio stream. As my application has been written in C#, you will also need a development environment that supports this programming language. My choice was Microsoft Visual Studio. (Although the .NET Framework will be installed automatically with the Visual Studio, make sure that .NET Framework 4 is installed on your PC.) And finally, some special components should be added to your references in Visual Studio, since the most simple way for implementing any ONVIF developments is using prewritten components. For this purpose I have installed Ozeki Camera SDK.
If you need to install any of the previously mentioned software requirements, you can download the Visual Studio and .NET Framework 4 from www.microsoft.com and you can obtain the SDK from www.camera-sdk.com.Basic settings in your development environment
After you have obtained all the necessary software and devices, start the development by launching your Visual Studio and follow the steps below:- Create a new project (Visual C# Windows Forms Application).
- Add the ONVIF Camera SDK's .dll file to your references.
- Change your target framework to '.NET Framwork 4.0'
Source code analysis
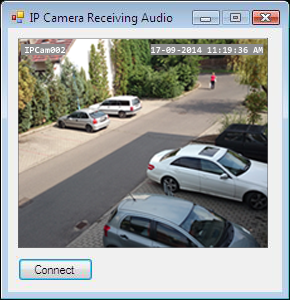
In order to implement this IP camera viewer application in C# you will need two classes: Form1.cs and Form1.Designer.cs. You can see in Code #2 that the objects of these classes have been declared at the beginning of the code. After initializing these objects in the constructor of the form, you need to call the SetVideoViewer() method then add the VideoViewerFM object to the control collection of the panel.You will see that the GUI of this application contains a 'Connect' button that can be used to establish connection between your application and your IP camera and to get the audio and video stream. Below you can see the methods that should be called when the user presses the 'Connect' button:
_camera = IPCamera.GetCamera("192.168.115.198:8080", "admin", "admin") // It initializes the camera device that has been declared as a private member of the class. The used arguments are the followings: the IP address of the camera, username and password.
_connector.Connect(_camera.VideoChannel, _imageProvider) // It can be used to establish the connection between the IP camera image and the image provider object that is used to display the image on the GUI.
_camera.Start() // For getting the IP camera image from the camera, you need to start that.
_videoViewerWF1.Start() // For displaying the IP camera image on the GUI, you need to start the viewer.
private Speaker _speaker // In order to play the audio stream, you need an extra object, a speaker.
_speaker = Speaker.GetDefaultDevice() // You need to initialize the new 'Speaker' object.
_connector.Connect(_camera.AudioChannel, _speaker) // For the audio stream an other connection is also needed. You need to use the MediaConnector object. The arguments: the audio channel of the camera and the speaker object.
_speaker.Start() // You need to start the speaker.
Code 1: C# source code analysisCode snippet for the audio and video streaming in C#
The following code snippet presents the Form1.cs class (Code #2). It contains all the necessary functions of the application that are needed to be able to get the IP camera image.
using System;
using System.Collections.Generic;
using System.ComponentModel;
using System.Data;
using System.Drawing;
using System.Linq;
using System.Text;
using System.Windows.Forms;
using Ozeki.Media.MediaHandlers;
using Ozeki.Media.MediaHandlers.IPCamera;
using Ozeki.Media.MediaHandlers.Video;
using Ozeki.Media.Video.Controls;
namespace Onvif_IP_Camera_Viewer
{
public partial class Form1 : Form
{
private IPCamera _camera;
private DrawingImageProvider _imageProvider = new DrawingImageProvider();
private MediaConnector _connector = new MediaConnector();
private VideoViewerWF _videoViewerWF1;
private Speaker _speaker;
public Form1()
{
InitializeComponent();
// Create video viewer UI control
_videoViewerWF1 = new VideoViewerWF();
_speaker = Speaker.GetDefaultDevice();
_videoViewerWF1.Name = "videoViewerWF1";
_videoViewerWF1.Size = panel1.Size;
panel1.Controls.Add(_videoViewerWF1);
// Bind the camera image to the UI control
_videoViewerWF1.SetImageProvider(_imageProvider);
}
// Connect camera video channel to image provider and start
private void connectBtn_Click(object sender, EventArgs e)
{
_camera = IPCamera.GetCamera("192.168.115.175:8080", "admin", "admin");
_connector.Connect(_camera.VideoChannel, _imageProvider);
_connector.Connect(_camera.AudioChannel, _speaker);
_camera.Start();
_videoViewerWF1.Start();
_speaker.Start();
}
}
}
Code 2: C# code snippet for the audio and video streamingCode snippet for the GUI
Below the content of the
Form1Design.cs class can be seen (Code #3). By using this code snippet, on the Graphical User Interface of your application will be seen all the necessary GUI elements (as well as buttons and the IP camera image).
namespace Onvif_IP_Camera_Viewer
{
partial class Form1
{
private System.ComponentModel.IContainer components = null;
protected override void Dispose(bool disposing)
{
if (disposing && (components != null))
{
components.Dispose();
}
base.Dispose(disposing);
}
#region Windows Form Designer generated code
private void InitializeComponent()
{
this.connectBtn = new System.Windows.Forms.Button();
this.panel1 = new System.Windows.Forms.Panel();
this.SuspendLayout();
//
// connectBtn
//
this.connectBtn.Location = new System.Drawing.Point(10, 230);
this.connectBtn.Name = "connectBtn";
this.connectBtn.Size = new System.Drawing.Size(75, 23);
this.connectBtn.TabIndex = 2;
this.connectBtn.Text = "Connect";
this.connectBtn.UseVisualStyleBackColor = true;
this.connectBtn.Click += new System.EventHandler(this.connectBtn_Click);
//
// panel1
//
this.panel1.BorderStyle = System.Windows.Forms.BorderStyle.FixedSingle;
this.panel1.Location = new System.Drawing.Point(10, 10);
this.panel1.Name = "panel1";
this.panel1.Size = new System.Drawing.Size(250, 210);
this.panel1.TabIndex = 3;
//
// Form1
//
this.AutoScaleDimensions = new System.Drawing.SizeF(6F, 13F);
this.AutoScaleMode = System.Windows.Forms.AutoScaleMode.Font;
this.ClientSize = new System.Drawing.Size(274, 264);
this.Controls.Add(this.panel1);
this.Controls.Add(this.connectBtn);
this.Name = "Form1";
this.StartPosition = System.Windows.Forms.FormStartPosition.CenterScreen;
this.Text = "IP Camera\'s Live Image";
this.ResumeLayout(false);
}
#endregion
private System.Windows.Forms.Button connectBtn;
private System.Windows.Forms.Panel panel1;
}
}
Code 3: C# code snippet for the GUIIf you have followed all steps above carefully, you will see a similar GUI like mine (Figure #2). You can view your IP camera's image and listen to the audio stream if you click on the 'Connect' button. Figure #2 presents the way I can monitor our parking lot though my Windows Forms Application.
 Figure 2: The GUI of the IP camera viewer application
Summary
To sum it up, in my code explanation I have presented how to implement an Onvif CCTV IP camera viewer in C#.NET that is able to stream audio as well. You can extend your IP camera viewer – and therefore improve your surveillance/security system – with further more professional features of course, such as camera size configuration, brightness/saturation/contrast settings, PTZ camera motion control, motion detection, web broadcasting, etc. The rest depends on your specific needs. I hope you found my solution interesting! Good work!
SOURCE CODE: Download the Source Code for the C# camera viewerResources
- http://www.ipcctv.com/article.php?xArt=10
- http://www.onvif.org/
- http://www.microsoft.com/en-us/download/details.aspx?id=43721
- http://www.microsoft.com/en-US/download/details.aspx?id=17851
- http://www.camera-sdk.com/p_13-download-onvif.html