

Nowadays, sending an email is a small kind of task. We can send email in ASP.NET using a Local Server easily. But on the GoDaddy Server, a little bit of code should be changed, like Port Number, Hosting Server, and user credentials etc.
Following are the steps.
Following are the steps.
Note - This code will work only on GoDaddy Server, not on a Local Server.
Step 1 Create a new project.
Step 2 Add bootstrap CSS in the CSS folder.
Step 3 Create a webform aspx page.
Step 4 Design the form like below.
- <!DOCTYPE html>
- <html xmlns="http://www.w3.org/1999/xhtml">
- <head runat="server">
- <title></title>
- <link href="css/bootstrap.min.css" rel="stylesheet" />
- </head>
- <body>
- <form id="form1" runat="server">
- <div class="container">
- <div class="row">
- <div class="col-md-4 col-md-offset-4">
- <div class="panel panel-primary">
- <div class="panel-heading">
- <h3 class="panel-title">E-mail</h3>
- </div>
- <div class="panel-body">
- <label>Name</label>
- <asp:TextBox ID="txtname" runat="server" CssClass="form-control" placeholder="Name"></asp:TextBox>
- <asp:RequiredFieldValidator ID="RequiredFieldValidator1" runat="server" ErrorMessage="Please Provide Name" ControlToValidate="txtname" ForeColor="Red"></asp:RequiredFieldValidator><br />
- <label>Subject</label>
- <asp:TextBox ID="txtsubj" runat="server" CssClass="form-control" placeholder="Subject"></asp:TextBox>
- <asp:RequiredFieldValidator ID="RequiredFieldValidator2" runat="server" ErrorMessage="Please Provide Subject" ControlToValidate="txtsubj" ForeColor="Red"></asp:RequiredFieldValidator><br />
- <label>Mobile</label>
- <asp:TextBox ID="txtmob" runat="server" CssClass="form-control" placeholder="Mobile Number" MaxLength="12"></asp:TextBox>
- <asp:RequiredFieldValidator ID="RequiredFieldValidator3" runat="server" ErrorMessage="Please Provide Mobile Number" ControlToValidate="txtmob" ForeColor="Red"></asp:RequiredFieldValidator><br />
- <label>Email</label>
- <asp:TextBox ID="txtemail" runat="server" CssClass="form-control" placeholder="Email ex([email protected])"></asp:TextBox>
- <asp:RequiredFieldValidator ID="RequiredFieldValidator4" runat="server" ErrorMessage="Please Provide Email-ID" ControlToValidate="txtemail" ForeColor="Red"></asp:RequiredFieldValidator><br />
- <asp:RegularExpressionValidator ID="RegularExpressionValidator1" runat="server" ErrorMessage="Please Proide Valid Email-ID" ControlToValidate="txtemail" ForeColor="Red" ValidationExpression="\w+([-+.']\w+)*@\w+([-.]\w+)*\.\w+([-.]\w+)*"></asp:RegularExpressionValidator><br />
- <label>Address</label>
- <asp:TextBox ID="txtaddress" runat="server" CssClass="form-control" placeholder="Address"></asp:TextBox>
- <asp:RequiredFieldValidator ID="RequiredFieldValidator5" runat="server" ErrorMessage="Please Provide Address" ControlToValidate="txtaddress" ForeColor="Red"></asp:RequiredFieldValidator><br />
- <asp:Button ID="Button1" runat="server" Text="Send Me" CssClass="btn btn-block btn-primary" OnClick="Button1_Click" />
- </div>
- </div>
- </div>
- </div>
- </div>
- </form>
- </body>
- </html>
Step 5
Add Server-side validation for every field. Use RequiredFieldValidator for checking the empty fields.
Add Server-side validation for every field. Use RequiredFieldValidator for checking the empty fields.
Step 6
Each FieldValidator needs to set the ControlToValidate in the properties.
Step 7
The Email Validation requires another validator like RegularExpressionValidator to check a valid Email-ID. Using ValidationExpression, we can check easily.
Step 8
Double click on "Send Me" button and add the below code.
Double click on "Send Me" button and add the below code.
- try {
- MailMessage msgs = new MailMessage();
- msgs.To.Add(txtemail.Text.Trim());
- MailAddress address = new MailAddress("[email protected]");
- msgs.From = address;
- msgs.Subject = "Contact";
- string htmlBody = @ " <
- !DOCTYPE html >
- <
- html >
- <
- head >
- <
- title > Email < /title> <
- /head> <
- body >
- <
- h1 > Hi welcome < /h1> <
- p > Thank you
- for register < /p> <
- /body> <
- /html>
- ";
- msgs.Body = htmlBody;
- msgs.IsBodyHtml = true;
- SmtpClient client = new SmtpClient();
- client.Host = "relay-hosting.secureserver.net";
- client.Port = 25;
- client.UseDefaultCredentials = false;
- client.Credentials = new System.Net.NetworkCredential("[email protected]", "password");
- //Send the msgs
- client.Send(msgs);
- ClientScript.RegisterStartupScript(GetType(), "alert", "alert('Your Details Sent Successfull.');", true);
- } catch (Exception ex) {}
Run the application. You will get an error like the following.
WebForms UnobtrusiveValidationMode requires a ScriptResourceMapping for 'jquery'. Please add a ScriptResourceMapping named jquery(case-sensitive).
Step 10So, add the below code in web.config.
- <appSettings>
- <add key="ValidationSettings:UnobtrusiveValidationMode" value="None" />
- </appSettings>
Step 11
Run the application again. Now, you will get a form like the following.
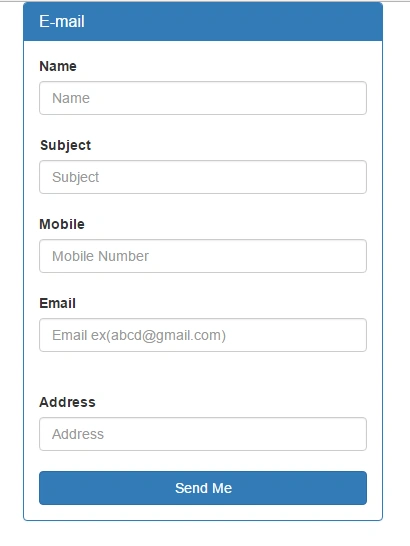
Run the application again. Now, you will get a form like the following.
Step 12
Just click the "Send Me" button. You will get an error message like below.
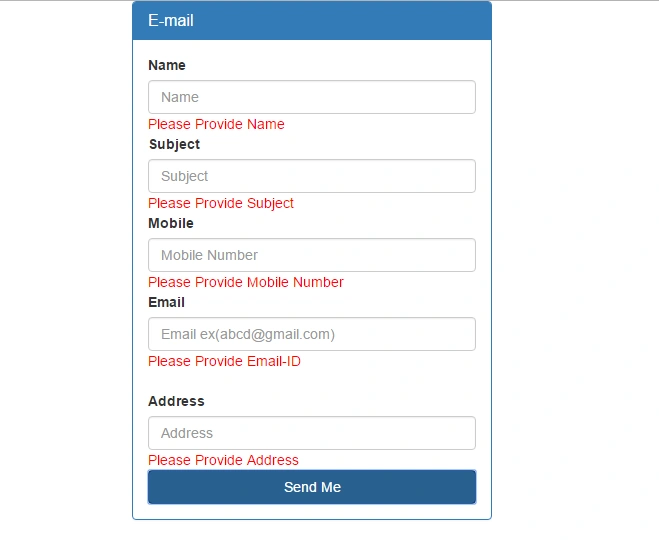
Just click the "Send Me" button. You will get an error message like below.
Step 13
Fill in all the fields and provide a valid Email-ID.
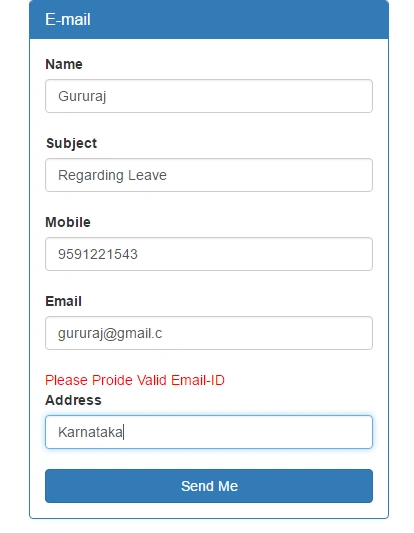
Fill in all the fields and provide a valid Email-ID.
The mail is sent successfully.
That's it. Thank you for reading my blog.
That's it. Thank you for reading my blog.
Sajjad AhmadPosted Oct 29, 2022, 7:10 AM
Doest it work with Gmail or we have to purchase email from server or twilio
Kuldeep KumarPosted Feb 11, 2022, 6:01 AM
It's not working
varma gattiPosted Oct 29, 2019, 8:09 AM
Its working in local, but not in live.
Satyam PrakashPosted Oct 31, 2018, 9:41 PM
Hello Gururaj... I used this code but my all emails are receiving on spam folder. Can you please explain why?
Bhimashankar GangadePosted Dec 30, 2016, 12:36 AM
Http://dreamit-sanjay.blogspot.in/2013/08/multi-language-web-site-in-aspnet.html
Bhimashankar GangadePosted Dec 30, 2016, 12:13 AM
Http://www.devtechie.com/post/2012/01/16/Weather-Information-from-Google-Weather-using-ASPNET-and-LINQ-to-XML.aspx
Bhimashankar GangadePosted Dec 30, 2016, 12:09 AM
Please check http://www.aspsnippets.com/Articles/Display-daily-Weather-Forecast-using-Weather-API-in-ASPNet.aspx
Bhimashankar GangadePosted Dec 1, 2016, 7:06 AM
Nice blog.....................