

Establishing Interaction Triggers in WPF
Establishing connections between UIElements and Commands using Interaction in WPF requires utilizing the Interaction. Triggers attached property to link specific events of UI elements with commands defined in a ViewModel. The process unfolds as follows.
- Attach Interaction.Triggers: In the XAML markup of your WPF view, you attach Interaction.Triggers to the desired UIElement by employing the Interaction.Triggers element.
- Define EventTriggers: Within the Interaction. Triggers element, you define one or more EventTrigger elements. Each EventTrigger specifies an event on the UIElement that will trigger the associated action, typically a command.
- Specify EventName: For each EventTrigger, you specify the name of the event that should trigger the action. This could be any event exposed by the UIElement, such as Click, MouseEnter, MouseLeave, and so forth.
- Define InvokeCommandAction: Inside each EventTrigger, you define an InvokeCommandAction element. This element specifies the command that should be executed when the associated event occurs.
- Bind Command: In the InvokeCommandAction element, you bind the Command property to the command defined in your ViewModel that you wish to execute when the event takes place.
- Execute Command: Upon the occurrence of the specified event on the UIElement, the associated command is executed, carrying out the intended action defined in your ViewModel.
In essence, utilizing Interaction in WPF facilitates a clear separation of concerns between the UI and the application logic (ViewModel), thereby enhancing the maintainability and testability of your WPF applications.
MVVM is an acronym for Model-View-ViewModel, which is a design pattern used in WPF (Windows Presentation Foundation) applications with C# (and other XAML-based frameworks) to achieve a clear separation of concerns between the user interface (View), the application logic (ViewModel), and the data (Model).
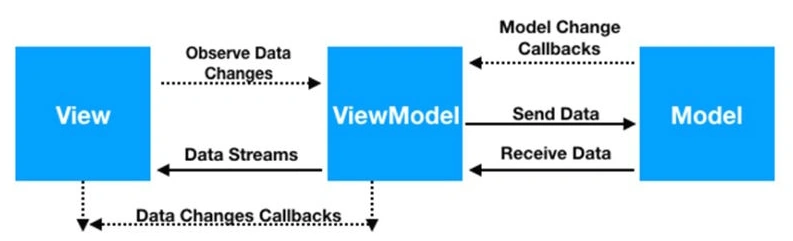
Below is a brief overview of all components within the MVVM architecture.
1. Model
- The Model embodies the data and business logic of the software. It encompasses the data structures, validation rules, business logic, and data access logic.
- The Model informs the ViewModel of any changes in the data through methods like data binding, events, or observables.
2. View
- The View showcases the user interface of the software. It defines the layout, appearance, and behavior of the user interface elements.
- In WPF, the View is typically defined using XAML (eXtensible Application Markup Language), which specifies the visual structure and properties of UI elements.
3. ViewModel
- The ViewModel serves as a mediator between the View and the Model. It exposes data and behavior required by the View and interacts with the Model to fetch or update data.
- The ViewModel consists of properties and commands that the View binds to, enabling it to display data and respond to user actions.
- The ViewModel does not directly interact with the View; instead, it communicates with the View through data binding and commands.
- The ViewModel often implements the INotifyPropertyChanged interface to notify the View of changes in data, facilitating two-way data binding.
The main goal of MVVM is to divide the responsibilities of the user interface from the software logic and data, which leads to improved maintainability, testability, and reusability of the code. Furthermore, MVVM enables a seamless separation between designers and developers, enabling designers to work on the View separately from the software logic implemented in the ViewModel.
Within the MVVM design pattern, the management of events that surpass click events often requires the utilization of interaction mechanisms. This is primarily due to the fact that MVVM inherently lacks support for various event types beyond clicks. As a result, when addressing events such as mouse hover, mouse enter, or mouse leave, etc. it is customary to depend on interaction mechanisms to implement such functionality within the MVVM pattern. Furthermore, several other events associated with different UIElements can only be efficiently managed through the utilization of the Interaction mechanism.
Key Components of Interaction
Key components of Interaction are outlined as follows.
<i:Interaction.Triggers>
    <i:EventTrigger EventName="MouseEnter">
        <i:InvokeCommandAction Command="{Binding ButtonMouseEnterCommand}" />
    </i:EventTrigger>
    <i:EventTrigger EventName="MouseLeave">
        <i:InvokeCommandAction Command="{Binding ButtonMouseLeaveCommand}" />
    </i:EventTrigger>
</i:Interaction.Triggers>
Each trigger within the Interaction. The trigger element represents an event listener that performs an action when a specific event occurs. Here is an explanation of each component.
- Interaction.Triggers: This element serves as a container for one or more triggers. It indicates that the triggers defined within it are responsible for handling interactions for the associated UI element.
- EventTrigger EventName="MouseEnter": This is the first trigger element. It defines that the action enclosed within it should be executed when the MouseEnter event takes place on the associated UI element, which in this case is a Button. When the MouseEnter event is triggered, it activates the specified action.
- InvokeCommandAction Command="{Binding ButtonMouseEnterCommand}": This action is triggered when the MouseEnter event occurs. It specifies that the command named `ButtonMouseEnterCommand` in the current DataContext (typically the view model) should be invoked. This allows you to execute a command defined in your view model when the MouseEnter event happens on the associated UI element.
- EventTrigger EventName="MouseLeave": This is the second trigger element. Similar to the first trigger, it indicates that the enclosed action should be executed when the MouseLeave event occurs on the associated UI element. When the MouseLeave event is raised, it triggers the specified action.
- InvokeCommandAction Command="{Binding ButtonMouseLeaveCommand}": This action is triggered when the MouseLeave event occurs. It specifies that the command named `ButtonMouseLeaveCommand` in the current DataContext (usually the view model) should be invoked. This allows you to execute a command defined in your view model when the MouseLeave event happens on the associated UI element.
This XAML snippet establishes triggers for the MouseEnter and MouseLeave events on a UI element (specifically a Button) and defines the corresponding commands to be invoked when these events occur.
I have incorporated this functionality utilizing a button, yet it can be applied to any UI element in WPF.
Implementation
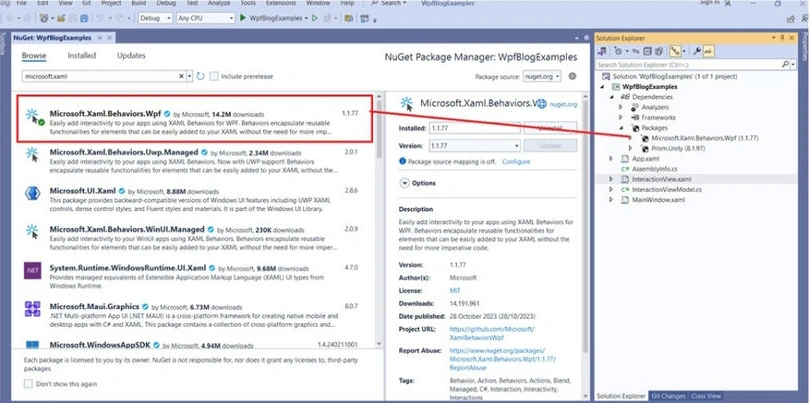
Step 1. To install the "Microsoft.Xaml.Behaviors.Wpf" NuGet package, use the following command.
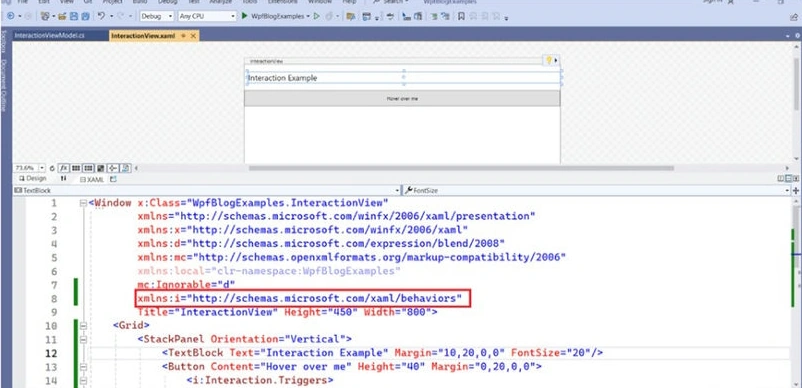
Step 2. Generate a new name for the interaction in the Xaml view.
In this example, the i alias is associated with the namespace http://schemas.microsoft.com/xaml/behaviors. This allows you to use elements and features from the behaviors namespace in your XAML, such as triggers and behaviors provided by the "Microsoft.Xaml.Behaviors.Wpf" package.
Step 3. Implementation of interaction in the view.

Step 4. The structure of the InteractionView is as depicted below.
<Window x:Class="WpfBlogExamples.InteractionView"
        xmlns="http://schemas.microsoft.com/winfx/2006/xaml/presentation"
        xmlns:x="http://schemas.microsoft.com/winfx/2006/xaml"
        xmlns:d="http://schemas.microsoft.com/expression/blend/2008"
        xmlns:mc="http://schemas.openxmlformats.org/markup-compatibility/2006"
        xmlns:local="clr-namespace:WpfBlogExamples"
        mc:Ignorable="d"
        xmlns:i="http://schemas.microsoft.com/xaml/behaviors"
        Title="InteractionView" Height="450" Width="800">
    <Grid>
        <StackPanel Orientation="Vertical">
            <TextBlock Text="Interaction Example" Margin="10,20,0,0" FontSize="20"/>
            <Button Content="Hover over me" Height="40" Margin="0,20,0,0">
                <i:Interaction.Triggers>
                    <i:EventTrigger EventName="MouseEnter">
                        <i:InvokeCommandAction Command="{Binding ButtonMouseEnterCommand}" />
                    </i:EventTrigger>
                    <i:EventTrigger EventName="MouseLeave">
                        <i:InvokeCommandAction Command="{Binding ButtonMouseLeaveCommand}" />
                    </i:EventTrigger>
                </i:Interaction.Triggers>
            </Button>
        </StackPanel>
    </Grid>
</Window>
Step 5. The code behind the provided view would typically contain logic related to the view's lifecycle events or any other UI-related functionality that cannot be expressed in XAML. Here's a generic example of what the code-behind file might look like for the " InteractionView".
using System.Windows;

namespace WpfBlogExamples
{
    /// <summary>
    /// Interaction logic for InteractionView.xaml
    /// </summary>
    public partial class InteractionView : Window
    {
        public InteractionView()
        {
            InitializeComponent();
            this.DataContext = new InteractionViewModel();
        }
    }
}
Step 6. Implementation of events in the ViewModel within the MVVM pattern.
using Prism.Commands;
using Prism.Mvvm;
using System.Windows;
using System.Windows.Input;

namespace WpfBlogExamples
{
    public class InteractionViewModel : BindableBase
    {
        public ICommand ButtonMouseEnterCommand { get; private set; }
        public ICommand ButtonMouseLeaveCommand { get; private set; }

        public InteractionViewModel()
        {
            ButtonMouseEnterCommand = new DelegateCommand<object>(ExecuteButtonMouseEnterCommand);
            ButtonMouseLeaveCommand = new DelegateCommand<object>(ExecuteButtonMouseLeaveCommand);
        }

        private void ExecuteButtonMouseEnterCommand(object parameter)
        {
            MessageBox.Show("Mouse enter event is fired");
        }

        private void ExecuteButtonMouseLeaveCommand(object parameter)
        {
            MessageBox.Show("Mouse leave event is fired");
        }
    }
}
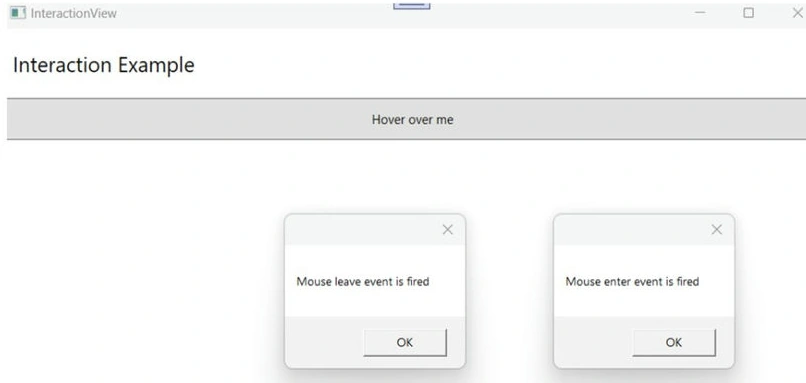
Step 7. The resulting output will appear as follows.
Join the conversation! Your thoughts help the community grow.