

Azure Managed Identities provide an identity for applications to use when connecting to resources that support Azure AD authentication. In this blog, we will walk through the steps to create a User Managed Identity and assign it to an Azure Function App using a PowerShell script.
Introduction
User Managed Identities (UMIs) in Azure are useful for managing and controlling the authentication of your Azure resources without needing to manage credentials explicitly. By assigning a UMI to your Azure Function App, you can securely access other Azure resources such as Azure Key Vault, Azure Storage, and more.
Use Cases
- Securely Access Resources: Use UMIs to securely access Azure services without hardcoding credentials.
- Automate Identity Assignment: Simplify identity management in CI/CD pipelines.
- Improve Security: Reduce the risk of credential leakage by using managed identities.
Steps to Assign a User Managed Identity to an Azure Function App
Create a User Managed Identity
- In the Azure portal, navigate to the "Managed identities" service.
- Click on "Create" and provide the necessary details such as the resource group and name for the managed identity.

- Click "Review + create" and then "Create".
Get the User Managed Identity Resource ID
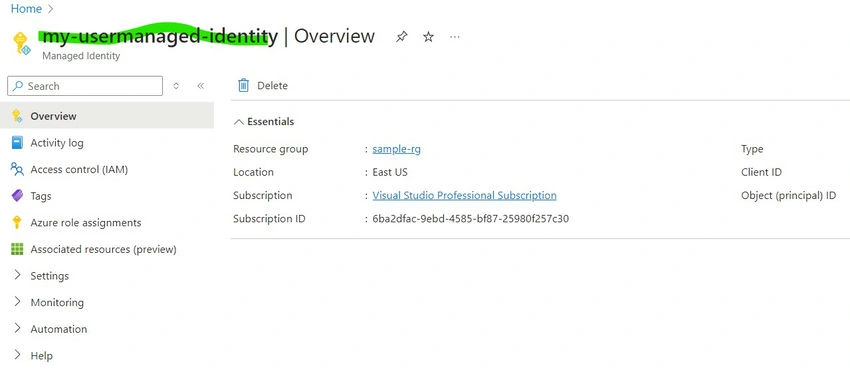
- Once the managed identity is created, go to its overview page.
- Copy the Name of the Managed Identity; you will need this to assign the identity to your Function App.
Assign the User-Managed Identity to the Function App:
- Ensure you have the Azure CLI installed and you are authenticated to your Azure subscription. You can download and install the Azure CLI from here.
az login - Use the provided PowerShell script to assign the user-managed identity to your Function App.
#Function to deploy Assign-SystemManagedIdentityFunctionApp
Function Assign-UserManagedIdentityFunctionApp {
    #Parameters - FunctionAppName, ResourceGroupName, SubscriptionId, Slot, UserManagedIdentity
    [CmdletBinding()]
    param (
      #FunctionApp Name
      [Parameter(Mandatory = $true)]
      [ValidateNotNullOrEmpty()]
      [String]$FunctionAppName,

      #ResourceGroup Name
      [Parameter(Mandatory = $true)]
      [ValidateNotNullOrEmpty()]
      [String]$ResourceGroupName,

      #Subscription Id
      [Parameter(Mandatory = $true)]
      [ValidateNotNullOrEmpty()]
      [String]$SubscriptionId,

      #Slot
      [Parameter(Mandatory = $false)]
      [String]$Slot,

      #UserManagedIdentity
      [Parameter(Mandatory = $true)]
      [ValidateNotNullOrEmpty()]
      [String]$UserManagedIdentity

    )
    Write-Host "##[debug] -----Starting Assign-SystemManagedIdentityFunctionApp-----" -ForegroundColor Cyan
    Write-Host "##[command] Parameters" -ForegroundColor Yellow
    "_" * 10
    # Get the command name
    $CommandName = $PSCmdlet.MyInvocation.InvocationName;
    # Get the list of parameters for the command
    $ParameterList = (Get-Command -Name $CommandName).Parameters;

    # Grab each parameter value, using Get-Variable
    foreach ($Parameter in $ParameterList) {
      Get-Variable -Name $Parameter.Values.Name -ErrorAction SilentlyContinue;
      #Get-Variable -Name $ParameterList;
    }

    #Set Subscription
    Write-Host "Setting Subscription"
    az account set -s $SubscriptionId

    try {
      Write-Host "Getting UsermanagedIdentity ResourceID"
      $ManagedId = az resource list  -g $ResourceGroupName -n $UserManagedIdentity --query [].id -o tsv
      Write-Host $ManagedId
      Write-Host "Assigning System Managed Identity for functionapp:$FunctionAppName"
      az webapp identity assign -g $ResourceGroupName -n $FunctionAppName --identities $ManagedId
      Write-Host "##[debug] -----Completed Assign-SystemManagedIdentityFunctionApp-----" -ForegroundColor Cyan
    }
    catch [Exception] {
      write-host $_.Exception.Message
      Write-Host "`nError in Line: " $_.InvocationInfo.Line
      Write-Host "`nError in Line Number: "$_.InvocationInfo.ScriptLineNumber
      Write-Host "`nError Item Name: "$_.Exception.ItemName
      throw $_.Exception.Message
    }
  }

  Assign-UserManagedIdentityFunctionApp -FunctionAppName "samplefunc-rg" -ResourceGroupName "sample-rg"  -SubscriptionId "6ba2dfac-" -UserManagedIdentity "my-usermanaged-identity"
This will Output
 \
\
Validate in Azure Function App
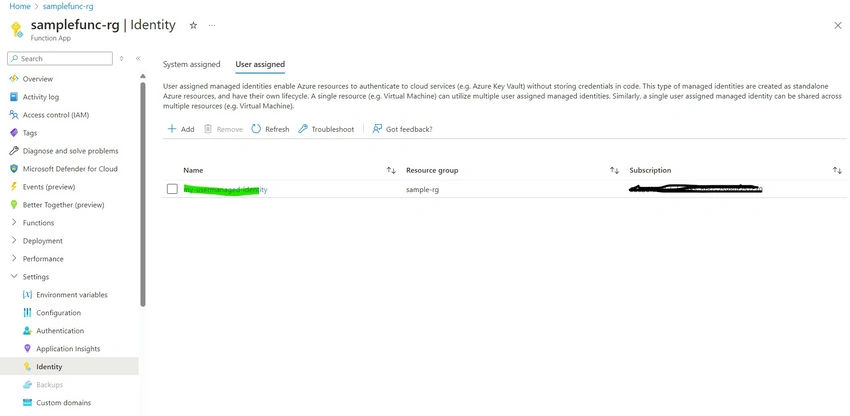
- Go to Azure Portal -> Function App -> Identity
- Go to User assigned and Validate whether Identity is assigned or not
Conclusion
By following these steps and using the provided PowerShell script, you can efficiently assign a User Managed Identity to your Azure Function App. This enables secure and managed access to other Azure resources, enhancing your application's security and simplifying identity management.
Join the conversation! Your thoughts help the community grow.