

Before we create a Google Map application we need Signed Fingerprint SHA1 KEY. So, I already explained how to create SHA1 KEY.
Step 1:
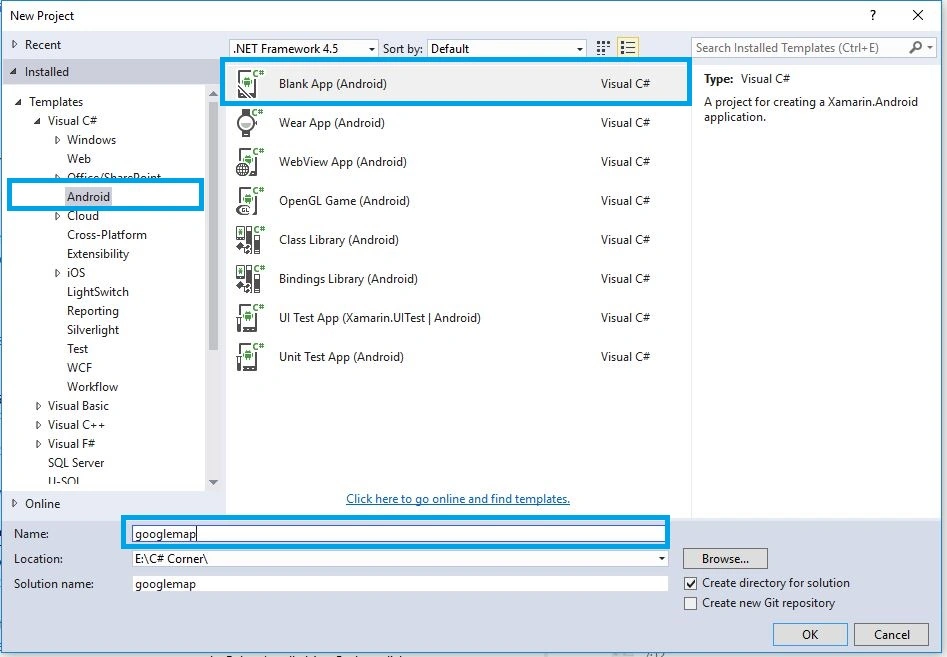
Open Visual Studio, New Project, Templates, Visual C#, Android, then click Blank App, and select Blank App. Then give Project Name and Project Location.
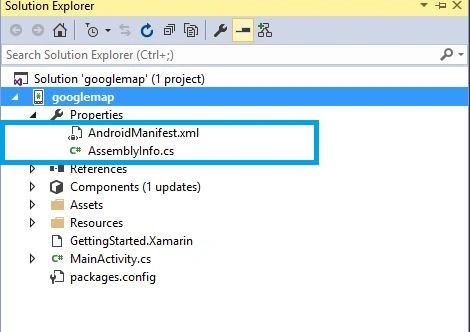
Step 2:Next Click to select Solution Explorer->Project Name->Properties-> AndroidManifest.xml file.
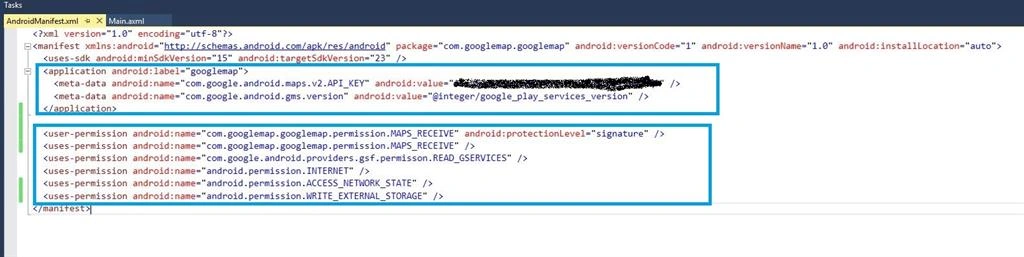
Step 3: Here will be Copy and paste of the already created Google Map SHA1 KEY and alsoit will give some permissions.
XML Code:
- <?xml version="1.0" encoding="utf-8"?>
- <manifest xmlns:android="http://schemas.android.com/apk/res/android" package="com.googlemap.googlemap" android:versionCode="1" android:versionName="1.0" android:installLocation="auto">
- <uses-sdk android:minSdkVersion="15" android:targetSdkVersion="23" />
- <application android:label="googlemap">
- <meta-data android:name="com.google.android.maps.v2.API_KEY" android:value="YOUR_API KEY" />
- <meta-data android:name="com.google.android.gms.version" android:value="@integer/google_play_services_version" />
- </application>
- <user-permission android:name="com.googlemap.googlemap.permission.MAPS_RECEIVE" android:protectionLevel="signature" />
- <uses-permission android:name="com.googlemap.googlemap.permission.MAPS_RECEIVE" />
- <uses-permission android:name="com.google.android.providers.gsf.permisson.READ_GSERVICES" />
- <uses-permission android:name="android.permission.INTERNET" />
- <uses-permission android:name="android.permission.ACCESS_NETWORK_STATE" />
- </manifest>
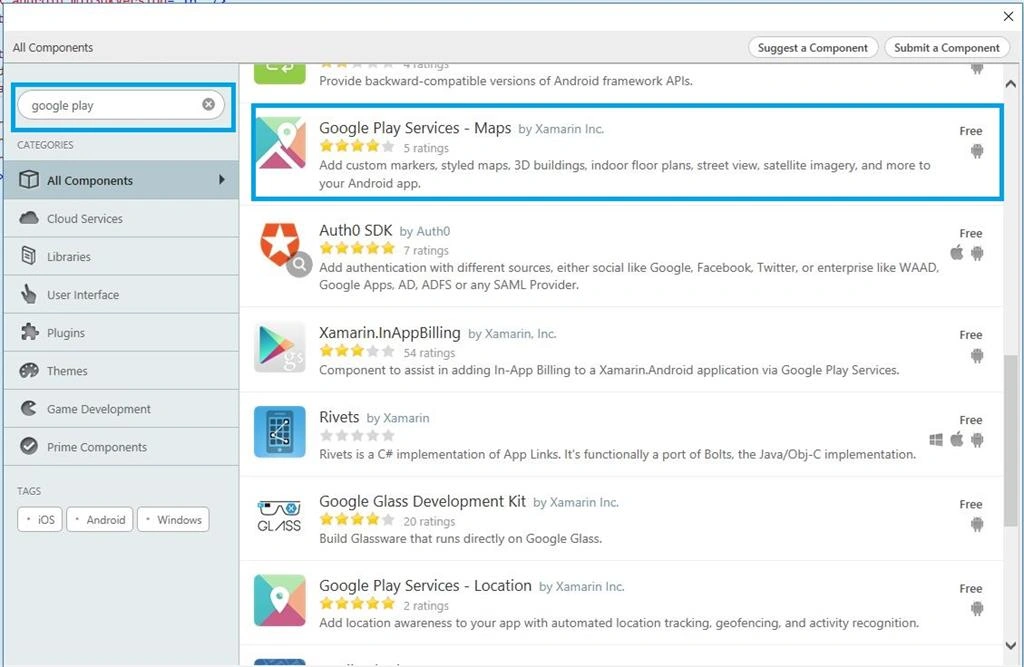
Step 5:
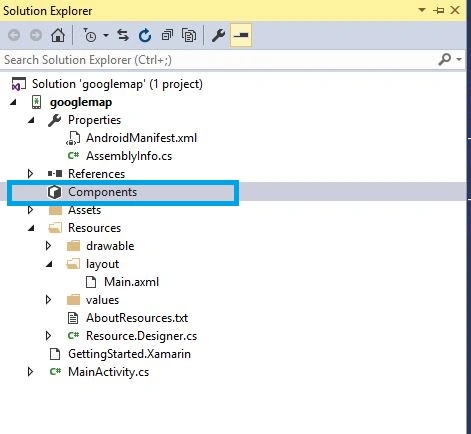
Then Add packages Google Play services - Maps, then check Solution Explorer-Project Name->References to be added Google play services packages.
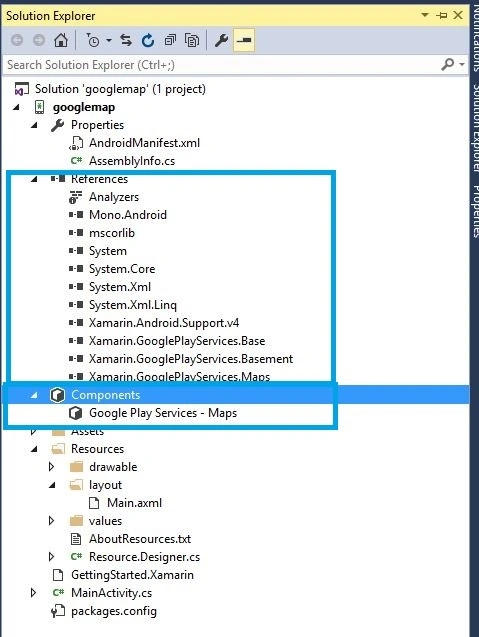
Step 6:
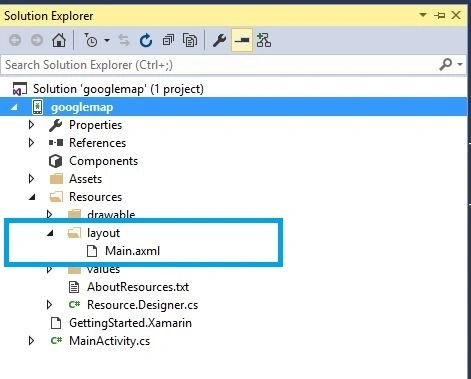
Next create Map function. In select Solution Explorer->Project Name->Resources->Layout->Main.axml, Click and open AXML Design Page to added below Code.
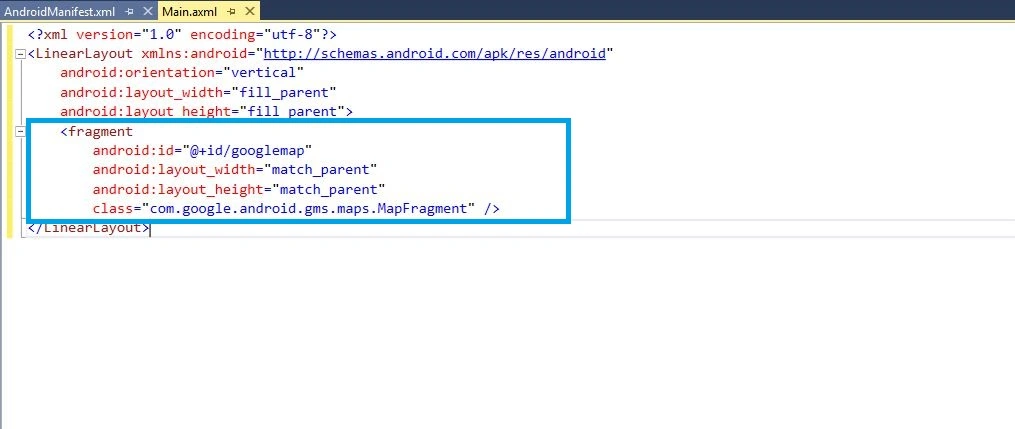
XML CODE:
- <?xml version="1.0" encoding="utf-8"?>
- <LinearLayout xmlns:android="http://schemas.android.com/apk/res/android"
- android:orientation="vertical"
- android:layout_width="fill_parent"
- android:layout_height="fill_parent">
- <fragment
- android:id="@+id/googlemap"
- android:layout_width="match_parent"
- android:layout_height="match_parent"
- class="com.google.android.gms.maps.MapFragment" />
- </LinearLayout>
Step 7: Next open MainActivity.cs page, then Add Namespace and following code.
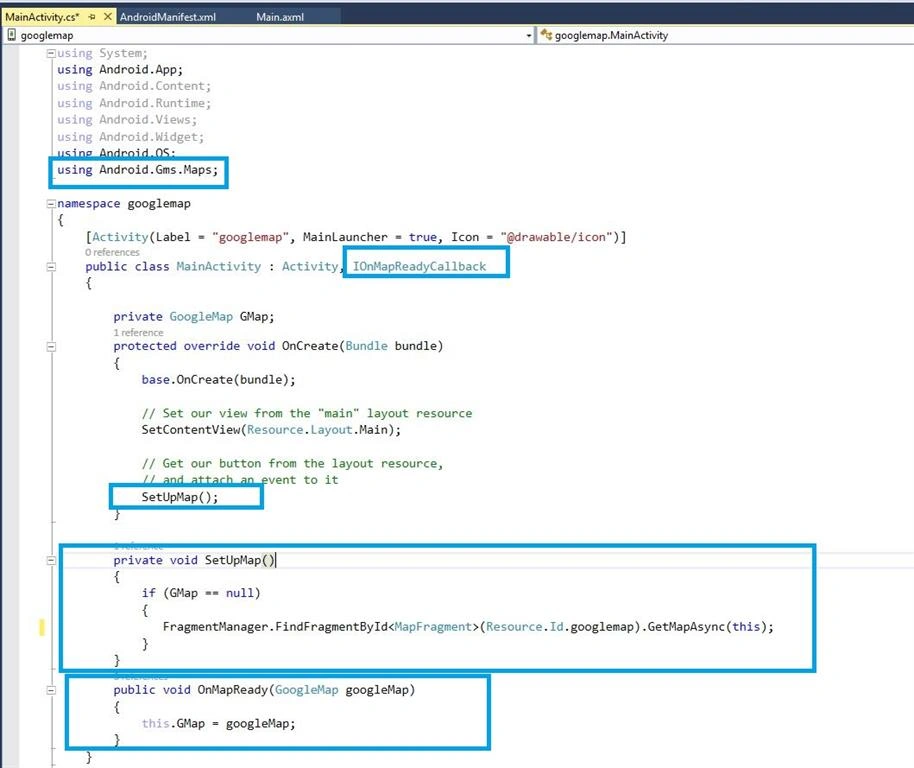
Namespace: using Android.Gms.Maps;
C# Code:
- public class MainActivity: Activity, IOnMapReadyCallback
- {
- private GoogleMap GMap;
- protected override void OnCreate(Bundle bundle)
- {
- base.OnCreate(bundle);
- // Set our view from the "main" layout resource
- SetContentView(Resource.Layout.Main);
- SetUpMap();
- }
- private void SetUpMap() {
- if (GMap == null) {
- FragmentManager.FindFragmentById < MapFragment > (Resource.Id.googlemap).GetMapAsync(this);
- }
- }
- public void OnMapReady(GoogleMap googleMap) {
- this.GMap = googleMap;
- }
- }
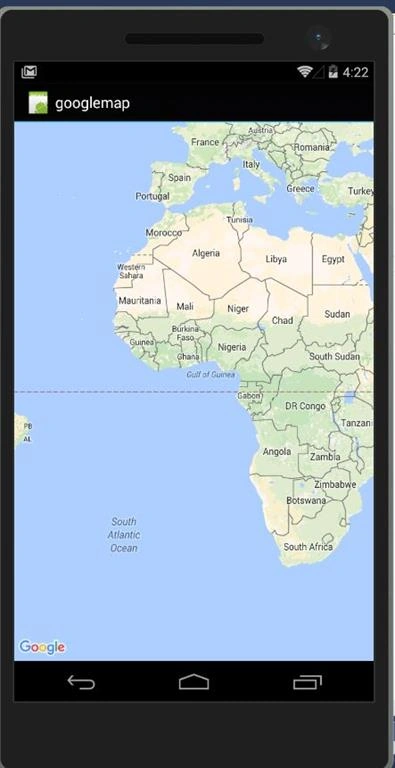
Step 8: Then Debug and run the application then check emulator showing Google map,
Step 9: Next Google map Marker will be added.
Step 10: Open MainActivity.cs page select section of OnMapReady Function to added following code.
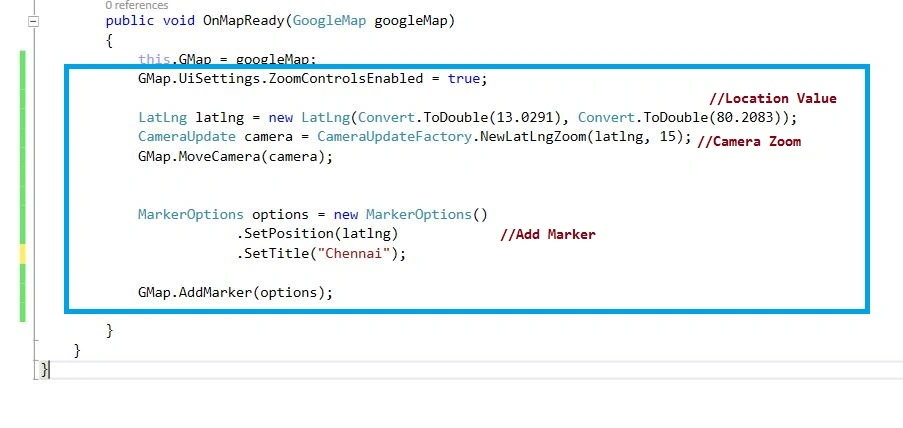
C# Code:
- LatLng latlng = new LatLng(Convert.ToDouble(13.0291), Convert.ToDouble(80.2083));
- CameraUpdate camera = CameraUpdateFactory.NewLatLngZoom(latlng, 15);
- GMap.MoveCamera(camera);
- MarkerOptions options = new MarkerOptions().SetPosition(latlng).SetTitle("Chennai");
- GMap.AddMarker(options);
Step 11: Then Run the Application,
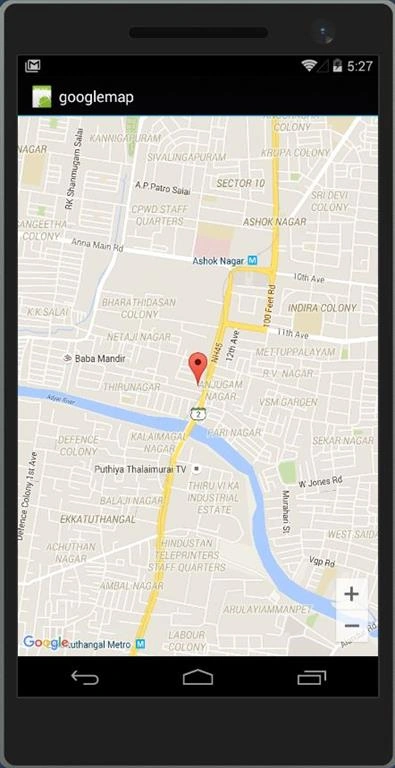
Finally, we have successfully created Xamarin Android Google Map with marker Application.
Muhammad ZubairPosted Jul 24, 2019, 1:00 PM
Helpful.thanks
unknown unknownPosted Feb 19, 2019, 11:18 AM
Hi, and how can i set target, destination and eventually middle points between?
Thamaraiselvan TPosted May 23, 2018, 8:13 AM
Hi, Everything works fine as per your tutorial. Now, I need the features as we are searching locations in Google maps. I mean, I want to show the route between my location and given location. Is it possible with this?
zohre rafieiPosted Mar 5, 2018, 3:05 PM
Hi. in my project android.gms.maps dont work . why?
Tany HTPosted Nov 22, 2017, 10:51 PM
Very good tutorial... I followed step by step and woooow, it worked!!!
Luis GualotoPosted Oct 30, 2017, 3:10 PM
Porfa una ayuda con esto me aparece en blanco la pantalla del mapa solo aparece el logo de google y los botones de acercar y alejar pero que en blano la pantalla...?
Umair KhanPosted Oct 4, 2017, 7:59 AM
I follow your code step by step but in last in my phone maps are not showing just yellow screen apear how to show proper map
Debdeep NandyPosted Sep 8, 2017, 3:21 AM
Please send me a link json parsing example using xamarin
Guillermo AlonsoPosted Sep 4, 2017, 12:55 PM
Hi , when i run the sample project, i do get the google map viewer but without any map , just google logo and zoom toolbar. No exception reported. How can I know if the API is expired? My API's KEY name is MapaME, is this WRONG? Can you help me please? Thanks
Mohsin Ali AyubPosted Aug 6, 2017, 1:18 AM
Hi, I tried your solution but it throws this exception: "Unhandled Exception: Android.Views.InflateException: Binary XML file line #1: Binary XML file line #1: Error inflating class fragment"
Ruwan RatnayakePosted Jul 20, 2017, 10:24 AM
I tried your source code with Visual studio 2015, but its not working, showing errors.
maxiPosted Feb 12, 2017, 4:53 PM
Hi Anbu, i got the same problem with the map, it doesnt render, but my api key is correct, it only shows the google logo below with a blank screen, can u help me? thank you
chandu guntiPosted Feb 7, 2017, 6:14 AM
I got Solution Anbu..this is all because of api
chandu guntiPosted Feb 6, 2017, 8:03 AM
My api key not even expired
chandu guntiPosted Feb 6, 2017, 8:02 AM
Hi , when i run the sample project, i do get the google map viewer but without any map , just google logo and zoom toolbar. No exception reported.
Vishnu BhangalePosted Feb 6, 2017, 1:36 AM
Hi i am getting error in axml class attribute is not declare
chandu guntiPosted Feb 5, 2017, 8:53 AM
Error 70 No resource found that matches the given name (at 'value' with value '@integer/google_play_services_version'). C:\Users\user_1601_01\Documents\Visual Studio 2013\Projects\NewTrackPool\NewTrackPool\obj\Debug\android\manifest\AndroidManifest.xml 18 NewTrackPool
chandu guntiPosted Feb 5, 2017, 8:53 AM
Error 69 No resource found that matches the given name (at 'value' with value '@integer/google_play_services_version'). C:\Users\user_1601_01\Documents\Visual Studio 2013\Projects\NewTrackPool\NewTrackPool\obj\Debug\android\manifest\AndroidManifest.xml 17 NewTrackPool
chandu guntiPosted Feb 5, 2017, 8:52 AM
Im getting error in AndroidManifest.xml
chandu guntiPosted Feb 5, 2017, 8:49 AM
Using Android.App;using Android.Widget; using Android.OS; using Android.Gms.Maps; using Android.Gms.Maps.Model; namespace NewTrackPool { [Activity(Label = "NewTrackPool", MainLauncher = true, Icon = "@drawable/icon")] public class MainActivity : Activity,IOnMapReadyCallback { protected override void OnCreate(Bundle bundle) { base.OnCreate(bundle); // Set our view from the "main" layout resource SetContentView (Resource.Layout.Main); MapFragment mapFragment = (MapFragment)FragmentManager.FindFragmentById(Resource.Id.map); mapFragment.GetMapAsync(this); } public void OnMapReady(GoogleMap googleMap) { MarkerOptions markerOptions = new MarkerOptions(); markerOptions.SetPosition(new LatLng(18.2019,79.3967)); markerOptions.SetTitle("My place"); googleMap.AddMarker(markerOptions); googleMap.UiSettings.ZoomControlsEnabled = true; googleMap.UiSettings.CompassEnabled = true; googleMap.MoveCamera(CameraUpdateFactory.ZoomIn()); } } } <?xml version="1.0" encoding="utf-8"?> <manifest xmlns:android="http://schemas.android.com/apk/res/android" package="NewTrackPool.NewTrackPool" android:versionCode="1" android:versionName="1.0" android:installLocation="auto"> <uses-sdk android:minSdkVersion="15" android:targetSdkVersion="23" /> <uses-permission android:name="android.permission.INTERNET" /> <uses-permission android:name="android.permission.WRITE_EXTERNAL_STORAGE" /> <uses-permission android:name="android.permission.ACCESS_NETWORK_STATE" /> <uses-permission android:name="android.permission.ACCESS_FINE_LOCATION" /> <uses-permission android:name="android.permission.ACCESS_COARSE_LOCATION" /> <uses-permission android:name="com.google.andriod.providers.gsf.permission.READ_GSERVICES" /> <uses-permission android:name="NewTrackPool.NewTrackPool.permissions.MAPS_RECEIVE" android:protectionLevel="signature" /> <uses-features android:glEsVersion="0x00020000" android:required="true" /> <application android:label="NewTrackPool"> <meta-data android:name="com.google.andriod.maps.v2.API_KEY" android:value="@string/GoogleKey" /> <meta-data android:name="com.google.andriod.gms.version" android:value="@integer/google_play_services_version" /> </application> </manifest>
chandu guntiPosted Feb 5, 2017, 8:48 AM
Using Android.App;using Android.Widget;using Android.OS; using Android.Gms.Maps; using Android.Gms.Maps.Model; namespace NewTrackPool { [Activity(Label = "NewTrackPool", MainLauncher = true, Icon = "@drawable/icon")] public class MainActivity : Activity,IOnMapReadyCallback { protected override void OnCreate(Bundle bundle) { base.OnCreate(bundle); // Set our view from the "main" layout resource SetContentView (Resource.Layout.Main); MapFragment mapFragment = (MapFragment)FragmentManager.FindFragmentById(Resource.Id.map); mapFragment.GetMapAsync(this); } public void OnMapReady(GoogleMap googleMap) { MarkerOptions markerOptions = new MarkerOptions(); markerOptions.SetPosition(new LatLng(18.2019,79.3967)); markerOptions.SetTitle("My place"); googleMap.AddMarker(markerOptions); googleMap.UiSettings.ZoomControlsEnabled = true; googleMap.UiSettings.CompassEnabled = true; googleMap.MoveCamera(CameraUpdateFactory.ZoomIn()); } } }
chandu guntiPosted Feb 3, 2017, 5:47 AM
Hi,please help me to get the solution..
chandu guntiPosted Feb 1, 2017, 6:53 AM
Hi,for me it is throwing No resource found that matches the given name (at 'value' with value '@integer/google_play_services_version').please let me know
Vishal NayanPosted Jan 29, 2017, 6:56 AM
In a new project i a getting this error when i set the content view "Android.Views.InflateException: Binary XML file line #1: Error inflating class fragment". Any idea how to fix this
Vishal NayanPosted Jan 29, 2017, 6:54 AM
Yes , it was key issue, thanks
Vishal NayanPosted Jan 28, 2017, 2:52 AM
Hi , when i run the sample project, i do get the google map viewer but without any map , just google logo and zoom toolbar. No exception reported.
Anbu ManiPosted Dec 26, 2016, 6:01 AM
You Installed Google Play services Package getting Error..so please reinstall that packages
selvam krPosted Dec 22, 2016, 2:32 AM
HI Anbu, i used your code but am getting error like "error : error: package com.google.android.gms.maps.model does not exist" nearly 100 errors how i can solve this? am using visual studio 2015, when i'll add google playservices.map then i'll get these error,
Anbu ManiPosted Nov 7, 2016, 11:09 PM
Pls Show me u r screenshot.....
Alamgeer AshrafPosted Nov 7, 2016, 5:45 AM
I m new to xamarin when i m using this tutorial i got "Android.Views.InflateException: Binary XML file line #1: Error inflating class fragment" how to fix it
Sagar KalokhePosted Aug 21, 2016, 9:02 AM
Great article Mani,really help me lot
Tien Ngoc NguyenPosted Aug 8, 2016, 3:53 AM
Hi, could you support to me. I use VS2015 on Win 10, when drag frament on xaml file has error "the element 'LinearLayout' has invalid child element fragment android xamarin ..." I add V4 and v7 and google play service maps. http://nhocbi.com/Capture.PNG , http://nhocbi.com/Capture1.PNG. Thanks !
Lavanya PasupuletiPosted Jul 12, 2016, 9:28 AM
I'm new to xamarin,can we use google maps for UWP as well?
manu g sPosted Jun 30, 2016, 3:52 AM
Hello Anbu Mani, I am getting the above error, once i drag the fragment on AXML file..pls help me out, if run the program at the end i will get like "Android.Views.InflateException: Binary XML file line #1: Error inflating class fragment" i have checked the spell and same as it is.. added v4 and v7 reference no use.. struck from 3 to 4 days no sol in internet too.
manu g sPosted Jun 30, 2016, 3:52 AM
Everity Code Description Project File Line Suppression StateWarning The element 'LinearLayout' has invalid child element 'fragment'. List of possible elements expected: 'GLSurfaceView, AdapterView, AdapterViewAnimator, AutoCompleteTextView, MediaController, TextView, FragmentBreadCrumbs, AppWidgetHostView, GestureOverlayView, ExtractEditText, KeyboardView, RSSurfaceView, RSTextureView, SurfaceView, TextureView, ViewGroup, ViewStub, WebView, AbsListView, AbsSeekBar, AbsSpinner, AbsoluteLayout, AdapterViewFlipper, AnalogClock, Button, CalendarView, CheckBox, CheckedTextView, Chronometer, CompoundButton, DatePicker, DialerFilter, DigitalClock, EditText, ExpandableListView, FrameLayout, Gallery, GridLayout, GridView, HorizontalScrollView, ImageButton, ImageSwitcher, ImageView, LinearLayout, ListView, MultiAutoCompleteTextView, NumberPicker, ProgressBar, QuickContactBadge, RadioButton, RadioGroup, RatingBar, RelativeLayout, ScrollView, SearchView, SeekBar, SlidingDrawer, Space, Spinner, StackView, Switch, TabHost, TabWidget, TableLayout, TableRow, TextSwitcher, TimePicker, ToggleButton, TwoLineListItem, VideoView, ViewAnimator, ViewFlipper, ViewSwitcher, ZoomButton, ZoomControls'. Map c:\users\User\documents\visual studio 2015\Projects\Map\Map\Resources\layout\Main.axml 6
Prasanna MuraliPosted May 20, 2016, 9:31 PM
Nice one...
Travis SchoeningPosted May 10, 2016, 7:49 PM
Thanks for the article. With this setup, do you have an example on how to capture gesture events (Mainly zoom and pan)
RajaPosted May 4, 2016, 1:17 AM
Great Work.keep It Up.:)
Manoj KulkarniPosted May 3, 2016, 11:05 PM
Nice article
Del WoodcockPosted May 3, 2016, 12:49 PM
Nice!