
Introduction
In this post, we will learn how we can use AngularJS Framework with Web API2 to call HTTP Services implemented in Part 1. I hope, you will like this.
In this part, we are going to-
- Implement module, routing, service and controller.
- Create different HTML pages to perform CRUD operations.
Implement module, routing, service and controller
First of all, we need to add 3 JS files respectively- AppEmployee.js, EmployeeService.js and EmployeeController.js
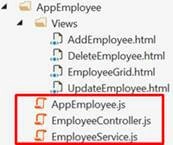
For doing this, right click on AppEmployee folder> Add > JavaScript file.
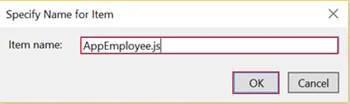
AppEmployee.js
- var app = angular.module('myApp', ['ngRoute']);
- app.config(['$routeProvider', function($routeProvider) {
- $routeProvider.when('/EmployeeGrid', { //route to get EmployeeGrid.html page
- templateUrl: '/AppEmployee/Views/EmployeeGrid.html',
- controller: 'EmployeeController'
- }).when('/AddEmployee', { //route to get AddEmployee.html page
- templateUrl: '/AppEmployee/Views/AddEmployee.html',
- controller: 'EmployeeController'
- }).when('/EditEmployee/:Id', { //route to get UpdateEmployee.html page
- templateUrl: '/AppEmployee/Views/UpdateEmployee.html',
- controller: 'EmployeeController'
- }).when('/DeleteEmployee/:Id', { //route to get DeleteEmployee.html page
- templateUrl: '/AppEmployee/Views/DeleteEmployee.html',
- controller: 'EmployeeController'
- }).otherwise({
- controller: 'EmployeeController'
- });
- }]);
- // This is just a sample script. Paste your real code (javascript or HTML) here.
- if ('this_is' == /an_example/) {
- of_beautifier();
- } else {
- var a = b ? (c % d) : e[f];
- }
Once configuring routes are finished, it’s time to implement all the Services required, which should be used to perform CRUD operations.
EmployeeService.js
- app.factory('EmployeeFactory', function($http, $q, $timeout) {
- var factory = {
- EmployeeList: [],
- //Get Employee List
- getEmployeeList: function() {
- var deferred = $q.defer();
- $http.get('api/Employee/GetListEmployee').success(function(data) {
- factory.EmployeeList = data;
- $timeout(function() {
- deferred.resolve(factory.EmployeeList);
- }, 2000);
- }).error(function() {
- deferred.reject('Error !');
- });
- return deferred.promise;
- },
- //Add New Employee
- addNewEmployee: function(newEmployee) {
- var deferred = $q.defer();
- $http.post('api/Employee/AddNewEmployee', newEmployee).success(function(data) {
- deferred.resolve(newEmployee);
- }).error(function() {
- deferred.reject('Error !');
- });
- return deferred.promise;
- },
- //Details Employee
- detailsEmployee: function(id) {
- var deferred = $q.defer();
- $http.get('api/Employee/DetailsEmployee/' + id).success(function(data) {
- $timeout(function() {
- deferred.resolve(data);
- }, 2000);
- }).error(function() {
- deferred.reject('Error !');
- });
- return deferred.promise;
- },
- //Update Employee
- updateEmployee: function(Employee) {
- var deferred = $q.defer();
- $http.put('api/Employee/UpdateEmployee', Employee).success(function(data) {
- deferred.resolve(data);
- }).error(function() {
- deferred.reject('Error !');
- });
- return deferred.promise;
- },
- //Delete Employee
- deleteEmployee: function(id) {
- var deferred = $q.defer();
- $http.delete('api/Employee/DeleteEmployee/' + id).success(function(data) {
- deferred.resolve(data);
- }).error(function() {
- deferred.reject('Error !');
- });
- return deferred.promise;
- }
- };
- return factory
- });
| Function | Description |
| getEmployeeList() | It Is used to retrieve all the data from the database table. |
| addNewEmployee() | It Is defined to add new employee in our database. |
| detailsEmployee(id) | Performs to get back data related to each employee. This function takes an Id as a parameter. |
| updateEmployee() | It Is used to modify information’s employee. |
| deleteEmployee(id) | This function deletes an employee, based on his Id. |
Note
- $http- It is a core Angular Service, which facilities the communication with the remote HTTP Servers via the Browser’s XMLHttpRequest object or via JSONP.
- $q- It helps you to run functions asynchronously and use their return values (or exceptions), when they are done processing.
EmployeeController.js
- app.controller('EmployeeController', ['$scope', 'EmployeeFactory', '$location', '$routeParams', function($scope, EmployeeFactory, $location, $routeParams) {
- $scope.EmployeeList;
- //Get all Employee
- EmployeeFactory.getEmployeeList().then(function(data) {
- $scope.EmployeeList = data;
- }, function(msg) {
- console.log(msg);
- });
- //Add new Employee
- $scope.AddNewEmployee = function() {
- var employee = {
- FirstName: $scope.FirstName,
- LastName: $scope.LastName,
- Gender: $scope.Gender,
- Designation: $scope.Designation,
- Salary: $scope.Salary,
- City: $scope.City,
- Country: $scope.Country
- };
- //debugger;
- EmployeeFactory.addNewEmployee(employee).then(function(data) {
- $location.path('/EmployeeGrid');
- }, function() {
- console.log('Error');
- });
- };
- //mapping Employee
- function mappingEmployee(employee) {
- $scope.EmployeeID = employee.EmployeeID;
- $scope.FirstName = employee.FirstName;
- $scope.LastName = employee.LastName;
- $scope.Gender = employee.Gender;
- $scope.Designation = employee.Designation;
- $scope.Salary = employee.Salary;
- $scope.City = employee.City;
- $scope.Country = employee.Country;
- }
- if ($routeParams.Id) {
- var id = $routeParams.Id;
- EmployeeFactory.detailsEmployee(id).then(function(data) {
- mappingEmployee(data);
- }, function() {
- console.log('Error');
- });
- }
- //Update Employee
- $scope.UpdateEmployee = function() {
- var employee = {
- EmployeeID: $scope.EmployeeID,
- FirstName: $scope.FirstName,
- LastName: $scope.LastName,
- Gender: $scope.Gender,
- Designation: $scope.Designation,
- Salary: $scope.Salary,
- City: $scope.City,
- Country: $scope.Country
- };
- //debugger;
- EmployeeFactory.updateEmployee(employee).then(function(data) {
- $location.path('/EmployeeGrid');
- }, function() {
- console.log('Error');
- });
- }
- //Delete Employee
- $scope.DeleteEmployee = function() {
- var Id = $scope.EmployeeID;
- EmployeeFactory.deleteEmployee(Id).then(function(data) {
- $location.path('/EmployeeGrid');
- }, function(msg) {
- console.log(msg);
- })
- }
- }]);
In Employee controller, I have used the same logic based on 2 steps,
- Calling your Service (ex: EmployeeFactory.getEmployeeList()).
- Using then (function(data){$scope.EmployeeList = data; }) expression, if the Service has been executed will be successful, else Function(msg){console.log(msg)}, if the error has been thrown.
Note
Don’t forget to call the following libraries inside Layout.cshtml
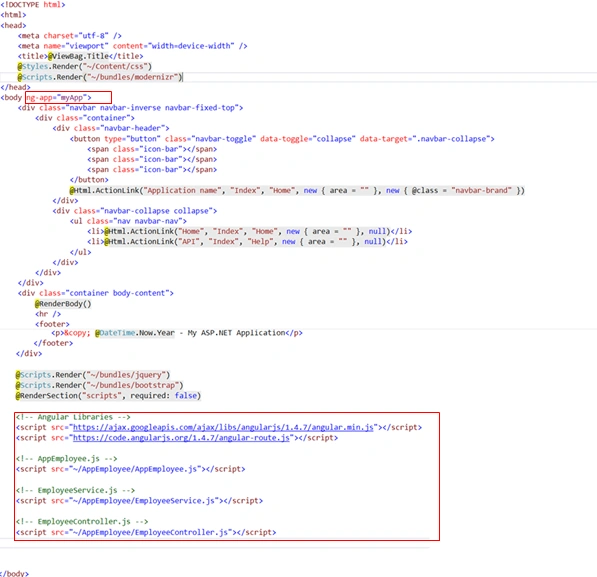
Create different html pages to perform CRUD operations
Now, add new folder from Solution Explorer and inside it, we are going to add 4 HTML files.
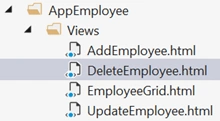
EmployeeGrid.html
- <ahrefahref="#/AddEmployee" class="btn btn-default btn-sm">Add New Employee</a>
- <br/>
- <divclassdivclass="table-responsive">
- <tableidtableid="mytable" class="table table-bordred table-striped">
- <thead>
- <th>EmployeeID</th>
- <th>First Name</th>
- <th>Last Name</th>
- <th>Gender</th>
- <th>Designation</th>
- <th>Salary</th>
- <th>City</th>
- <th>Country</th>
- <th>Edit</th>
- <th>Delete</th>
- </thead>
- <tbody>
- <trng-repeattrng-repeat="iteminEmployeeList">
- <td>{{item.EmployeeID}}</td>
- <td>{{item.FirstName}}</td>
- <td>{{item.LastName}}</td>
- <td>{{item.Gender}}</td>
- <td>{{item.Designation}}</td>
- <td>{{item.Salary}}</td>
- <td>{{item.City}}</td>
- <td>{{item.Country}}</td>
- <td>
- <aclassaclass="btn btn-primary btn-success" href="#/EditEmployee/{{item.EmployeeID}}">
- Edit
- </a>
- </td>
- <td>
- <aclassaclass="btn btn-warning" href="#/DeleteEmployee/{{item.EmployeeID}}">
- Delete
- </a>
- </td>
- </tr>
- </tbody>
- </table>
- </div>
Now, you can run your Application. Don’t forget to change the URL address, given below-
http://localhost:55192/#/EmployeeGrid
Let’s see the output, given below-
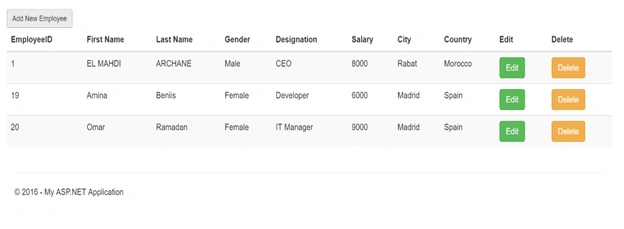
- EmployeeID First Name Last Name Gender Designation Salary City Country Edit Delete {
- {
- item.EmployeeID
- }
- } {
- {
- item.FirstName
- }
- } {
- {
- item.LastName
- }
- } {
- {
- item.Gender
- }
- } {
- {
- item.Designation
- }
- } {
- {
- item.Salary
- }
- } {
- {
- item.City
- }
- } {
- {
- item.Country
- }
- }
- Edit Delete ">
- <formmethodformmethod="post">
- <h4> Add New Employee </h4>
- <divclassdivclass="form-group">
- <labelforlabelfor="InputFirstName">FirstName</label>
- <inputtypeinputtype="text" class="form-control" id="InputFirstName" placeholder="First Name" ng-model="FirstName">
- </div>
- <divclassdivclass="form-group">
- <labelforlabelfor="InputLastName">Last Name</label>
- <inputtypeinputtype="text" class="form-control" id="InputLastName" placeholder="Last Name" ng-model="LastName">
- </div>
- <divclassdivclass="form-group">
- <labelforlabelfor="InputGender">Gender</label>
- <inputtypeinputtype="text" class="form-control" id="InputGender" placeholder="Gender" ng-model="Gender">
- </div>
- <divclassdivclass="form-group">
- <labelforlabelfor="InputDesignation">Designation</label>
- <inputtypeinputtype="text" class="form-control" id="InputDesignation" placeholder="Designation" ng-model="Designation">
- </div>
- <divclassdivclass="form-group">
- <labelforlabelfor="InputSalary">Salary</label>
- <inputtypeinputtype="text" class="form-control" id="InputSalary" placeholder="Salary" ng-model="Salary">
- </div>
- <divclassdivclass="form-group">
- <labelforlabelfor="InputCity">City</label>
- <inputtypeinputtype="text" class="form-control" id="InputCity" placeholder="City" ng-model="City">
- </div>
- <divclassdivclass="form-group">
- <labelforlabelfor="InputCountry">Country</label>
- <inputtypeinputtype="text" class="form-control" id="InputCountry" placeholder="Country" ng-model="Country">
- </div>
- <buttontypebuttontype="submit" class="btn btn-primary" ng-click="AddNewEmployee()">Save Employee</button>
- </form>
Let’s see the output, given below-
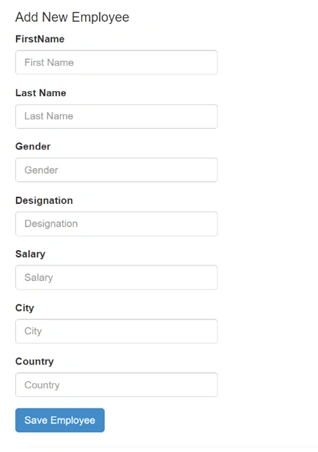
UpdateEmployee.html
- <formmethodformmethod="post">
- <h4> Update Employee </h4>
- <divclassdivclass="form-group">
- <labelforlabelfor="InputFirstName">FirstName</label>
- <inputtypeinputtype="text" class="form-control" id="InputFirstName" placeholder="First Name" ng-model="FirstName">
- </div>
- <divclassdivclass="form-group">
- <labelforlabelfor="InputLastName">Last Name</label>
- <inputtypeinputtype="text" class="form-control" id="InputLastName" placeholder="Last Name" ng-model="LastName">
- </div>
- <divclassdivclass="form-group">
- <labelforlabelfor="InputGender">Gender</label>
- <inputtypeinputtype="text" class="form-control" id="InputGender" placeholder="Gender" ng-model="Gender">
- </div>
- <divclassdivclass="form-group">
- <labelforlabelfor="InputDesignation">Designation</label>
- <inputtypeinputtype="text" class="form-control" id="InputDesignation" placeholder="Designation" ng-model="Designation">
- </div>
- <divclassdivclass="form-group">
- <labelforlabelfor="InputSalary">Salary</label>
- <inputtypeinputtype="text" class="form-control" id="InputSalary" placeholder="Salary" ng-model="Salary">
- </div>
- <divclassdivclass="form-group">
- <labelforlabelfor="InputCity">City</label>
- <inputtypeinputtype="text" class="form-control" id="InputCity" placeholder="City" ng-model="City">
- </div>
- <divclassdivclass="form-group">
- <labelforlabelfor="InputCountry">Country</label>
- <inputtypeinputtype="text" class="form-control" id="InputCountry" placeholder="Country" ng-model="Country">
- </div>
- <buttontypebuttontype="submit" class="btn btn-primary" ng-click="UpdateEmployee()">Update Employee</button>
- </form>
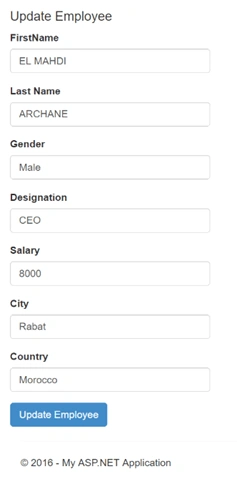
DeleteEmployee.html
- <divclassdivclass="panel panel-default">
- <divclassdivclass="panel-heading">Delete Employee Panel</div>
- <divclassdivclass="panel-body">
- <div>Do you want to delete <b>{{FirstName}}</b> ??</div><br/><br/>
- <buttontypebuttontype="submit" class="btn btn-info" ng-click="DeleteEmployee()">
- <spanclassspanclass="glyphicon glyphicon-ok-sign">
- </span> Delete Employee </button>
- </div>
- </div>
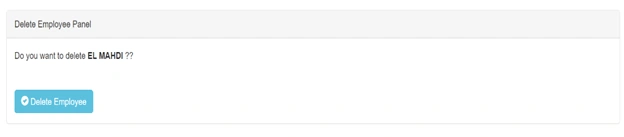
Happy coding.
That’s all, Please send your feedback and queries in comments box.
Ricardo AGPosted Feb 28, 2017, 4:51 PM
Good article. Could you share the source code?
Muhammad Aqib ShehzadPosted Oct 6, 2016, 2:02 AM
Fantastic article