Here is Part 1
Description:
In this article I will describe how to match the required username and the password and redirect to a particular page from a Controller Class for a given employee in to the Log on Information
Content:
So in my previous article I described how to create a new user registration page for an employee in a certain company.
Here I will describe the login functionality of a particular user.
Step 1:
First go to the "_Layout.cshtml" under the Shared folder and under the div "menucontainer" paste the code below:
<li>@Html.ActionLink("BookCab", "CreateLogin", "Cab")</li>
It will show a menu; name it "BookCab" in the home page.
Now we have to create a Controller class named "CabController" under the Controller folder. Also we have to create an ActionResult method named "CreateLogin" inside the "cabcontroller" class. So when we click the menu it will display the "CreateLogin" page.
Step 2:
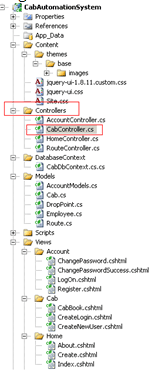
Now create a controller class named "CabController" under the "Controller" folder just like Figure 1 (marked with red).
Figure 1:
Step 3:
Now create an ActionResult method named "CreateLogin" inside the "cabcontroller" Class. The method code is given below:
public ActionResult CreateLogin()
{
ViewBag.Route = _db.Cab.OrderBy(g => g.JourneyTime).ToList();
ViewBag.DropPoint = _db.Employee.OrderBy(a => a.EmployeeName).ToList();
var Employee = new Employee();
var Cab = new Cab();
return View(Employee);
}
//
// POST: /Route/Create
[HttpPost]
public ActionResult CreateLogin(Employee Employee)
{
try
{
List<Employee> lstEmployee = new List<Employee>();
foreach (var obj in _db.Employee.ToList())
{
lstEmployee.Add(obj);
}
foreach (var obj in lstEmployee)
{
if (obj.Email == Employee.Email && obj.Password == Employee.Password)
{
return RedirectToAction("CabBook");
}
else
{
return RedirectToAction("CreateLogin");
}
}
//return RedirectToAction("Index");
ViewBag.Route = _db.Cab.OrderBy(g => g.JourneyTime).ToList();
ViewBag.DropPoint = _db.Employee.OrderBy(a => a.EmployeeName).ToList();
return View(Employee);
}
catch
{
return View();
}
}
In this "CreateLogin" method first I take a List.
After that I add all the employee registration records to the List.
Then I loop through that List and match the required Username and Password.
If it matches the two credentials then I redirect to the "CAbBook" page.
Here I redirect to another page by using RedirectToAction method.
Step 3:
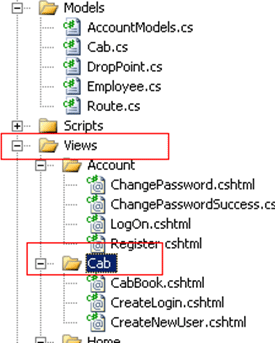
Now create a new folder named "Cab" under the Views folder just like Figure 2.
Figure 2:
Step 4:
Create a Razor file named "CreateLogin.cshtml" under the Cab folder. After creating it, paste the code shown below.
@model CabAutomationSystem.Models.Employee
@{
ViewBag.Title = "Account Information ";
}
<h2>Enter Login Information</h2>
<script src="@Url.Content("~/Scripts/jquery.validate.min.js")" type="text/javascript"></script>
<script src="@Url.Content("~/Scripts/jquery.validate.unobtrusive.min.js")" type="text/javascript"></script>
@using (Html.BeginForm()) {
@Html.ValidationSummary(true)
<fieldset>
<legend>Employee</legend>
<div class="editor-label">
@Html.LabelFor(model => model.Email)
</div>
<div class="editor-field">
@Html.EditorFor(model => model.Email)
@Html.ValidationMessageFor(model => model.Email)
</div>
<div class="editor-label">
@Html.LabelFor(model => model.Password)
</div>
<div class="editor-field">
@Html.EditorFor(model => model.Password)
@Html.ValidationMessageFor(model => model.Password)
</div>
<p>
<input type="submit" value="Create" /> @Html.ActionLink("Register", "CreateNewUser") if you don't have an account.
</p>
</fieldset>
}
Now we have the login page named "CreateLogin.cshtml" and also the controller method named "CreateLogin". Now we have to create the Target Page after successful login of the user credentials.
Here I am creating the target view page named "CabBook" and also in the controller class we have to create the "CabBook" action result method.
Step 5:
Now I am creating a new action result method namedd "CabBook" under the "cabcontroller" class.
The code for that method is:
public ActionResult CabBook()
{
ViewBag.Route = _db.Cab.OrderBy(g => g.JourneyTime).ToList();
ViewBag.DropPoint = _db.Employee.OrderBy(a => a.EmployeeName).ToList();
var Employee = new Employee();
var Cab = new Cab();
TimeSpan ts = new TimeSpan();
ts = DateTime.Now.TimeOfDay;
//string s = ts.ToString("{hh:mm:ss}");
//var Route = new Route();
return View(Cab);
}
//+
// POST: /Cab/Create
[HttpPost]
public ActionResult CabBook(Cab Cab)
{
try
{
//Save Employee
TimeSpan ts = new TimeSpan();
ts = DateTime.Now.TimeOfDay;
Cab.BookTime = ts;
Cab.BookId = ts.Milliseconds - 10;
_db.Cab.Add(Cab);
_db.SaveChanges();
return RedirectToAction("CreateLogin");
}
catch
{
return View();
}
}
Step 6:
Now create a new razor view page named "CabBook.cshtml" under the "cab" folder.
Copy the code below under the "CabBook.cshtml" file.
@model CabAutomationSystem.Models.Cab
@{
ViewBag.Title = "CabBook";
}
<h2>CabBook</h2>
<script src="@Url.Content("~/Scripts/jquery.validate.min.js")" type="text/javascript"></script>
<script src="@Url.Content("~/Scripts/jquery.validate.unobtrusive.min.js")" type="text/javascript"></script>
<script src="@Url.Content("~/Scripts/jquery.maskedinput-1.2.2.js")" type="text/javascript"></script>
<script type="text/javascript">
jQuery(function ($) {
$(' @Html.EditorFor(model => model.JourneyTime)').mask('(hh) mm-yy');
// $('#<%=TextBox_Fax.ClientID %>').mask('(999) 999-9999');
// $('#<%=TextBox_Mobile.ClientID %>').mask('(999) 999-9999');
});
</script>
@using (Html.BeginForm()) {
@Html.ValidationSummary(true)
<fieldset>
<legend>Cab</legend>
<div class="editor-label">
@Html.LabelFor(model => model.JourneyTime)
</div>
<div class="editor-field">
$('#date').mask("99-9999999");
@Html.EditorFor(model => model.JourneyTime)
@Html.ValidationMessageFor(model => model.JourneyTime)
</div>
<div class="editor-label">
@Html.LabelFor(model => model.JourneyPlace)
</div>
<div class="editor-field">
@Html.EditorFor(model => model.JourneyPlace)
@Html.ValidationMessageFor(model => model.JourneyPlace)
</div>
<p>
<input type="submit" value="Create" />
</p>
</fieldset>
}
@*<div>
@Html.ActionLink("Back to List", "Index")
</div>*@
Step 7:
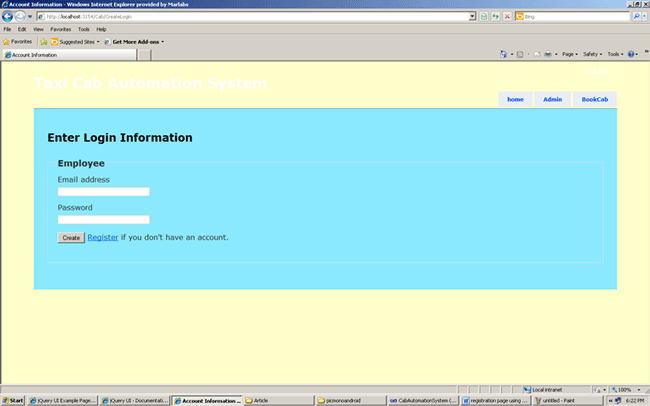
Run that application and click on the book cab menu; it will look like Figure 3.
Figure 3:
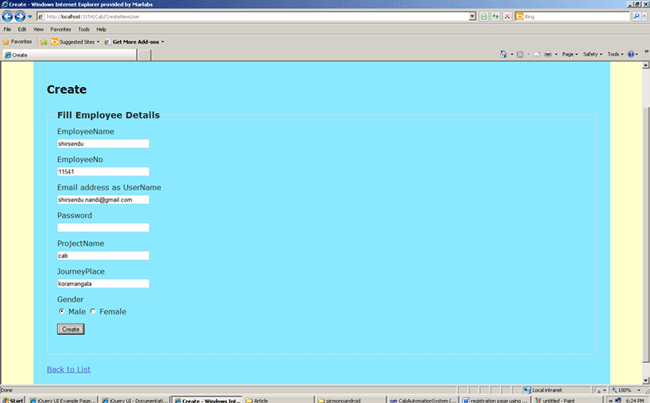
If you don't have registration then register by clicking the "register" link. It will look like Figure 4:
Figure 4:
Step 8:
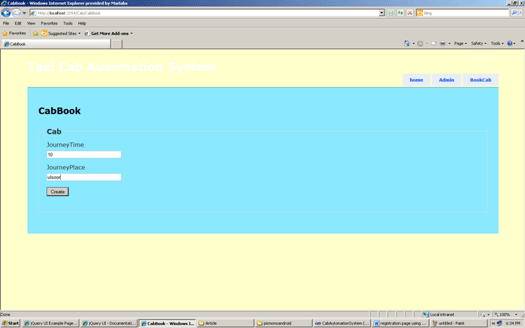
After clicking the submit button you will redirect to Login information page. Then give the required "Username" and "Password" and press the submit button; it will redirect to your desired page.
Just like Figure 5 and Figure 6:
Figure 5:
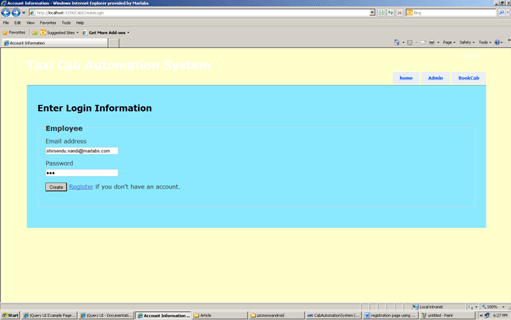
Figure 6:
Conclusion:
So in this article we have learned how to create a custom login page using ASP.Net MVC3 Razor application.