

In this tutorial I will show you how to use NumericUpDown control of AJAX Toolkit in ASP.NET using C#, where we take two textbox and make that textbox to work as a numeric up control.
INITIAL CHAMBER:
Step 1: Open Visual Studio 2010 and create an empty website. Give it a suitable name: numericup_demo.
Step 2: In Solution Explorer you will get your empty website and then add a Web Form and SQL Server Database. By going like the following:
For Web Form:
numericup_demo (Your Empty Website) - Right Click, Add New Item, then click Web Form. Name it insertdata_demo.aspx.
For SQL Server Database:
numericup_demo (Your Empty Website) - Right Click, Add New Item, then SQL Server Database. Add Database inside the App_Data_folder.
DATABASE CHAMBER:
Step 3: In Server Explorer click on your database Database.mdf - Tables, then Add New Table. Make table like the following:
Table - tbl_data [Don’t Forget to make ID as IS Identity - True]
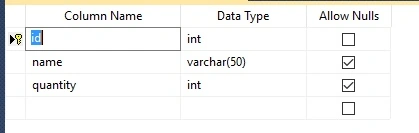
Figure 1: Table
Design Chamber
Step 4: Now make some design for your application by going to numericup_demo.aspx and try the following code:
numericup_demo.aspx
- <%@ Page Language="C#" AutoEventWireup="true" CodeFile="Default.aspx.cs" Inherits="_Default" %><%@ Register assembly="AjaxControlToolkit" namespace="AjaxControlToolkit" tagprefix="asp" %>
- <!DOCTYPE html PUBLIC "-//W3C//DTD XHTML 1.0 Transitional//EN" "http://www.w3.org/TR/xhtml1/DTD/xhtml1-transitional.dtd">
- <html
- xmlns="http://www.w3.org/1999/xhtml">
- <head runat="server">
- <title></title>
- <style type="text/css">
- .style1
- {
- width: 144px;
- }
- .style2
- {
- width: 224px;
- }
- </style>
- </head>
- <body>
- <form id="form1" runat="server">
- <asp:ToolkitScriptManager ID="ToolkitScriptManager1" runat="server"></asp:ToolkitScriptManager>
- <table style="width:100%;">
- <tr>
- <td class="style1">
- Your Product :</td>
- <td class="style2">
- <asp:TextBox ID="TextBox1" runat="server"></asp:TextBox>
- <asp:NumericUpDownExtender ID="TextBox1_NumericUpDownExtender" runat="server"
- Enabled="True" Maximum="0"
- Minimum="0" RefValues="Football;Basketball;Shoes;Wallet;Watches;Novels" ServiceDownMethod=""
- ServiceDownPath="" ServiceUpMethod="" Tag="" TargetButtonDownID=""
- TargetButtonUpID="" TargetControlID="TextBox1" Width="200"></asp:NumericUpDownExtender>
- </td>
- <td>
- </td>
- </tr>
- <tr>
- <td class="style1">
- Quantity :</td>
- <td class="style2">
- <asp:TextBox ID="TextBox2" runat="server"></asp:TextBox>
- <asp:NumericUpDownExtender ID="TextBox2_NumericUpDownExtender" runat="server"
- Enabled="True" Maximum="20"
- Minimum="0" RefValues="" ServiceDownMethod=""
- ServiceDownPath="" ServiceUpMethod="" Tag="" TargetButtonDownID=""
- TargetButtonUpID="" TargetControlID="TextBox2" Width="200"></asp:NumericUpDownExtender>
- </td>
- <td>
- <asp:Label ID="Label1" runat="server"></asp:Label>
- </td>
- </tr>
- <tr>
- <td class="style1">
- </td>
- <td class="style2">
- <asp:Button ID="Button1" runat="server" Text="Submit" onclick="Button1_Click" />
- </td>
- <td>
- </td>
- </tr>
- </table>
- </form>
- </body>
- </html>
Your design will look like the following image
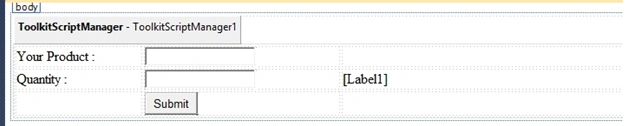
Figure 2: Design
CODE CHAMBER
Step 5: Now the time is for server side coding so that our application works. Open your numericup_demo.aspx.cs file and code it like the following:
numericup_demo.aspx.cs
- using System;
- using System.Collections.Generic;
- using System.Linq;
- using System.Web;
- using System.Web.UI;
- using System.Web.UI.WebControls;
- using System.Data;
- using System.Data.SqlClient;
- public partial class _Default: System.Web.UI.Page
- {
- protected void Page_Load(object sender, EventArgs e)
- {
- }
- protected void Button1_Click(object sender, EventArgs e)
- {
- SqlConnection con = new SqlConnection(@
- "Data Source=.\SQLEXPRESS;AttachDbFilename=|DataDirectory|\Database.mdf;Integrated Security=True;User Instance=True");
- SqlCommand cmd = new SqlCommand("insert into tbl_data values(@name,@quantity)", con);
- cmd.Parameters.AddWithValue("@name", TextBox1.Text);
- cmd.Parameters.AddWithValue("quantity", TextBox2.Text);
- con.Open();
- int k = cmd.ExecuteNonQuery();
- con.Close();
- if (k != 0)
- {
- Label1.Text = "Data Inserted";
- Label1.ForeColor = System.Drawing.Color.ForestGreen;
- }
- else
- {
- Label1.Text = "Data is not Inserted";
- Label1.ForeColor = System.Drawing.Color.Red;
- }
- }
- }
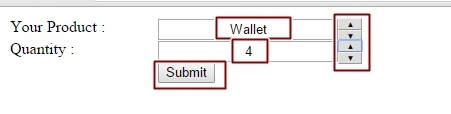
Figure 3: Output
Show table data- [tbl_data]
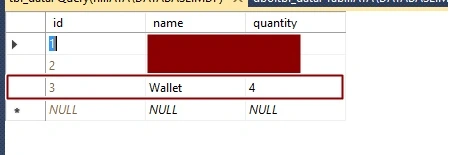
Figure 4: Table data
Hope you liked it. Thank you for reading.
Arul RPosted Oct 28, 2015, 5:29 AM
Good one !!!
Santhakumar MunuswamyPosted Oct 18, 2015, 3:04 AM
Good one
Sibeesh VenuPosted Oct 15, 2015, 4:13 AM
Thanks for sharing
Mukesh KumarPosted Oct 15, 2015, 2:27 AM
Good Job Nilesh Sir
Ankit BansalPosted Oct 15, 2015, 12:49 AM
nice..thanks for sharing
Rupali ShindePosted Oct 15, 2015, 12:18 AM
good work
Harshad PansuriyaPosted Oct 14, 2015, 11:58 PM
Nice one