

In this tutorial, I’ll show you how to use DropDownList inside GridView, and how to perform edit, update, delete operation on each field along with DropDownList.
INITIAL CHAMBER
Step 1: Open Visual Studio 2010 and create an empty website. Give a suitable name gridview_demo.
Step 2: In Solution Explorer you will get your empty website. Add a web form, SQL Database. By following these steps:
For Web Form
gridview_demo (Your Empty Website) - Right Click, Add New Item, then Web Form. Name it gridview_demo.aspx.
For SQL Server Database
gridview_demo (Your Empty Website) - Right Click, Add New Item, then SQL Server Database. Add Database inside the App_Data_folder.
DATABASE CHAMBER
Step 3: Go to your Database [Database.mdf], we will create a table - tbl_Data. Go to the database.mdf - Table, then Add New table. Design your table like the following:
Table - tbl_data [Don’t forget to make ID - Identity Specification - Yes]
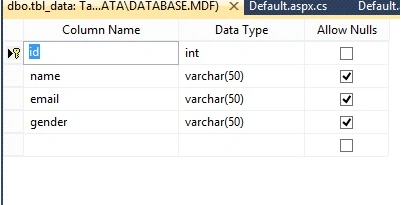
Figure 1: Database
DESIGN CHAMBER
Step 5: Now Open your gridview_demo.aspx file, where we create our design for binding and performing edit, delete, and update operation with dropdownlist.
Gridview_demo.aspx
- <%@ Page Language="C#" AutoEventWireup="true" CodeFile="Default.aspx.cs" Inherits="_Default" %>
- <!DOCTYPE html PUBLIC "-//W3C//DTD XHTML 1.0 Transitional//EN" "http://www.w3.org/TR/xhtml1/DTD/xhtml1-transitional.dtd">
- <html
- xmlns="http://www.w3.org/1999/xhtml">
- <head runat="server">
- <title></title>
- </head>
- <body>
- <form id="form1" runat="server">
- <div>
- <asp:GridView ID="GridView1" runat="server" AutoGenerateColumns="False"
- AutoGenerateDeleteButton="True" AutoGenerateEditButton="True" DataKeyNames="id"
- onrowcancelingedit="GridView1_RowCancelingEdit"
- onrowdeleting="GridView1_RowDeleting" onrowediting="GridView1_RowEditing"
- onrowupdating="GridView1_RowUpdating" BackColor="White"
- BorderColor="White" BorderStyle="Ridge" BorderWidth="2px" CellPadding="3"
- CellSpacing="1" GridLines="None">
- <Columns>
- <asp:TemplateField HeaderText="Name">
- <EditItemTemplate>
- <asp:TextBox ID="TextBox2" runat="server" Text='<%# Bind("name") %>'>
- </asp:TextBox>
- </EditItemTemplate>
- <ItemTemplate>
- <asp:Label ID="Label2" runat="server" Text='<%# Bind("name") %>'>
- </asp:Label>
- </ItemTemplate>
- </asp:TemplateField>
- <asp:TemplateField HeaderText="Email">
- <EditItemTemplate>
- <asp:TextBox ID="TextBox3" runat="server" Text='<%# Bind("email") %>'>
- </asp:TextBox>
- </EditItemTemplate>
- <ItemTemplate>
- <asp:Label ID="Label3" runat="server" Text='<%# Bind("email") %>'>
- </asp:Label>
- </ItemTemplate>
- </asp:TemplateField>
- <asp:TemplateField HeaderText="Gender">
- <EditItemTemplate>
- <asp:DropDownList ID="DropDownList2" runat="server"
- SelectedValue='<%# Bind("gender") %>'>
- <asp:ListItem>--Select Gender--</asp:ListItem>
- <asp:ListItem>Male</asp:ListItem>
- <asp:ListItem>Female</asp:ListItem>
- </asp:DropDownList>
- </EditItemTemplate>
- <ItemTemplate>
- <asp:Label ID="Label4" runat="server" Text='<%# Bind("gender") %>'>
- </asp:Label>
- </ItemTemplate>
- </asp:TemplateField>
- </Columns>
- <FooterStyle BackColor="#C6C3C6" ForeColor="Black" />
- <HeaderStyle BackColor="#4A3C8C" Font-Bold="True" ForeColor="#E7E7FF" />
- <PagerStyle BackColor="#C6C3C6" ForeColor="Black" HorizontalAlign="Right" />
- <RowStyle BackColor="#DEDFDE" ForeColor="Black" />
- <SelectedRowStyle BackColor="#9471DE" Font-Bold="True" ForeColor="White" />
- <SortedAscendingCellStyle BackColor="#F1F1F1" />
- <SortedAscendingHeaderStyle BackColor="#594B9C" />
- <SortedDescendingCellStyle BackColor="#CAC9C9" />
- <SortedDescendingHeaderStyle BackColor="#33276A" />
- </asp:GridView>
- </div>
- </form>
- </body>
- </html>
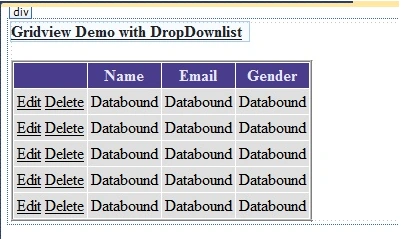
Figure 2: GridView
You have to look around this Property in GridView:
- DataKeysName: id.
- Auto Generate Delete Button: True.
- Auto Generate Edit Button : True.
In Events: [Make Double Click in each event shown below to go to the code]
- Row Cancelling Edit
- Row Deleting
- Row Editing
- Row Updating
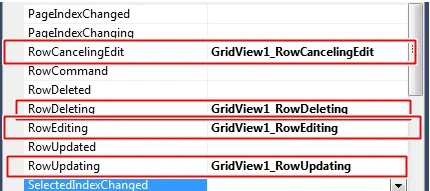
Figure 3: Row
CODE CHAMBER
Step 6: Open your gridview_demo.aspx.cs and write some code so that our application starts working.
- using System;
- using System.Collections.Generic;
- using System.Linq;
- using System.Web;
- using System.Web.UI;
- using System.Web.UI.WebControls;
- using System.Data.SqlClient;
- using System.Data;
- public partial class _Default: System.Web.UI.Page
- {
- SqlConnection con = new SqlConnection(@
- "Data Source=.\SQLEXPRESS;AttachDbFilename=|DataDirectory|\Database.mdf;Integrated Security=True;User Instance=True");
- protected void Page_Load(object sender, EventArgs e)
- {
- if (!Page.IsPostBack)
- {
- refreshdata();
- }
- }
- public void refreshdata()
- {
- SqlCommand cmd = new SqlCommand("select * from tbl_data", con);
- SqlDataAdapter sda = new SqlDataAdapter(cmd);
- DataTable dt = new DataTable();
- sda.Fill(dt);
- GridView1.DataSource = dt;
- GridView1.DataBind();
- }
- protected void GridView1_RowEditing(object sender, GridViewEditEventArgs e)
- {
- GridView1.EditIndex = e.NewEditIndex;
- refreshdata();
- }
- protected void GridView1_RowDeleting(object sender, GridViewDeleteEventArgs e)
- {
- int id = Convert.ToInt16(GridView1.DataKeys[e.RowIndex].Values["id"].ToString());
- SqlCommand cmd = new SqlCommand("delete from tbl_data where id = @id", con);
- cmd.Parameters.AddWithValue("@id", id);
- con.Open();
- cmd.ExecuteNonQuery();
- con.Close();
- refreshdata();
- }
- protected void GridView1_RowCancelingEdit(object sender, GridViewCancelEditEventArgs e)
- {
- GridView1.EditIndex = -1;
- refreshdata();
- }
- protected void GridView1_RowUpdating(object sender, GridViewUpdateEventArgs e)
- {
- int id = Convert.ToInt16(GridView1.DataKeys[e.RowIndex].Values["id"].ToString());
- TextBox txtname = GridView1.Rows[e.RowIndex].FindControl("TextBox2") as TextBox;
- TextBox txtemail = GridView1.Rows[e.RowIndex].FindControl("TextBox3") as TextBox;
- DropDownList drpgender = GridView1.Rows[e.RowIndex].FindControl("DropDownList2") as DropDownList;
- SqlCommand cmd = new SqlCommand("update tbl_data set name=@name, email=@email,gender=@gender where id =@id", con);
- cmd.Parameters.AddWithValue("@name", txtname.Text);
- cmd.Parameters.AddWithValue("@email", txtemail.Text);
- cmd.Parameters.AddWithValue("@gender", drpgender.SelectedItem.Text);
- cmd.Parameters.AddWithValue("@id", id);
- con.Open();
- cmd.ExecuteNonQuery();
- con.Close();
- refreshdata();
- }
- }
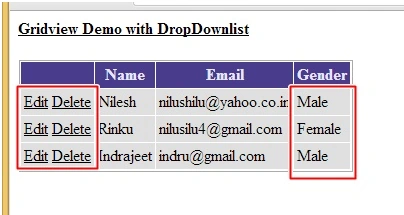
Figure 4: Output
Update
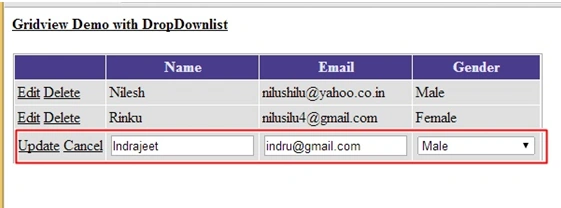
Figure 5: Update
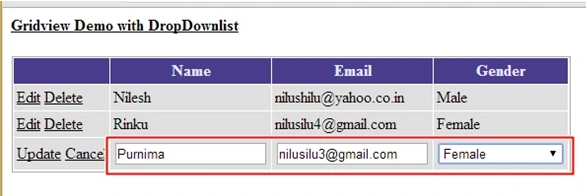
Figure 6: Update
Show table data
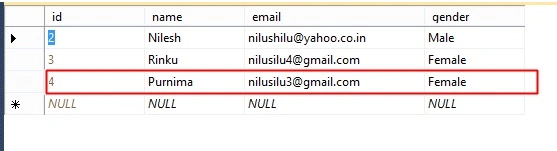
Figure 7: Show data
Hope you liked it. All controls are working, you can check out. Thank you for reading. Have a good day!
Darwin AliasoftPosted Nov 10, 2019, 7:30 AM
What if gender has its own tbl_gender for e.g. (male, female, transgender) then field names (id, gender) once i click on edit dropdownlist loads the data from tbl_gender once and then once i click update button its save and update the data but only id will be save on the tbl_data
Rohan RaoPosted Sep 2, 2019, 12:32 AM
What would be the code if the gender comes from database?
girmachew gulintPosted May 6, 2019, 6:40 AM
What if Gender is from sql server?
Arul RPosted Oct 28, 2015, 5:28 AM
Good one !!!
Nadeesh PriyangaPosted Oct 21, 2015, 4:12 AM
thanks for sharing this article.
Anoop Kumar SharmaPosted Oct 19, 2015, 10:18 AM
Nice one. Thanks for sharing..!!
Santhakumar MunuswamyPosted Oct 18, 2015, 2:28 AM
Good one
Debasis SahaPosted Oct 17, 2015, 5:41 AM
Nice one..
Kamlesh BhorPosted Oct 16, 2015, 8:09 AM
Very good...
Harshad PansuriyaPosted Oct 16, 2015, 7:58 AM
Nice Work
Mukesh KumarPosted Oct 16, 2015, 7:03 AM
Good job sir