

Introduction
In this article we are going to understand C# program compilation steps and contains of .EXE file.
Description
C# Program compilation steps are as follows.
- Compiling Source Code into Managed Module.
- Combining newly created managed module into the assembly / assemblies.
- Loading the CLR.
- Executing the assembly in & by CRL.
Every .NET program first compiles with an appropriate compiler like if we write a program in C# language then it get compiled by C# compiler (i.e. csc.exe).
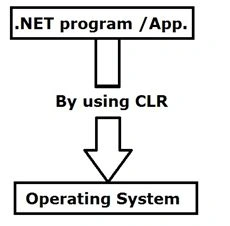
In .NET framework every program executes (communicate) in an operating system by using CLR (Common Language Runtime).
Compiling Source Code into Managed Module
- All languages in .NET framework have their own compiler. Like C# has a C# compiler, JavaScript has a Jscript compiler, etc.
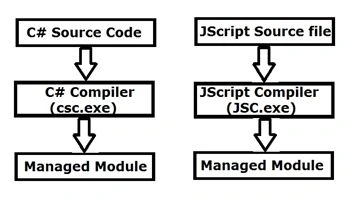
- Whenever source code gets compiled by its appropriate compiler it gets converted into a Managed Module.
- Suppose if we create a console application & compile it then it creates .exe file. If we create web application & compile it then it creates .dll files.
- Managed module is standard windows Portable Executable (PE) file which contains the following parts.
- PE Header
It is similar to common object file format.
- CLR Header
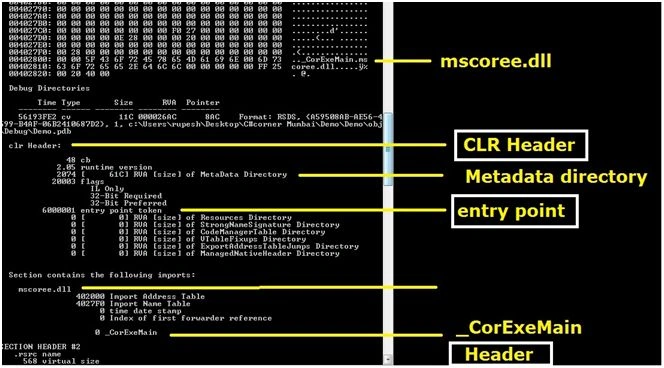
This contains CLR version required to run this managed module, location & metadata. This also contains entry point of function i.e. the address of entry point of function.
- Metadata
This contains table information means variable with its data types and default values, functions / methods which are declared & defined in our program.
In symbol table all information is stored like the following code snippet:.EXE file also contains Date Time, Owner name, on which operating system this .exe file is created with bit system like 32 bit or 64 bit. It also contains Magic Number which will get matched whenever we want to execute .exe file on our computer. If this magic number does not match with the operating system then it will generate error.- .int i = 25000;
- string str = “Rupesh Kahane”;
- PE Header
Combining newly created managed module into the assembly / assemblies
Assembly is nothing but .dll or .exe. In web application there are different program files which are written in different languages. This assembly combines & get together into a single assembly. It also contains images (i.e. resource files) & multiple managed modules.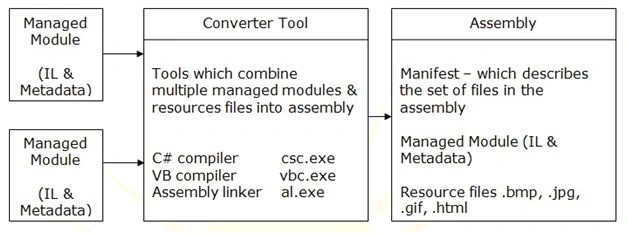
(Diagram reference Wikipedia)
Loading the CLR
(Diagram reference Wikipedia)
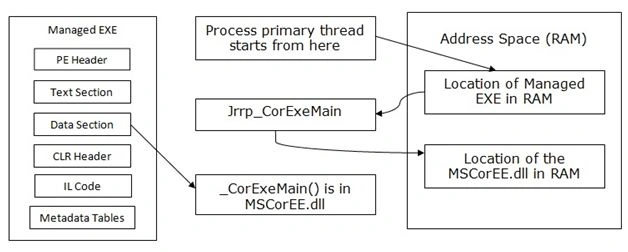
Every program is located on hard disk. To run / execute each file it should have to come on RAM from hard disk means magnetic address space to electric address space. This is possible by using the help of the Loader.
Question: What is mscoree.dll in .Net framework?
Answer: (Reference Wikipedia).
- It provides the possibility to connect information, systems, people and devices through software.
- The mscoree.dll file is a Microsoft Runtime Execution Engine.
- It contains the fundamental functions of the.NET framework.
- Functions: quickly build, manage, deploy, & Security enhanced solutions with web services.
Question: What is _CoreExeMain function?
Answer: (Reference Wikipedia)
- Initializes the CLR
- Locates the managed entry point in the executable assembly’s CLR header, and begins execution.
- This function is called by the loader in processes created from managed executable assemblies.
- For DLL assemblies, the loader calls to _CoreDllMain function.
Executing the assembly in & by CLR
CLR means common language runtime. It is the heart of the .NET framework which helps to execute the program on an operating system.
CLR provides some functionalities such as Garbage Collection, Code Verification, Memory Management, Code Access Security and IL to Native translation.
We can see PE Header, CLR Header, Metadata and Address Table values by dumpbin.exe:
- First install it in our local machine (download dumpbin.exe from internet).
- To see dumpbin.exe location in our local pc.
- This will be present in c drive where files of latest visual studio is installed, for example like the following:
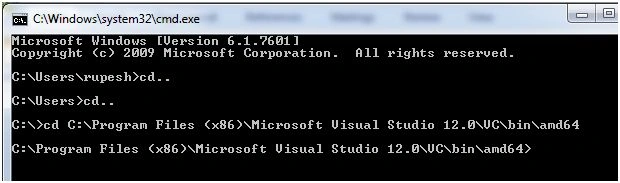
C:\Program Files<x86>\ Microsoft Visual Studio 12.0\VC\bin\amd64\dumpbin.exe
Use the following syntax:
C:\dumpbin /options /impots whatever.exe
A B C
Where,
A – location of dumpbin file
B – options for dumpbin file
C - location of our file (.exe or .dll)
Example:
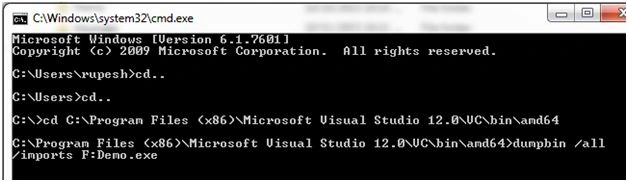
C:\Program Files (x86)\Microsoft Visual Studio 12.0\VC\bin\amd64>dumpbin /all /imports D:\Demo.exe
Step 1: Create a simple console application & compile it. After compiling in bin folder we will get .exe file.
- class Program {
- public int a;
- public Program() {
- a = 25000;
- }
- public string str = "rupesh kahane";
- void fun() {
- Console.WriteLine(a);
- Console.WriteLine(str);
- }
- static void Main(string[] args) {
- Program obj = new Program();
- obj.fun();
- Console.ReadKey();
- }
- }
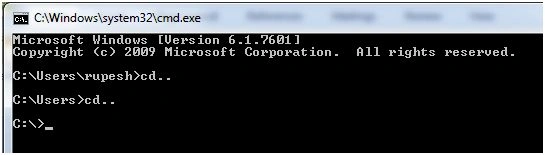
Step 3: Please refer syntax now.
Firstly, open file location of dumpbin using cd command as
Step 4: Now give options & import location of our .exe file (for the time being I have copied .exe file on F drive) as:
Step 5: We will see the big screen which contains some sections as follows:
Relative Virtual Address (RVA)
It is a virtual address because file is present on a hard disk, so it will not show a direct address. It is the virtual address of an object from the file once it is loaded into the memory.
If the file were to be mapped literally from the disk to memory, the RVA would be the same as that of the offset into the file, but this is actually quite unusual.
Summary
This article helps fresher candidates to crack the technical interview rounds. Hope you enjoyed this one. Don’t forget to comment.
Ammar AlTuhafiPosted Jun 7, 2022, 10:50 AM
Thank you for your effort knu.edu.iq
Rupesh KahanePosted Oct 18, 2015, 7:15 AM
Thx Santhakumar sir
Santhakumar MunuswamyPosted Oct 18, 2015, 3:32 AM
Good one
Rupesh KahanePosted Oct 16, 2015, 3:23 PM
@suraj Krishnaswami thanks a lot to you, other readers & commenters....
Shakti SaxenaPosted Oct 15, 2015, 7:52 AM
Great
Suraj KrishnaswamiPosted Oct 13, 2015, 1:33 PM
Nice article rupesh. Explained the concepts in detail, yet quite clear. Nice one..
Rupesh KahanePosted Oct 13, 2015, 1:06 PM
Thanks to all of you.....
Pankaj BajajPosted Oct 13, 2015, 12:43 PM
Gud One Rupesh
Poonam YadavPosted Oct 13, 2015, 12:14 PM
Very well explained
Gowtham KPosted Oct 13, 2015, 11:53 AM
Good One
nikhil golatkarPosted Oct 13, 2015, 11:31 AM
I like the Article and the simplicity of explanation..
Gopi ChandPosted Oct 13, 2015, 11:06 AM
Nice one
Sujeet SumanPosted Oct 13, 2015, 10:33 AM
Good Article..............
RakeshPosted Oct 13, 2015, 10:26 AM
Good Job
Mukesh KumarPosted Oct 13, 2015, 8:31 AM
To the point with best description
Debendra DashPosted Oct 13, 2015, 6:19 AM
great..
Nilesh JadavPosted Oct 13, 2015, 6:08 AM
Good Article sir
Harshad PansuriyaPosted Oct 13, 2015, 5:41 AM
Nice one